
Setting up enemy game mechanics.
In this tutorial we’ll create schematics for the enemy’s movement, attack and death.
Enemy Movement: Schematic #
First, we’ll set up the enemy’s movement – the enemy will be moved using NavMesh.
Open the Makinom editor, navigate to Schematics and create a new schematic. Change the following settings.
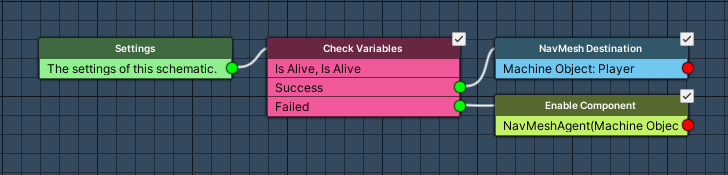
Check Variables #
Add Node > Value > Variable > Check Variables
This node is used to check for variable conditions. We’ll use it to check the health of the enemy and player using our template.
Click on Add Variable to add a variable condition.
- Condition Type
Select Template. - Template
Select Is Alive. - Object (User Object)
Select Machine Object.
Copy the variable condition and change the following settings.
- Object (User Object)
Select Player.
NavMesh Destination #
Add Node > Movement > NavMesh > NavMesh Destination
This node is used to set the destination of a NavMesh agent. We’ll use it to move the enemy to the player’s position.
This node is connected to the Success slot of the Check Variables node.
Moving Object #
- Object
Select Machine Object.
Target Position #
- To Object
Enable this setting. - Object
Select Player.
Enable Component #
Add Node > Game Object > Component > Enable Component
This node is used to enable/disable components. We’ll use it to disable the NavMesh agent component.
This node is connected to the Failed slot of the Check Variables node.
- Enable/Disable
Disable this setting. - Component Name
Set to NavMeshAgent. - Object
Select Machine Object.
And that’s it for the schematic – click on Save Schematic and save it as EnemyMovement in Assets/Schematics/.
Enemy Attack: Schematic #
Next, we’ll create the schematic handling the enemy’s attack. The enemy will attack the player while being within the enemy’s trigger.
Create a new schematic and change the following settings.

Settings #
We’ll set up local variables as Machine Start Variables for easy setup in the machine component at a later time. When using the schematic in a machine component, the defined start variables will be added automatically, using their default values.
Machine Start Variables #
Click on Add Start Variable to add a local start variable that will be exposed to the machine component’s inspector.
- Variable Key
Set to damage. - Type
Select Int. - Default Value
Set to 10.
Again, click on Add Start Variable to add another local start variable.
- Variable Key
Set to attackTimeout. - Type
Select Float. - Default Value
Set to 0.5.
Start Tagged Machine #
Add Node > Machine > Start Tagged Machine
This node is used to start a tagged machine. We’ll use it to start a tagged machine with the tag damage, which will handle reducing the target’s health. The actual damage is stored in the local float variable damage (local start variable of the machine).
- Share Local Variables
Enable this setting. - Wait
Disable this setting.
Machine Object
#
- Object
Select Starting Object.
Starting Object #
- Object
Select Machine Object.
Tag Settings #
Click on Add Tag to add a starting tag.
- Tag
Set to damage.
Wait #
Add Node > Base > Wait
This node is used to wait for some time. We’ll use it to wait for the enemy’s attack timeout (local start variable).
- Time (s)
Select Variable > Float Variable. - Variable Key
Set to attackTimeout. - Variable Origin
Select Local.
And that’s it for the schematic – click on Save Schematic and save it as EnemyAttack in Assets/Schematics/.
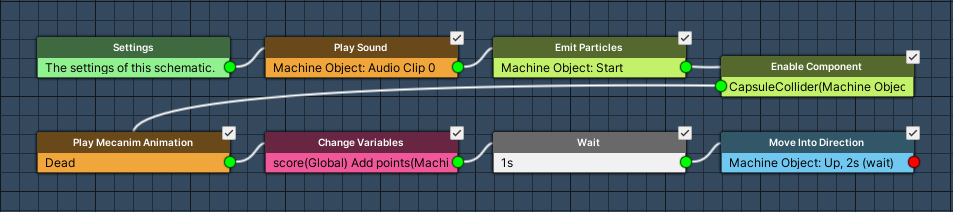
Enemy Death: Schematic #
When an enemy dies, we’ll play an audio clip, disable the collider, play a death animation and move the enemy’s game object down into the floor.
Create a new schematic and change the following settings.
Settings #
Since we’ll use this schematic for different enemies, we want to play different audio clips for them. Adding an audio clip as a resource will allow us to override it in the machine’s settings.
Audio Clips #
Click on Add Audio Clip Resource to add an audio clip resource.
- Name
Set to Death.
We don’t select an actual audio clip – they’ll be defined in the machine component’s we’re using on the enemies.
Play Sound #
Add Node > Audio > Audio > Play Sound
This node is used to play audio clips. We’ll use it to play the death audio clip resource.
Play On #
- Object
Select Machine Object.
Audio Settings #
- Audio Clip
Select Death. - Play One Shot
Enable this setting. - Volume
Set to 1.
Emit Particles #
Add Node > Game Object > Component > Emit Particles
This node is used to start/stop emitting particles. We’ll use it to start a death particle effect.
- Emit
Enable this setting. - Stop Before Start
Enable this setting. - Object
Select Machine Object. - Child Object
Set to DeathParticles.
Enable Component #
Add Node > Game Object > Component > Enable Component
We’ll use this node to disable the capsule collider.
- Enable/Disable
Disable this setting. - Component Name
Set to CapsuleCollider. - Object
Select Machine Object.
Play Mecanim Animation #
Add Node > Animation > Mecanim > Play Mecanim Animation
This node is used to play an animation or set parameters of an animator. We’ll use it to play the death animation of the enemy by setting the Dead trigger parameter.
- Object
Select Machine Object. - Play Mode
Select None.
We’ll play the animation by setting a parameter.
Click on Add Parameter to add an parameter that will be changed.
- Parameter Name
Set to Dead. - Parameter Type
Select Trigger.
Change Variables #
Add Node > Value > Variable > Change Variables
This node is used to change variables. We’ll use it to increase the score by the enemy’s points. The score is stored in the global int variable score, the points are stored in the enemy’s object int variable points.
Click on Add Variable to add a variable change.
- Change Type
Select Variable. - Variable Key
Set to score. - Variable Origin
Select Global. - Type
Select Int. - Operator
Select Add. - Float Value
Select Variable > Int Variable. - Variable Key
Set to points. - Variable Origin
Select Object. - Object
Select Machine Object.
Wait #
Add Node > Base > Wait
We’ll wait for a second to allow the enemy’s death animation to finish.
- Time (s)
Set to 1 (Value).
Move Into Direction #
Add Node > Movement > Movement > Move Into Direction
This node is used to move a game object into a direction. We’ll use it to move the enemy into the floor.
Moving Object #
- Object
Select Machine Object. - Move Component
Select Transform.
This makes sure we don’t use any physics for the movement.
Movement Settings #
- Time (s)
Set to 2. - Wait
Enable this setting. - Speed
Set to 2.5.
Direction #
- Vector3 Type
Select Value > Direction. - Direction
Select Down.
And that’s it for this schematic – click on Save Schematic and save it as EnemyDeath in Assets/Schematics/.
Take Damage: Schematic #
Finally, we’ll set up the schematic that reduces the health and starts a tagged machine with the tag death in case the health is reduced to 0. This schematic will also be used by the player to take damage.
Create a new schematic and change the following settings.

Settings #
Since we’ll use this schematic for different enemies, we want to play different audio clips for them. Adding an audio clip as a resource will allow us to override it in the machine’s settings.
Audio Clips #
Click on Add Audio Clip Resource to add an audio clip resource.
- Name
Set to Hurt.
Play Sound #
Add Node > Audio > Audio > Play Sound
We’ll use it to play the hurt audio clip resource.
Play On #
- Object
Select Machine Object.
Audio Settings #
- Audio Clip
Select Hurt. - Play One Shot
Enable this setting. - Volume
Set to 1.
Change Variables #
Add Node > Value > Variable > Change Variables
We’ll usethis node to reduce the health (object variable) by the damage, a local variable passed on by the schematic that started this schematic (tagged machine).
Click on Add Variable to add a variable change.
- Change Type
Select Variable. - Variable Key
Set to health. - Variable Origin
Select Object. - Object
Select Machine Object. - Type
Select Int. - Operator
Select Sub. - Float Value
Select Variable > Int Variable. - Variable Key
Set to damage. - Variable Origin
Select Local.
Check Variables #
Add Node > Value > Variable > Check Variables
We’ll use this node to check if the health reached 0.
Click on Add Variable to add a variable condition.
- Condition Type
Select Variable. - Variable Key
Set to health. - Variable Origin
Select Object. - Object
Select Machine Object. - Is Valid
Enable this setting. - Exists
Enable this setting. - Type
Select Int. - Check Type
Select Is Less Equal. - Check Value
Set to 0 (Value).
Start Tagged Machine #
Add Node > Machine > Start Tagged Machine
We’ll use this node to start the death tagged machine when the health is gone.
This node is connected to the Success slot of the Check Variables node.
- Wait
Disable this setting.
Machine Object
#
- Object
Select Machine Object.
Starting Object #
- Object
Select Starting Object.
Tag Settings #
Click on Add Tag to add a starting tag.
- Tag
Set to death.
And that’s it for this schematic – click on Save Schematic and save it as TakeDamage in Assets/Schematics/.
The next tutorial will handle setting up the enemies.


