
Setting up the health pickup.
In this tutorial we’ll create the schematics to pick up health crates and pickups landing on the ground, and set up the the health crate prefab.
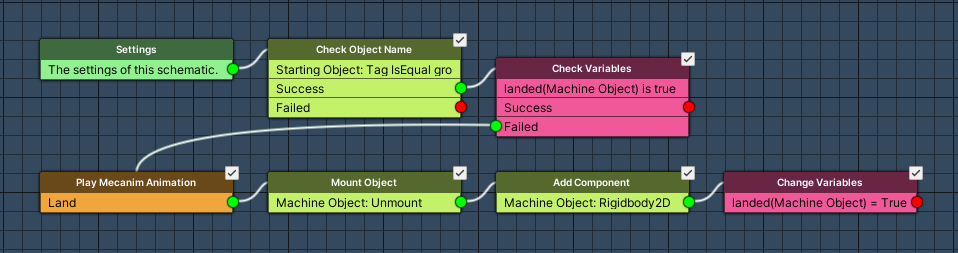
Land Crate: Schematic #
The pickups will be dropped from the sky, landing on parachutes. When they land, the need to be detached from the parachute – we’ll first create the schematic handling this mechanic. The schematic will be played by a trigger machine.
Open the Makinom editor, navigate to Schematics and create a new schematic. Change the following settings.
Check Object Name #
Add Node > Game Object > Game Object > Check Object Name
We’ll use this node to check if the game object that started the trigger machine has the tag ground.
- Check Tag
Enable this setting. - Check Value
Set to ground. - Check Type
Select Is Equal. - Object
Select Starting Object.
Check Variables #
Add Node > Value > Variable > Check Variables
We’ll use this node to check if the crate has already landed. This will be stored in the object bool variable landed.
Click on Add Variable to add a variable condition.
- Condition Type
Select Variable. - Variable Key
Set to landed. - Variable Origin
Select Object. - Object
Select Machine Object. - Is Valid
Enable this setting. - Exists
Enable this setting. - Type
Select Bool.
Play Mecanim Animation #
Add Node > Animation > Mecanim > Play Mecanim Animation
We’ll use this node to play the landing animation on the root of the crate (i.e. the parachute – the crate object with the trigger machine is a child of it).
This node is connected to the Failed slot of the previous node.
- Object
Select Machine Object. - Use Root
Enable this setting. - Play Mode
Select None.
Click on Add Parameter to add a parameter change.
- Parameter Name
Set to Land. - Parameter Type
Select Trigger.
Mount Object #
Add Node > Game Object > Game Object > Mount Object
We’ll use this node to unmount the crate from the parachute.
- Mount
Disable this setting. - Object
Select Machine Object.
Add Component #
Add Node > Game Object > Component > Add Component
We’ll use this node to add a Rigidbody2D component to the crate.
- Component Name
Set to Rigidbody2D. - Object
Select Machine Object.
Change Variables #
Add Node > Value > Variable > Change Variables
We’ll use this node to mark the crate as landed.
Click on Add Variable to add a variable change.
- Change Type
Select Variable. - Variable Key
Set to landed. - Variable Origin
Select Object. - Object
Select Machine Object. - Type
Select Bool. - Bool Value
Enable this setting.
That’s it for the schematic – click on Save Schematic and save it as LandCrate in Assets/Schematics/.
Health Pickup: Schematic #
Next, we’ll create the schematic handling the health pickup. Collecting the health crate will restore some health on the player, defined by an object variable on the crate.
Create a new schematic and change the following settings.
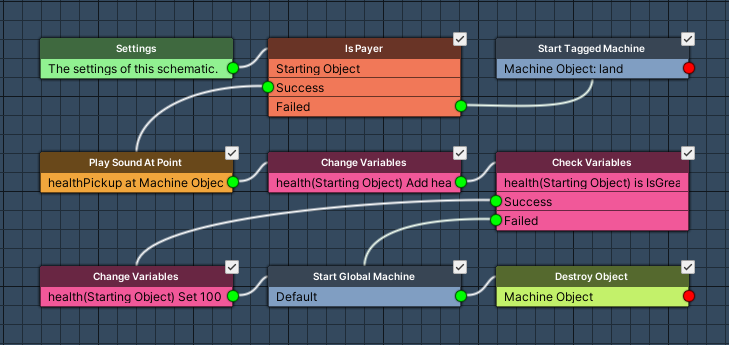
Is Payer #
Add Node > Game > Player > Is Player
First, we’ll check if the starting object is the player.
Check Object #
- Object
Select Starting Object.
Start Tagged Machine #
Add Node > Machine > Start Tagged Machine
In case the starting object is not the player, we’ll try to land the crate through a tagged machine.
This node is connected to the Failed slot of the Is Player node.
- Share Local Variables
Disable this setting. - Wait
Enable this setting.
Machine Object #
- Object
Select Machine Object.
Starting Object #
- Object
Select Starting Object.
Tag Settings #
Click on Add Tag to add a starting tag.
- Tag
Set to land.
Play Sound At Point #
Add Node > Audio > Audio > Play Sound At Point
In case the starting object is the player, we’ll play a health pickup sound.
This node is connected to the Success slot of the Is Player node.
Position #
- Vector3 Type
Select Game Object > Game Object. - Object
Select Machine Object. - Value Origin
Select Position.
Audio Settings #
- Audio Clip
Select Select Audio Clip and healthPickup.
The audio clip can be found at Assets/Tutorial Resources/Audio/FX/. - Wait
Disable this setting. - Volume
Set to 1 (Value).
Change Variables #
Add Node > Value > Variable > Change Variables
We’ll use this node to increase the player’s health by the crate’s health bonus.
Click on Add Variable to add a variable change.
- Change Type
Select Variable. - Variable Key
Set to health. - Variable Origin
Select Object. - Object
Select Starting Object. - Type
Select Int. - Operator
Select Add. - Float Type
Select Variable > Int Variable. - Variable Key
Set to healthBonus. - Variable Origin
Select Object. - Object
Select Machine Object.
Check Variables #
Add Node > Value > Variable > Check Variables
Now we’ll check if the health exceeds the maximum health (i.e. 100).
Click on Add Variable to add a variable condition.
- Condition Type
Select Variable. - Variable Key
Set to health. - Variable Origin
Select Object. - Object
Select Starting Object. - Is Valid
Enable this setting. - Exists
Enable this setting. - Type
Select Int. - Check Type
Select Is Greater. - Check Value
Set to 100 (Value).
Change Variables #
Add Node > Value > Variable > Change Variables
In case the health exceeds maximum, we’ll need to set it to the maximum (100).
This node is connected to the Success slot of the previous Check Variables node (i.e. health is greater than 100).
Click on Add Variable to add a variable change.
- Change Type
Select Variable. - Variable Key
Set to health. - Variable Origin
Select Object. - Object
Select Starting Object. - Type
Select Int. - Operator
Select Set. - Float Value
Set to 100 (Value).
Start Global Machine #
Add Node > Machine > Start Global Machine
This node is used to start a global machine. We’ll use it to start the global machine handling the pickup spawning – we’ll set it up later, so just select the first global machine that we’ll use later. Picking up a health crate will result in the next pickup being spawned after some time.
This node is connected to the previous node’s Next slot and the Failed slot of the previous Check Variables node (i.e. health is less than 100).
- Global Machine
Select 0: Default. - Wait
Disable this setting.
Machine Object #
- Object
Select Player.
Starting Object #
- Object
Select Player.
Destroy Object #
Add Node > Game Object > Game Object > Destroy
Finally, we’ll destroy the crate’s game object.
Destroy Object #
- Object
Select Machine Object. - Use Root
Enable this setting.
We’ll need to destroy the game object from it’s root, in case the crate is still hanging on the parachute.
And that’s it for the schematic – click on Save Schematic and save it as HealthPickup in Assets/Schematics/.
Health Crate Prefab #
Now we’ll set up the healthCrate prefab – we need to add object variables, a trigger machine (HealthPickup schematic) and a tagged machine (LandCrate schematic). The healthCrate prefab can be found at Assets/Tutorial Resources/Prefabs/Pickups/.
We’ll add the components to the health child object of the healthCrate prefab.
Object Variables #
First, we’ll add the object variables. Add an object variable component to the prefab (e.g. using the component menu: Makinom > Scenes > Object Variables) and change the following settings.
- Local Variables
Enable this setting. - Always Initialize
Enable this setting.
Click on Add Variable to add an object variable. This variable will store the amount of health that will be restored if the pickup is collected.
- Variable Key
Set to healthBonus.
Select the Value string type. - Type
Select Int. - Operator
Select Set. - Float Value
Set to 25 (Value).
Health Pickup: Trigger Machine #
Next, we’ll add a trigger machine that will handle the pickup by the player (or landing the crate if it’s not the player). Add a trigger machine component to the prefab (e.g. using the component menu: Makinom > Machines > Trigger Machine) and change the following settings.
Start Settings #
- Trigger Enter
Enable this setting. - Start By Other (Starting Objects)
Enable this setting.
Machine Execution Settings #
- Schematic Asset
Select HealthPickup. - Execution Type
Select Single. - Update Type
Select Update.
Land Crate: Tagged Machine #
Finally, we’ll add a tagged machine that will handle landing the crate. Add a tagged machine component to the prefab (e.g. using the component menu: Makinom > Machines > Tagged Machine) and change the following settings.
Start Settings #
Click on Add Tag to add a starting tag
- Tag
Set to land.
Machine Execution Settings #
- Schematic Asset
Select LandCrate. - Execution Type
Select Single. - Update Type
Select Update.
And that’s it – we don’t need to apply the changes, since we’ve worked on the prefab directly.
Testing #
If you want to test your health crate, just drag it into the scene and click on Play. The health crate will float down and land on the ground – the player can pick it up on the ground or in the air.
The next tutorial will handle the bomb pickup.


