
Setting up the enemy game mechanics.
In this tutorial we’ll create schematics for the enemy game mechanics. We need schematics for the movement, being hit by a rocket and death of an enemy.
Enemy: Schematic #
First, we’ll set up the movement schematic. The enemy will just move in one direction (left or right) until an obstacle is in the way (checked through a point shapecast), and continue moving in the other direction (i.e. flipping the sprite).
Open the Makinom editor, navigate to Schematics and create a new schematic. Change the following settings.
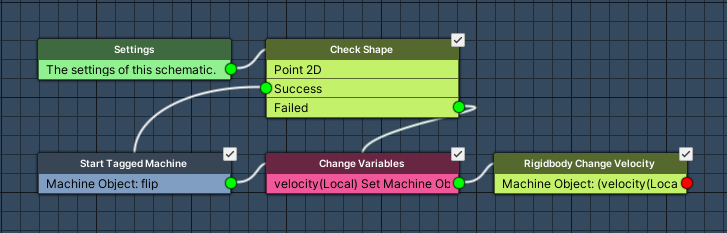
Check Shape #
Add Node > Game Object > Raycast > Check Shape
This node will use a shape (e.g. a 3D sphere or a 2D box) to check for colliders in the scene. We’ll use it to check for 2D colliders at a point in world space (in front of the enemy) to determine if we’ve reached an obstacle.
Shape Settings #
- Check All
Enable this setting.
There might be multiple objects at that point, so we need to check them all. - Single Objects
Enable this setting.
We only want each object once – otherwise we’d get objects with multiple colliders multiple times. - Shape Type
Select Point 2D.
The Point defines the 2D point in world space we’ll be checking – using 2D shapes will only check for 2D colliders.
- Vector3 Type
Select Game Object > Game Object. - Object
Select Machine Object. - Child Object
Set to frontCheck. - Value Origin
Select Position.
The Layer Mask defines the layers we’ll be hitting.
- Float Type
Select Value > Layer Mask and Everything.
We’ll use Filter Game Objects to only check for objects with the tag Obstacle.
- Use Filter
Enable this setting.
Click on Add Object Check to add a filter check.
- Check Type
Select Tag. - Name
Set to Obstacle. - Check Type
Select Is Equal. - Is Valid
Enable this setting.
Start Tagged Machine #
Add Node > Machine > Start Tagged Machine
We’ll use this node to flip the enemy’s sprite by starting a tagged machine with the tag flip.
This node is connected to the Success slot of the Check Shape node (i.e. we’ve run into an obstacle).
- Share Local Variables
Disable this setting. - Wait
Enable this setting.
Machine Object #
- Object
Select Machine Object.
Starting Object #
- Object
Select Machine Object.
Tag Settings #
Click on Add Tag to add a starting tag.
- Tag
Set to flip.
Change Variables #
Add Node > Value > Variable > Change Variables
We’ll use this node to store the X-axis velocity we’ll use for the enemy. The velocity will be the scale (which determines if the enemy is facing left or right, i.e. -1 or 1) multiplied by the speed (an object variable of the enemy).
This node is connected to the previous node’s Next slot and the Failed slot of the Check Shape node (i.e. we didn’t hit an obstacle, but still need to move).
Click on Add Variable to add a variable change – first we’ll store the X-axis scale of the enemy.
- Change Type
Select Variable. - Variable Key
Set to velocity. - Variable Origin
Select Local. - Type
Select Float. - Operator
Select Set. - Float Type
Select Game Object > Game Object and X. - Object
Select Machine Object. - Value Origin
Select Scale.
Copy the previous variable change and change the following settings – we’ll now multiply by the speed.
- Operator
Select Multiply. - Float Type
Select Variable > Float Variable. - Variable Key
Set to speed. - Variable Origin
Select Object. - Object
Select Machine Object.
Rigidbody Change Velocity #
Add Node > Game Object > Rigidbody > Rigidbody Change Velocity
Finally, we’ll set the enemy’s velocity.
Rigidbody Object #
- Object
Select Machine Object.
Velocity #
- Vector3 Type
Select Value > Set Axis.
We’ll use the velocity variable for the X-axis.
- Float Type
Select Variable > Float Variable. - Variable Key
Set to velocity. - Variable Origin
Select Local.
We’ll use the current Y-axis velocity of the enemy as Y-axis.
- Float Type
Select Game Object > Game Object and Y. - Object
Select Machine Object. - Value Origin
Select Velocity.
The Z-axis velocity will be set to 0.
- Z-Axis
Set to 0 (Value).
That’s it for the movement schematic – click on Save Schematic and save it as Enemy in Assets/Schematics/.
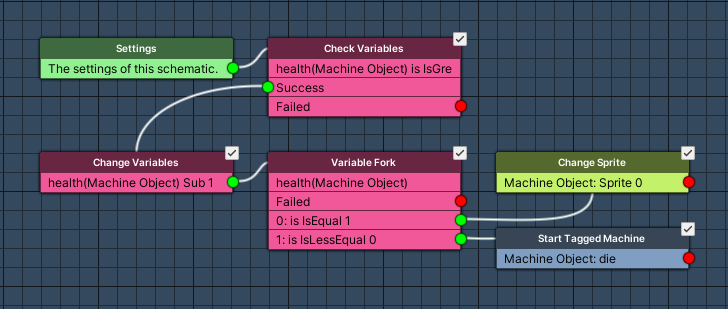
Enemy Hit: Schematic #
Next, we’ll set up the schematic that’ll be started by the rocketHit tag when the enemy was hit by a rocket.
Create a new schematic and change the following settings.
Settings #
We’ll change the sprite of the enemy when the health is down to 1, so we’ll need to add a sprite resource to the schematic.
Sprites #
Click on Add Sprite Resource to add a sprite resource.
- Name
Set to Damaged.
We’ll set the sprite in the machine’s resource overrides.
Check Variables #
Add Node > Value > Variable > Check Variables
We’ll use this node to check if the enemy still has health left.
Variable Condition 0 #
- Condition Type
Select Variable. - Variable Key
Set to health. - Variable Origin
Select Object. - Object
Select Machine Object. - Is Valid
Enable this setting. - Exists
Enable this setting. - Type
Select Int. - Check Type
Select Is Greater. - Check Value
Set to 0 (Value).
Change Variables #
Add Node > Value > Variable > Change Variables
We’ll use this step to reduce the enemy’s health by 1 due to the rocket hit.
This node is connected to the previous node’s Success slot.
Click on Add Variable to add a variable change.
- Change Type
Select Variable. - Variable Key
Set to health. - Variable Origin
Select Object. - Object
Select Machine Object. - Type
Select Int. - Operator
Select Sub. - Float Value
Set to 1 (Value).
Variable Fork #
Add Node > Value > Variable > Variable Fork
This node is used to check a single variable for multiple conditions – the first condition that’s valid will continue the schematic. We’ll use it to check the enemy’s health – if it’s down to 1, we want to change the sprite, if it’s 0 or less we want to initiate death.
Variable Settings #
- Variable Key
Set to health. - Variable Origin
Select Object. - Object
Select Machine Object.
Change the settings of the already added variable condition.
- Is Valid
Enable this setting. - Exists
Enable this setting. - Type
Select Int. - Check Type
Select Is Equal. - Check Value
Set to 1 (Value).
Copy the variable condition and change the following settings.
- Check Type
Select Is Less Equal. - Check Value
Set to 0 (Value).
Change Sprite #
Add Node > Game Object > Renderer > Change Sprite
We’ll use this node to change the sprite of the enemy to the damaged sprite.
This node is connected to slot 0 of the Variable Fork node (i.e. is equal 1).
- Sprite
Select Damaged. - Object
Select Machine Object. - Child Object
Set to body.
The sprite renderer is placed on the body child object of the enemy. - Scope
Select Single.
We only want to change a single renderer on the defined game object.
Start Tagged Machine #
Add Node > Machine > Start Tagged Machine
We’ll use this node to initiate the death of the enemy.
This node is conencted to slot 1 of the Variable Fork node (i.e. is less equal 0).
- Share Local Variables
Disable this setting. - Wait
Enable this setting.
Machine Object #
- Object
Select Machine Object.
Starting Object #
- Object
Select Machine Object.
Tag Settings #
Click on Add Tag to add a starting tag.
- Tag
Set to die.
That’s it for the hit schematic – click on Save Schematic and save it as EnemyHit in Assets/Schematics/.
Move Notification: Schematic #
Before handling the enemy’s death, we’ll set up a small schematic that will be used to move a notification/flying text we’ll display when the enemy dies (displaying the points the player earned). Flying texts are displayed using a Show Flying Text node and can be animated using schematics – we’ll fade the text in and out and move it upwards.
Create a new schematic and change the following settings.

Change Color #
Add Node > Game Object > Renderer > Change Color
This node is used to change colors, e.g. fade the color of game objects (changing the color of the renderer) and can also be used to fade flying texts. We’ll use it to fade in the text at the start.
- Color Type
Select Renderer. - Fade
Select Fade. - Wait
Disable this setting. - Time (s)
Set to 0.25 (Value). - Fade Alpha
Enable this setting. - Fade Red/Green/Blue
Disable these settings. - Start Color
Set to R=0, G=0, B=0, A=0. - End Color
Set to R=0, G=0, B=0, A=255.
Game Object #
- Object
Select Machine Object.
Move Into Direction #
Add Node > Movement > Movement > Move Into Direction
We’ll use this node to move the flying text upwards.
Moving Object #
- Object
Select Machine Object.
Movement Settings #
- Time (s)
Set to 3 (Value). - Wait
Disable this setting. - Speed
Set to 1.
Direction #
- Vector3 Type
Select Value > Direction. - Direction
Select Up. - Local Space
Enable this setting. - Face Direction
Disable this setting.
Wait #
Add Node > Base > Wait
We’ll wait for 2.75 seconds – afterwards, we’ll fade out the text for another 0.25 seconds.
- Time (s)
Set to 2.75 (Value).
Change Color #
Add Node > Game Object > Renderer > Change Color
Finally, we’ll fade out the text.
- Color Type
Select Renderer. - Fade
Select Fade. - Wait
Enable this setting. - Time (s)
Set to 0.25 (Value). - Fade Alpha
Enable this setting. - Fade Red/Green/Blue
Disable these settings. - Start Color
Set to R=0, G=0, B=0, A=255. - End Color
Set to R=0, G=0, B=0, A=0.
Game Object #
- Object
Select Machine Object.
That’s it for the schematic – click on Save Schematic and save it as MoveNotification in Assets/Schematics/.
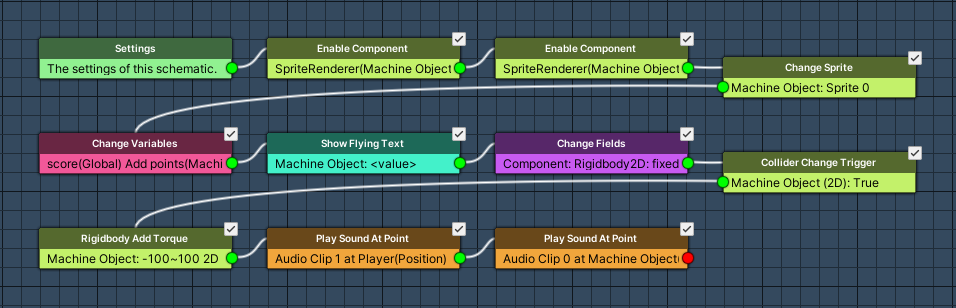
Enemy Death: Schematic #
Finally, we’ll set up the schematic handling the enemy’s death. When the enemy dies, we’ll disable all sprite renderers and only enable the main sprite renderer and change it’s sprite. Afterwards, we’ll send the enemy flying down. Additionally, we’ll add points to the player’s score (global variable) and display a score notification (flying text). We’ll need to set up a UI prefab for the flying text later with the rest of the UI setup.
Create a new schematic and change the following settings.
Settings #
We’ll play a random enemy death sound, a random taunt sound on the player and change the sprite of the dead enemy, so we’ll need some resources.
Audio Clips #
Click on Add Audio Clip Resource to add an audio clip resource
- Name
Set to Death. - Use Order
Select Random.
We’ll use 3 different audio clips for the enemy’s death sound, so add the needed amount of clips by clicking on Add Audio Clip.
- Audio Clip
Select enemy-death1, enemy-death2 and enemy-death3.
The audio clips can be found at Assets/Tutorial Resources/Audio/Enemy/.
Click on Add Audio Clip Resource again to add another audio clip resource
- Name
Set to Taunt. - Use Order
Select Random.
We’ll use 8 different audio clips for the taunt sound, so add the needed amount of clips by clicking on Add Audio Clip.
- Audio Clip
Select all audio clips found at Assets/Tutorial Resources/Audio/Player/Taunt/.
Sprites #
Click on Add Sprite Resource to add a sprite resource.
- Name
Set to Dead.
We’ll set the sprite in the machine’s resource overrides.
Enable Component #
Add Node > Game Object > Component > Enable Component
We’ll use this node to disable the sprite renderers on the enemy.
- Enable/Disable
Disable this setting. - Component Name
Set to SpriteRenderer. - Scope
Select All In Children. - Object
Select Machine Object.
Enable Component #
Add Node > Game Object > Component > Enable Component
We’ll use this node to enable the main sprite renderer on the body (we’ll use it to display the dead sprite).
- Enable/Disable
Enable this setting. - Component Name
Set to SpriteRenderer. - Scope
Select Single. - Object
Select Machine Object. - Child Object
Set to body.
Change Sprite #
Add Node > Game Object > Renderer > Change Sprite
We’ll use this node to change the sprite of the enemy.
- Sprite
Select Dead. - Object
Select Machine Object. - Child Object
Set to body. - Scope
Select Single.
Change Variables #
Add Node > Value > Variable > Change Variables
We’ll use this node to increase the player’s score (global variable) by the points reward of the enemy (object variable).
Click on Add Variable to add a variable change.
- Change Type
Select Variable. - Variable Key
Set to score. - Variable Origin
Select Global. - Type
Select Int. - Operator
Select Add. - Float Type
Select Variable > Int Variable. - Variable Key
Set to points. - Variable Origin
Select Object. - Object
Select Machine Object.
Show Flying Text #
Add Node > UI > Dialogue > Show Flying Text
This node is used to display a flying text in the scene. We’ll use it to display the points the player earned – using the schematic we’ve created earlier to animate the text.
We need to return here later after setting up the UI prefabs.
- Object
Select Machine Object. - Show Number
Enable this setting. - Float Type
Select Variable > Int Variable. - Variable Key
Set to points. - Variable Origin
Select Object. - Object
Select Machine Object.
The Content defines what’s displayed in the flying text, we’ll show the points and use an additional content to show a ‘Points’ text. Additional content can be used to display multiple contents in a UI on different locations and different styles (beyond using text codes).
- Text (Content)
Set to:
<value>
Click on Add Additional Content to add another content.
- Content ID
Set to points.
The content ID is used to identify where the content will be placed in the UI prefab setup (when using Unity UI). - Text (Additional Content 0)
Set to:
Points
We’ll also use the schematic we just created to animate/move the text.
- Schematic Asset
Select MoveNotification. - Destroy Time (s)
Set to 3.
Change Fields #
Add Node > Function > Change Fields
This node is used to change fields or properties on components or static classes – you can use it to change options on components that aren’t yet supported by their own nodes.
We’ll use this node to change the fixedAngle property of the enemy’s Rigidbody2D component.
- Object
Select Machine Object. - Class Name
Set to Rigidbody2D.
Click on Add Field to add a field/property that will be changed.
- Field Name
Set to fixedAngle. - Is Property
Enable this setting. - Field Type
Select Bool. - Bool Value
Disable this setting.
Collider Change Trigger #
Add Node > Game Object > Collider > Collider Change Trigger
We’ll use this node to set all colliders on the enemy’s game object to be triggers. That way the enemy will fall through the ground.
- Use 2D
Enable this setting. - Object
Select Machine Object. - Scope
Select All In Children. - Bool Value
Enable this setting.
Rigidbody Add Torque #
Add Node > Game Object > Rigidbody > Rigidbody Add Torque
We’ll use this node to add a random torque to the enemy, this will cause the enemy to rotate.
Rigidbody Object #
- Object
Select Machine Object.
Torque Settings #
- Use 2D
Enable this setting. - Continue Torque
Disable this setting. - Float Type
Select Value > Random and set the 1st field to -100 and the 2nd field to 100.
Play Sound At Point #
Add Node > Audio > Audio > Play Sound At Point
We’ll use this node to play the player’s taunting sound at the player’s position.
Position #
- Vector3 Type
Select Game Object > Game Object. - Object
Select Player. - Value Origin
Select Position.
Audio Settings #
- Audio Clip
Select Taunt. - Wait
Disable this setting. - Volume
Set to 1 (Value).
Play Sound At Point #
Add Node > Audio > Audio > Play Sound At Point
We’ll use this node to play the enemy’s death sound at the enemy’s position.
Position #
- Vector3 Type
Select Game Object > Game Object. - Object
Select Machine Object. - Value Origin
Select Position.
Audio Settings #
- Audio Clip
Select Death. - Wait
Disable this setting. - Volume
Set to 1 (Value).
And that’s it for this schematic – click on Save Schematic and save it as EnemyDeath in Assets/Schematics/.
The next tutorial will handle adding the enemy machines playing the schematics we created in this tutorial.


