
Setting up losing a life and game over.
In this tutorial we’ll set up the schematic to lose a life and call game over when all lives have been lost. The schematic will be added to the water at the bottom of the level – if the ball falls into the water, the player will lose a life and respawn.
Lose Life: Schematic #
First, we’ll set up the schematic for handling life reduction and game over. Losing a life will lead to destroying the ball and the paddle and spawning a new instance of the ball/paddle player prefab.
Open the Makinom editor, navigate to Schematics and create a new schematic. Change the following settings.
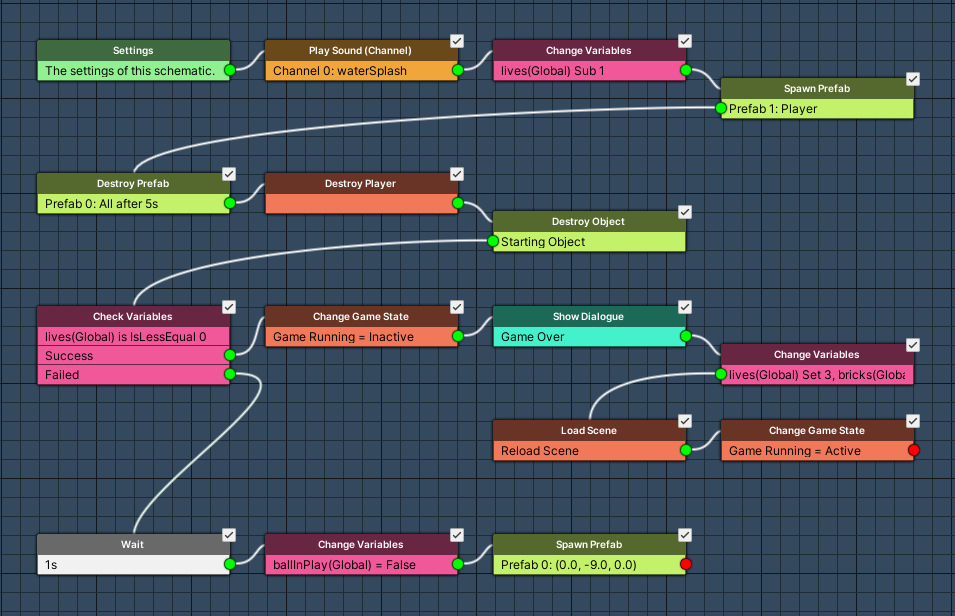
Settings #
We’ll need 2 prefabs – a death particle and a player prefab.
Prefabs #
Click on Add Prefab Resource to add a prefab resource.
- Prefab
Select Paddle.
This is the player prefab (including the mounted ball), it can be found at Assets/Tutorial Resources/Prefabs/.
Click on Add Prefab Resource again to add another prefab resource.
- Prefab
Select Death Particle.
Play Sound (Channel) #
Add Node > Audio > Audio > Play Sound (Channel)
We’ll use this node to play a water splash sound.
- Audio Clip
Select Select Audio Clip and waterSplash. - Wait
Disable this setting. - Play One Shot
Enable this setting. - Volume
Set to 1.
Change Variables #
Add Node > Value > Variable > Change Variables
We’ll use this node to reduce the player’s lives by 1.
Click on Add Variable to add a variable change.
- Change Type
Select Variable. - Variable Key
Set to lives. - Variable Origin
Select Global. - Type
Select Int. - Operator
Select Sub. - Float Value
Set to 1 (Value).
Spawn Prefab #
Add Node > Game Object > Prefab > Spawn Prefab
Time to spawn the death particles.
- Prefab
Select Prefab 1: Death Particles. - Target Type
Select Object.
Target Object #
- Object
Select Player.
Destroy Prefab #
Add Node > Game Object > Prefab > Destroy Prefab
We’ll destroy the death particles after 5 seconds.
- Prefab
Select Prefab 1: Death Particles. - Spawned Prefab ID
Set to -1. - Destroy After Time
Enable this setting. - Time (s)
Set to 5 (Value). - Wait
Disable this setting.
Destroy Player #
Add Node > Game > Player > Destroy Player
We’ll destroy the player (paddle) using this node.
No further settings needed.
Destroy Object #
Add Node > Game Object > Game Object > Destroy Object
We’ll use this node to destroy the ball (i.e. the starting object).
- Object
Select Starting Object.
Check Variables #
Add Node > Value > Variable > Check Variables
Now, we’ll check if the player lost all lives.
Click on Add Variable to add a variable condition.
- Condition Type
Select Variable. - Variable Key
Set to lives. - Variable Origin
Select Global. - Is Valid
Enable this setting. - Exists
Enable this setting. - Type
Select Int. - Check Type
Select Is Less Equal. - Check Value
Set to 0 (Value).
Change Game State #
Add Node > Game > Game > Change Game State
The player lost all lives (i.e. game over), we’ll set the Game Running state to Inactive.
This node is connected to the Success slot of the previous Check Variables node (i.e. all lives lost).
Click on Add Game State to add a state change.
- Game State
Select Game Running. - Set State
Select Inactive.
Show Dialogue #
Add Node > UI > Dialogue > Show Dialogue
We’ll display a game over message for 3 seconds. As before, we haven’t yet set up the UI box, but we’ll use the same as before and set up the UI later.
- Dialogue Type
Select Auto Close. - UI Box
Select Default. - Block Accept Button
Enable this setting. - Close After (s)
Set to 3. - Wait
Enable this setting. - Message
Set to:
Game Over
Change Variables #
Add Node > Value > Variable > Change Variables
Before reloading the level, we’ll reset all global variables (lives to 3, bricks to 0, score to 0, ballInPlay to false).
Click on Add Variable to add a variable change.
- Change Type
Select Variable. - Variable Key
Set to lives. - Variable Origin
Select Global. - Type
Select Int. - Operator
Select Set. - Float Value
Set to 3 (Value).
Copy the previous variable change and change the following settings.
- Variable Key
Set to bricks. - Float Value
Set to 0 (Value).
Copy the previous variable change and change the following settings.
- Variable Key
Set to score.
Click on Add Variable again to add another variable change.
- Change Type
Select Variable. - Variable Key
Set to ballInPlay. - Variable Origin
Select Global. - Type
Select Bool. - Bool Type
Select Value. - Bool Value
Disable this setting.
Load Scene #
Add Node > Game > Scene > Load Scene
We’ll use this node to reload the scene.
- Reload Scene
Enable this setting.
Change Game State #
Add Node > Game > Game > Change Game State
Finally, we’ll set Game Running to Active again – the game continues.
Click on Add Game State to add a state change.
- Game State
Select Game Running. - Set State
Select Active.
Wait #
Add Node > Base > Wait
The player still has lives, we’ll wait for 1 second before respawning the player.
This node is connected to the Failed slot of the Check Variables node checking the global int variable lives (i.e. the player still has lives).
- Time (s)
Set to 1 (Value).
Change Variables #
Add Node > Value > Variable > Change Variables
We need to set ballInPlay to false, otherwise the player wont be able to fire the ball again after respawning.
Click on Add Variable to add a variable change.
- Change Type
Select Variable. - Variable Key
Set to ballInPlay. - Variable Origin
Select Global. - Type
Select Bool. - Bool Type
Select Value. - Bool Value
Disable this setting.
Spawn Prefab #
Add Node > Game Object > Prefab > Spawn Prefab
Finally, we’ll spawn the player’s prefab again.
- Prefab
Select Prefab 0: Paddle. - Target Type
Select Position.
Position #
- Vector3 Type
Select Value. - Value
Set to X=0, Y=-9, Z=0.
And that’s it for the schematic – click on Save Schematic and save it as LoseLife in Assets/Schematics/.
Lose Life: Trigger Machine #
We’ll add the LoseLife schematic to the Water game object in the scene (child object of Level) using a Trigger Machine. The machine should start when the Ball enters the water’s trigger while the Game Running game state is Active (i.e. we wont lose a life after winning, since the state is inactive at that time).
Add a trigger machine component to the Water game object (e.g. using the component menu: Makinom > Machines > Trigger Machine). Change the following settings.
Start Settings #
- Trigger Enter
Enable this setting. - Start By Other (Starting Objects)
Enable this setting.
Click on Add Check to add a game object check for the starting object. We only want the machine to start when the Ball is the starting object.
- Check Type
Select Name. - Name
Set to Ball. - Check Type
Select Is Equal. - Is Valid
Enable this setting.
Machine Execution Settings #
- Schematic Asset
Select LoseLife. - Execution Type
Select Single. - Update Type
Select Update. - Stop On Destroy
Disable this setting.
Condition Settings #
Click on Add Condition, we’ll set up the game state condition here.
In the added Condition 0, we’ll set up our game state condition.
- Condition Type
Select Game State.
Click on Add Game State.
- Condition Type
Select Game State. - Game State
Select Game Running. - Check State
Select Active.
And that’s it – don’t forget to save the scene.
Testing #
Hit Play to test the game. You’ll now lose a life when you miss the ball and it falls into the water. If all lifes are lost, you’ll get a game over message (not visible yet) and the game restarts. However, you don’t know how many lives you’ve left or the score you achieved …
The next tutorial will get to the UI setup, i.e. the UI box we already used in schematics and HUDs showing our lives and score.


