
Setting up enemy spawners.
In this tutorial we’ll set up a schematic spawning enemies and 3 machines playing the schematic. When an enemy is spawned, a particle effect (flash) is played.
Spawner: Schematic #
First, we’ll create the schematic spawning the enemies.
Open the Makinom editor, navigate to Schematics and create a new schematic. Change the following settings.
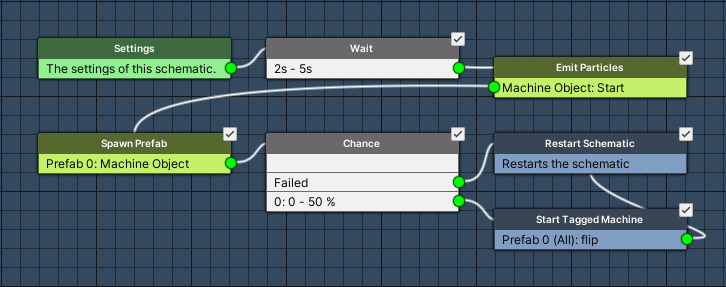
Settings #
We’ll add the 2 enemy prefabs as a prefab resource.
Prefabs #
Click on Add Prefab Resource to add a prefab resource.
- Name
Set to Enemy. - Use Order
Select Random.
We’ll use 2 prefabs, so add another one by clicking on Add Prefab.
- Prefab
Select enemy1 and enemy2.
Wait #
Add Node > Base > Wait
We’ll wait for 2-5 seconds before spawning an enemy.
- Random
Enable this setting. - Time (s)
Set to 2 (Value). - Time 2 (s)
Set to 5 (Value).
Emit Particles #
Add Node > Game Object > Component > Emit Particle
We’ll use this node to emit the spawning particles – the particle effect is placed on a child object of the spawner game object we’ll be using.
- Emit
Enable this setting. - Stop Before Start
Enable this setting. - Object
Select Machine Object. - Scope
Select In Children.
Spawn Prefab #
Add Node > Game Object > Prefab > Spawn Prefab
We’ll use this node to spawn one of the enemy prefabs.
- Prefab
Select Prefab 0: Enemy. - Target Type
Select Object.
Target Object #
- Object
Select Machine Object.
Chance #
Add Node > Base > Chance
This step is used to play the next node based on chance ranges. We’ll use it to have a 50 % chance that the enemy will face left after spawning.
Each Chance Range you add to the node will have it’s own next slot – the first chance range that contains the randomly generated chance number (by default between 0 and 100 – this can be changed in Game > Game Settings in the Chance Settings) will continue the schematic.
- Minimum Range
Set to 0 (Value). - Maximum Range
Set to 50 (Value).
Start Tagged Machine #
Add Node > Machine > Start Tagged Machine
We’ll use this node to flip the enemy (i.e. face left).
This node is connected to slot 0 of the Chance node.
- Share Local Variables
Disable this setting. - Wait
Enable this setting.
Machine Object #
- Object
Select Prefab 0: Enemy and set to -1.
Starting Object #
- Use Same Object
Enable this setting.
Tag Settings #
Click on Add Tag to add a starting tag.
- Tag
Set to flip.
Restart Schematic #
Add Node > Machine > Restart Schematic
This node is used to restart the schematic in the next frame. It’ll keep the schematic running without having to stop and start again via a machine component.
This node is connected to the Failed slot of the Chance node and the Next slot of the Start Tagged Machine node.
And that’s it for the schematic – click on Save Schematic and save it as Spawner in Assets/Schematics/.
Spawner: Auto Machine #
Now we’ll add the Spawner schematic using an auto machine to the spawner game objects in the scene. The spawner game objects are the 3 child objects of the spawners game object in the scene.
The machine component setup is the same for all 3 spawner game objects, so you can either repeat the setup or copy/paste the components on the other spawners.
Add an auto machine component to the spawner game objects (e.g. using the component menu: Makinom > Machines > Auto Machine) and change the following settings.
Start Settings #
- Start
Enable this setting.
Machine Execution Settings #
- Schematic Asset
Select Spawner. - Execution Type
Select Single. - Update Type
Select Update.
And that’s it – don’t forget to save the scene.
Testing #
Click on Play to start the game. The enemies will now spawn from the 3 spawn points in the sky with random times between 2 spawns.

The next tutorial will handle player damage and the fall remover (removing everything that falls into the river).


