
A simple movement AI moving to random waypoints.
In this tutorial we’ll create a schematic to move a game object to random waypoints using NavMesh. When reaching a waypoint, the game object will optionally perform an idle behaviour (using a tagged machine, e.g. wait for some time) and select a new random waypoint.
You can download the finished schematics here.
Random Waypoint: Schematic #
First we’ll create the schematic handling the random waypoint and movement. It will check if the destination was reached, start the tagged machine with the idle behaviour and move to the next random waypoint.
Open the Makinom editor, navigate to Schematics and create a new schematic. Change the following settings.

Is On NavMesh #
Add Node > Movement > NavMesh > Is On NavMesh
This node checks if a NavMesh agent is on a NavMesh and active. If that isn’t the case, it would be useless telling the agent where to move and would result in warning messages.
Object #
- Object
Select Machine Object.
NavMesh Remaining Distance #
Add Node > Movement > NavMesh > NavMesh Remaining Distance
We’ll use this node to check if we’ve reached the destination (i.e. we’ll check if we’re close to it).
This node is connected to the Success slot of the Is On NavMesh node.
Object #
- Object
Select Machine Object.
Check #
- Check Type
Select Is Less. - Check Value
Set to 0.1 (Value).
Start Tagged Machine #
Add Node > Machine > Start Tagged Machine
We’ll use this node to start the optional idle behaviour through a tagged machine.
This node is connected to the Success slot of the NavMesh Remaining Distance node.
- Wait
Enable this setting.
Machine Object #
- Object
Select Machine Object.
Starting Object #
- Object
Select Machine Object.
Tag Settings #
Click on Add Tag to add a starting tag.
- Tag
Set to idle.
Vector3 Multiply #
Add Node > Value > Vector > Vector3 Multiply
We’ll use this node to create a random position within the random movement radius of the game object (stored in the local start variable radius).
Variable Settings #
- Variable Key
Set to waypoint. - Variable Origin
Select Local. - Operator
Select Set.
Vector3 Value #
- Vector3 Type
Select Random > Random Inside Sphere.
Multiply By #
- Float Type
Select Variable > Float Variable. - Variable Key
Set to radius. - Variable Origin
Select Local.
Vector3 Transform Value #
Add Node > Value > Vector > Vector3 Transform Value
We’ll use this node to transform the random position we’ve created into world space. The random position we’ve created is around on X=0, Y=0, Z=0, so we need to translate it to the moving object.
Variable Settings #
- Variable Key
Set to waypoint. - Variable Origin
Select Local. - Operator
Select Set.
Value #
- Vector3 Type
Select Vector3 Variable. - Variable Key
Set to waypoint. - Variable Origin
Select Local.
Object #
- Object
Select Machine Object. - Modify
Select Transform Point.
Store Sample Position #
Add Node > Movement > NavMesh > Store Sample Position
We’ll use this node to find the closest NavMesh position to our random waypoint.
Variable Settings #
- Variable Key
Set to waypoint. - Variable Origin
Select Local. - Operator
Select Set.
Source Position #
- Vector3 Type
Select Vector3 Variable. - Variable Key
Set to waypoint. - Variable Origin
Select Local.
NavMesh Destination #
Add Node > Movement > NavMesh > NavMesh Destination
Finally, we’ll set the destination for the NavMesh agent to the new random waypoint.
Moving Object #
- Object
Select Machine Object.
Position #
- Vector3 Type
Select Vector3 Variable. - Variable Key
Set to waypoint. - Variable Origin
Select Local.
That’s it for the random waypoint schematic – click on Save Schematic and save it e.g. as RandomWaypoint.
Idle Wait: Schematic #
Now, we’ll create a schematic for a simple idle behaviour – waiting for some time.
Create a new schematic and change the following settings.
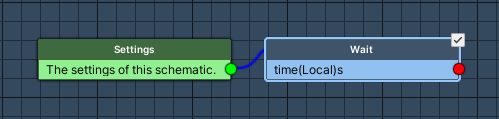
Wait #
Add Node > Base > Wait
We’ll use this node to wait for some time. The wait time will be defined by the local start variable time.
- Float Type
Select Variable > Float Variable. - Variable Key
Set to time. - Variable Origin
Select Local.
And that’s it for the schematic – click on Save Schematic and save it e.g. as IdleWait.
Random Waypoint: Tick Machine #
The random waypoint schematic will be added using a tick machine. The game object you want to move also needs a NavMeshAgent component.
Add a tick machine component to the game object (e.g. using the component menu: Makinom > Machines > Tick Machine) and change the following settings.
Start Settings #
- Update
Enable this setting.
Machine Execution Settings #
- Schematic Asset
Select RandomWaypoint. - Execution Type
Select Single. - Update Type
Select Update.
Local Start Variables #
- Set Start Variables
Enable this setting.
Click on Add Variable to add a start variable.
- Variable Key
Set to radius.
Use the Value string type. - Type
Select Float. - Operator
Select Set. - Float Type (Float Value)
Select Value > Random. - Minimum Value
Set to 5. - Maximum Value
Set to 10.
Idle Wait: Tagged Machine #
We’ll add the idle behaviour using a tagged machine, started by the tag idle. By using a tagged machine for that, you can add different idle behaviour to different game objects, e.g. playing an animation or rotationt the game object.
Add a tagged machine component to the game object (e.g. using the component menu: Makinom > Machines > Tagged Machine) and change the following settings.
Start Settings #
Click on Add Starting Tag to add a tag that can start this machine.
- Starting Tag
Set to idle.
Machine Execution Settings #
- Schematic Asset
Select IdleWait. - Execution Type
Select Single. - Update Type
Select Update.
Local Start Variables #
- Set Start Variables
Enable this setting.
Click on Add Variable to add a start variable.
- Variable Key
Set to time.
Use the Value string type. - Type
Select Float. - Operator
Select Set. - Float Value
Select Value > Random. - Minimum Value
Set to 0. - Maximum Value
Set to 3.
And that’s it!
Tip! #
Need to stop your random waypoint AI at some point? E.g. when the game object should chase the player instead.
Use a bool object variable to do that – use it as a variable condition in the tick machine’s Condition Settings to prevent the machine from starting.


