Makinom - Game Toolkit for Unity
  • Features
  • Showcase
  • Guide
    • Documentation
    • Tutorials
    • Extensions
    • API
  • Makinom 1
    • Tutorials
    • Plugins
    • API
  • Support
  • Forum
  • Get Makinom

Guide

Schematics

  • Setting the Player
  • Simple Character Controller
  • Mouse Orbit Camera
  • Random Waypoints

Breakout

  • Breakout Tutorial Introduction
  • 01 First Steps
  • 02 Player Controls
  • 03 Bricks
  • 04 Losing a Life
  • 05 UI Setup
  • 06 Sound Assignments

Space Shooter

  • Space Shooter Tutorial Introduction
  • 01 First Steps
  • 02 Player Move Controls
  • 03 Player Weapon Controls
  • 04 Hit and Destroy
  • 05 Asteroids
  • 06 Game Controller
  • 07 UI Setup
  • 08 Player’s Destruction
  • 09 Enemy Ship Mechanics
  • 10 Enemy Ship
  • 11 Moving the Background

Match 3

  • Match 3 Tutorial Introduction
  • 01 First Steps
  • 02 UI Setup
  • 03 Generating the Level
  • 04 Matching Jewels
  • 05 Destroying Jewels
  • 06 Game Controls
  • 07 Jewel Setup

Survival Shooter

  • Survival Shooter Tutorial Introduction
  • 01 First Steps
  • 02 Player Movement
  • 03 Player Shooting
  • 04 Enemy Mechanics
  • 05 Setting up the Enemies
  • 06 UI Setup
  • 07 Player’s Death
  • 08 Enemy Spawner

2D Roguelike

  • 2D Roguelike Tutorial Introduction
  • 01 First Steps
  • 02 Generating the Level
  • 03 Level Generation Machines
  • 04 Player Controls
  • 05 Walls, Food and Exit
  • 06 Game Manager and UI Setup
  • 07 Enemy Mechanics
  • 08 Game Over

2D Platformer

  • 2D Platformer Tutorial Introduction
  • 01 First Steps
  • 02 Player Movement
  • 03 Camera and Background
  • 04 Shooting Rockets
  • 05 Enemy Mechanics
  • 06 Setting up the Enemies
  • 07 Enemy Spawners
  • 08 Player Damage and Fall Remover
  • 09 Health Pickup
  • 10 Bomb Pickup
  • 11 Bomb Prefabs and Lay Bombs
  • 12 Pickup Spawner
  • 13 UI Setup
  • 14 Background Animations
  • Home
  • Guide
  • Tutorials
  • 2D Roguelike
  • 03 Level Generation Machines

03 Level Generation Machines

Table of Contents
  • Board Manager: Auto Machine
    • Start Settings
    • Machine Execution Settings
    • Local Start Variables
  • Random Placement: Tagged Machines
    • Walls
      • Start Settings
      • Machine Execution Settings
      • Resource Overrides
      • Local Start Variables
    • Food
      • Start Settings
      • Resource Overrides
      • Local Start Variables
    • Enemies
      • Start Settings
      • Resource Overrides
      • Local Start Variables
  • Testing

Setting up the machines generating the level.

In this tutorial we’ll add the schematics we created in the previous tutorial using an Auto Machine and 3 Tagged Machine components.

First, create a new empty game object (e.g. using the Unity menu: Game Object > Create Empty), rename it to GameManager and place it at X=-5, Y=4, Z=0. We’ll be adding the machine components to this game object.

Board Manager: Auto Machine #

The BoardManager schematic handles generating the level – we’ll use an auto machine to do this at the start of the level.

Add an auto machine component to the GameManager (e.g. using the component menu: Makinom > Machines > Auto Machine) and change the following settings.

Start Settings #

  • Start
    Enable this setting.

Machine Execution Settings #

  • Schematic Asset
    Select BoardManager.
  • Execution Type
    Select Single.
  • Update Type
    Select Update.
  • Stop On Destroy
    Disable this setting.

Local Start Variables #

The Machine Start Variables we’ve set up in the schematic are automatically added here with their default values – since the default values are already what we need, we don’t have more to do here. Make sure all variables are enabled.

That’s it for the auto machine.

Random Placement: Tagged Machines #

We’ll add 3 tagged machines for the random placement.

Walls #

Add a tagged machine component to the GameManager (e.g. using the component menu: Makinom > Machines > Tagged Machine) and change the following settings.

Start Settings #

Click on Add Starting Tag to add a tag that can start this machine.

  • Starting Tag
    Set to walls.

Machine Execution Settings #

  • Schematic Asset
    Select RandomPlacement.
  • Execution Type
    Select Single.
  • Update Type
    Select Update.

Resource Overrides #

Expand the Resource Overrides to change the used prefabs.

  • Override Prefabs
    Enable this setting.

Click on Add Prefab multiple times – we’ll need 8 prefabs in total.

  • Prefab
    Select Wall1 to Wall8.
    The prefabs can be found at Assets/Tutorial Resources/Prefabs/.

Local Start Variables #

  • Set Start Variables
    Enable this setting.

Click on Add Variable to add a start variable.

  • Variable Key
    Set to objectCount.
    Use the Value string type.
  • Type
    Select Int.
  • Operator
    Select Set.
  • Float Value
    Select Value > Random.
  • Value
    Set to 5.
  • Value 2
    Set to 9.

We’ll be adding between 5 and 9 walls to the level.

Food #

Copy the previous tagged machine by right clicking on the component’s name and selecting Copy Component. Add it by right clicking on the name again and selecting Paste Component As New.

Change the following settings.

Start Settings #

  • Starting Tag
    Set to food.

Resource Overrides #

Expand the Resource Overrides to change the used prefabs.

We only need 2 prefabs this time, i.e. remove the not needed amount.

  • Prefab
    Select Food and Soda.
    The prefabs can be found at Assets/Tutorial Resources/Prefabs/.

Local Start Variables #

Change the random numbers – we’ll be adding between 1 and 5 food items to the level.

  • Value
    Set to 1.
  • Value 2
    Set to 5.

Enemies #

Again, copy the previous tagged machine by right clicking on the component’s name and selecting Copy Component. Add it by right clicking on the name again and selecting Paste Component As New.

Change the following settings.

Start Settings #

  • Starting Tag
    Set to enemies.

Resource Overrides #

Expand the Resource Overrides to change the used prefabs.

  • Prefab
    Select Enemy1 and Enemy2.
    The prefabs can be found at Assets/Tutorial Resources/Prefabs/.

Local Start Variables #

The enemy objectCount will be set by the BoardManager that calls this tagged machine, so we don’t need local start variables this time.

  • Set Start Variables
    Disable this setting.

And that’s it for now – don’t forget to save the scene.

Testing #

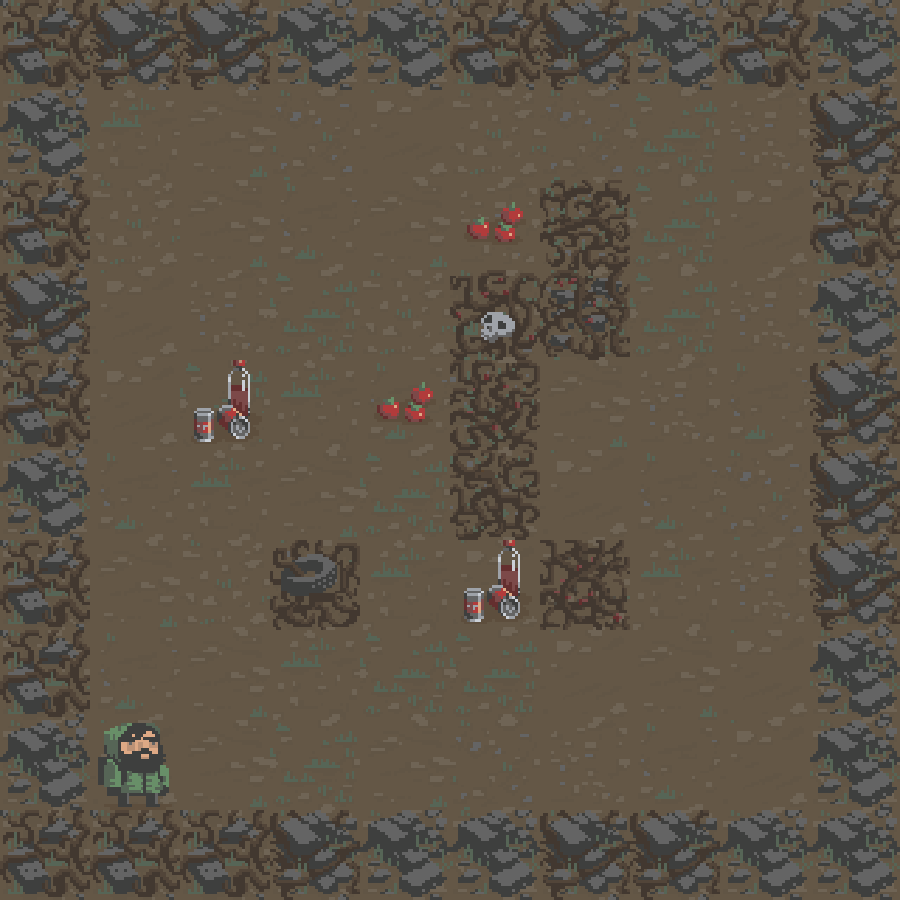
Click on Play to test the game. The text message will be not yet be displayed (Day 1), since we haven’t set up the UI box prefabs yet, but after the screen faded in you’ll see the generated level – each time you start the game, different level will be generated.

The next tutorial will handle the player controls.

Share This Article :
  • Facebook
  • Twitter
  • LinkedIn
  • Pinterest
Updated on January 5, 2021
Table of Contents
  • Board Manager: Auto Machine
    • Start Settings
    • Machine Execution Settings
    • Local Start Variables
  • Random Placement: Tagged Machines
    • Walls
      • Start Settings
      • Machine Execution Settings
      • Resource Overrides
      • Local Start Variables
    • Food
      • Start Settings
      • Resource Overrides
      • Local Start Variables
    • Enemies
      • Start Settings
      • Resource Overrides
      • Local Start Variables
  • Testing
Sitemap
  • Features
  • Showcase
  • Guide
    • Documentation
    • Tutorials
    • Extensions
    • API
  • Makinom 1 Hub
    • Tutorials
    • Plugins
    • API
  • Support
  • Forum
  • Get Makinom
  • Contact
  • Blog
  • ORK Framework
  • gamingislove.com
Categories
  • Makinom 1 (97)
    • Tutorial (97)
      • 2D Platformer (14)
      • 2D Roguelike (8)
      • Breakout (6)
      • How-to (34)
      • Match 3 (6)
      • Schematic (4)
      • Scripting (6)
      • Space Shooter (11)
      • Survival Shooter (8)
  • News (11)
  • Release (68)
Search

© 2015 Gaming is Love e.U.

Disclosure: This site may contain affiliate links, which means I may receive a commission if you click a link and purchase something that I have recommended. While clicking these links won’t cost you any money, they will help me fund my development projects while recommending great assets!