
A simple player control using a Character Controller component.
In this tutorial, we’ll create a schematic to control our player using a Character Controller component. The control will allow to move the player around (with the player facing into the move direction) and jumping.
You can download the finished schematic here.
Input Keys #
We’re using input keys for jumping, horizontal and vertical movement, so set them up as you want them to be.
When downloading the schematic make sure to open it up, change the input keys to use your inputs and save the schematic.
Schematic #
Open the Makinom editor, navigate to Schematics and create a new schematic. Change the following settings.
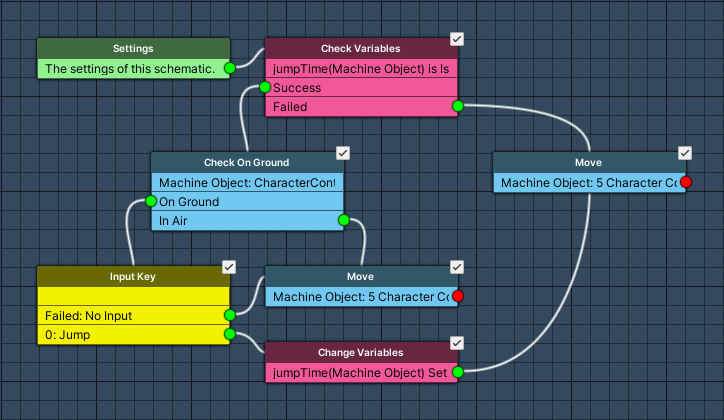
Check Variables #
Add Node > Value > Variable > Check Variables
First, we’ll check if we’re currently jumping – in that case we’ll just continue to move the game object upwards.
Jumping will set an object variable on the game object to the current time + an offset, when the current time exceeds that value, we’ll stop moving upwards.
- Condition Type
Select Variable. - Variable Key
Set to jumpTime. - Variable Origin
Select Object. - Object
Select Machine Object. - Is Valid
Enable this setting. - Exists
Disable this setting. - Type
Select Float. - Check Type
Select Is Less. - Float Type (Check Value)
Select Time > Time.
Check On Ground #
Add Node > Movement > Movement > Check On Ground
We’re not jumping, so let’s check if we’re on the ground to see if we can jump. Since we’re using a Character Controller component, we can check if we’re on the ground without using a raycast.
This node is connected to the Success slot of the Check Variables node.
- Object
Select Machine Object. - Use Raycast
Disable this setting.
Input Key #
Add Node > Input > Input Key
We’re on the ground, so let’s check if the player pressed jump.
This node is connected to the On Ground slot of the Check On Ground node.
- Input Key
Select Jump.
Move #
Add Node > Movement > Movement > Move
We’re in the air (falling) or on the ground and the player isn’t jumping, we’ll just move normally using the player’s input.
This node is connected to the In Air slot of the Check On Ground node and to the Failed slot of the Input Key node.
Moving Object #
- Object
Select Machine Object. - Move Component
Select Character Controller.
Move Change #
- Vector3 Type
Select Value > Set Axis. - X-Axis
Select Input > Input Key Axis and Horizontal. - Y-Axis
Set to 0 (Value). - Z-Axis
Select Input > Input Key Axis and Vertical.
Speed Settings #
- Speed
Set to 5 (Value).
You can also use a float variable where you’ve stored your desired movement speed (or a different value). - Clamp Magnitude
Enable this setting.
Gravity #
- Add Gravity
Enable this setting. - Vector3 Type
Select Value > Gravity 3D. - Use Delta Time
Enable this setting. - Local Space
Disable this setting.
Rotation Settings #
- Face Direction
Enable this setting. - Rotation Component
Select Auto. - Lock Rotation X
Enable this setting. - Lock Rotation Y
Disable this setting. - Lock Rotation Z
Enable this setting.
Change Variables #
Add Node > Value > Variable > Change Variables
The player pressed jump, so let’s set the time to remember when to stop moving upwards.
This node is connected to the Jump slot of the Input Key node.
- Change Type
Select Variable. - Variable Key
Set to jumpTime. - Variable Origin
Select Object. - Object
Select Machine Object. - Type
Select Float. - Operator
Select Set. - Float Type
Select Time > Time and 0.25.
This sets the variable to the current time (since application start) + 0.25 seconds.
Move #
Add Node > Movement > Movement > Move
The player is jumping (i.e. moving upwards), but we also use the player’s input to move. Since this is a simple control, the jump will set the Y-axis to 2, using the double of the movement speed for jumping.
This node is connected to the Next slot of the Change Variables node and to the Failed slot of the Check Variables node.
Moving Object #
- Object
Select Machine Object. - Move Component
Select Character Controller.
Move Change #
- Vector3 Type
Select Value > Set Axis. - X-Axis
Select Input > Input Key Axis and Horizontal. - Y-Axis
Set to 2 (Value). - Z-Axis
Select Input > Input Key Axis and Vertical.
Speed Settings #
- Speed
Set to 5 (Value).
You can also use a float variable where you’ve stored your desired movement speed (or a different value).
Note that the the jump speed will be twice that value. - Clamp Magnitude
Disable this setting.
Gravity #
- Add Gravity
Disable this setting. - Use Delta Time
Enable this setting. - Local Space
Disable this setting.
Rotation Settings #
- Face Direction
Disable this setting.
And that’s it – click on Save Schematic and e.g. save it as SimpleControl.
Game Object Setup #
An example setup for a game object using the schematic.
Object Variables #
Since we’re storing the jump time as an object variable, we’ll need to add an Object Variables component to the game object.
E.g. use the component menu: Makinom > Scenes > Object Variables
You can use the object variables in local mode (i.e. enabling Local Variables) or use an object ID to keep the data alive across multiple scenes (and save games).
Tick Machine #
The schematic needs to be added using a tick machine. Don’t forget to also add an Object Variables component to the game object.
Add a tick machine component to the game object (e.g. using the component menu: Makinom > Machines > Tick Machine) and change the following settings.
Start Settings #
- Update
Enable this setting.
Machine Execution Settings #
- Schematics Asset
Select SimpleControl (or however you named your schematic). - Execution Type
Select Single. - Update Type
Select Update.
And that’s it.


