
Setting up the bomb pickup and bomb explosion.
In this tutorial we’ll create the schematics to pick up bomb crates and exploding bombs.
Bomb Pickup: Schematic #
First, we’ll set up the bomb pickup schematic. The bomb crate works like the health crate – it will float down from the sky and land on the ground. When the player enters the trigger machine playing the schematic, he will get a defined number of bombs (object variable).
Open the Makinom editor, navigate to Schematics and create a new schematic. Change the following settings.
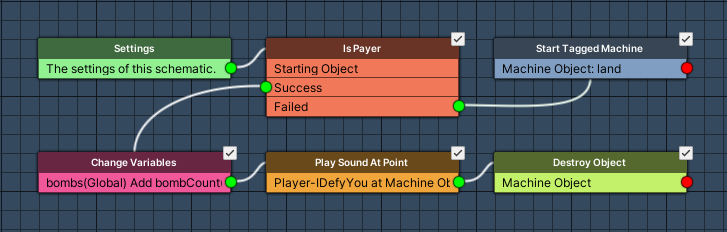
Is Payer #
Add Node > Game > Player > Is Player
First, we’ll check if the starting object is the player.
Check Object #
- Object
Select Starting Object.
Start Tagged Machine #
Add Node > Machine > Start Tagged Machine
In case it’s not the player, we try landing the crate.
This node is connected to the Failed slot of the Is Player node.
- Share Local Variables
Disable this setting. - Wait
Enable this setting.
Machine Object #
- Object
Select Machine Object.
Starting Object #
- Object
Select Starting Object.
Tag Settings #
Click on Add Tag to add a starting tag.
- Tag
Set to land.
Change Variables #
Add Node > Value > Variable > Change Variables
We’ll use this node to add a bomb to the player’s bomb counter.
This node is connected to the Success slot of the Is Player node.
Click on Add Variable to add a variable change.
- Change Type
Select Variable. - Variable Key
Set to bombs. - Variable Origin
Select Global. - Type
Select Int. - Operator
Select Add. - Float Type
Select Variable > Int Variable. - Variable Key
Set to bombCount. - Variable Origin
Select Object. - Object
Select Machine Object.
Play Sound At Point #
Add Node > Audio > Audio > Play Sound At Point
We’ll use this node to play a taunt sound of the player.
Position #
- Vector3 Type
Select GameObject > Game Object. - Object
Select Machine Object. - Value Origin
Select Position.
Audio Settings #
- Audio Clip
Select Select Audio Clip and Player-IDefyYou.
The audio clip can be found at Assets/Tutorial Resources/Audio/Player/Taunts/. - Wait
Disable this setting. - Volume
Set to 1 (Value).
Destroy Object #
Finally, we’ll destroy the crate’s game object from the root (in case it’s still hanging on the parachute).
Destroy Object #
- Object
Select Machine Object. - Use Root
Enable this setting.
That’s it for the schematic – click on Save Schematic and save it as BombPickup in Assets/Schematics/.
Bomb Force: Schematic #
Next, we’ll create a schematic that will be used by the bomb’s explosion schematic to push enemies away from the bomb when it explodes.
Create a new schematic and change the following settings.
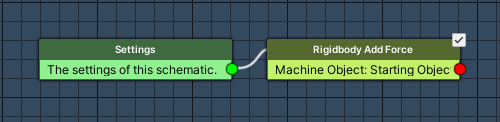
Rigidbody Add Force #
Add Node > Game Object > Rigidbody > Rigidbody Add Force
We can do this in one node by directly getting the direction and multiplying it by the force we want to apply.
Rigidbody Object #
- Object
Select Machine Object.
Force Settings #
- Use 2D
Enable this setting. - Continue Force
Disable this setting.
Force #
- Vector3 Type
Select Game Object > Game Object Direction. - From Game Object
Set to Starting Object. - To Game Object
Select Machine Object. - Force Multiply
Set to 100 (Value).
That’s it for the schematic – click on Save Schematic and save it as BombForce in Assets/Schematics/.
Bomb Explosion: Schematic #
Next, we’ll set up the bomb’s explosion schematic. The explosion will kill all enemies within a defined radius (local start variable).
Create a new schematic and change the following settings.
Settings #
We need a machine start variable (radius), 1 actor and 1 prefab.
Machine Start Variables #
Click on Add Start Variable to add a new variable.
- Variable Key
Set to radius. - Type
Select Float. - Default Value
Set to 10.
Actors #
We’ll use an explosion particle effect that’s already placed in the scene as actor. Actors are game objects that are already present in the scene – unline prefabs, we don’t need to spawn them.
Click on Add Actor to add an actor.
- Type
Select Find Object. - Search Type
Select Name. - Search Name
Set to explosionParticle.
Prefabs #
We’ll spawn a circle shaped prefab to show the explosion radius.
Click on Add Prefab Resource to add a prefab resource.
- Name
Set to Circle. - Prefab
Select explosionCircle.
The prefab can be found at Assets/Tutorial Resources/Prefabs/Pickups/.
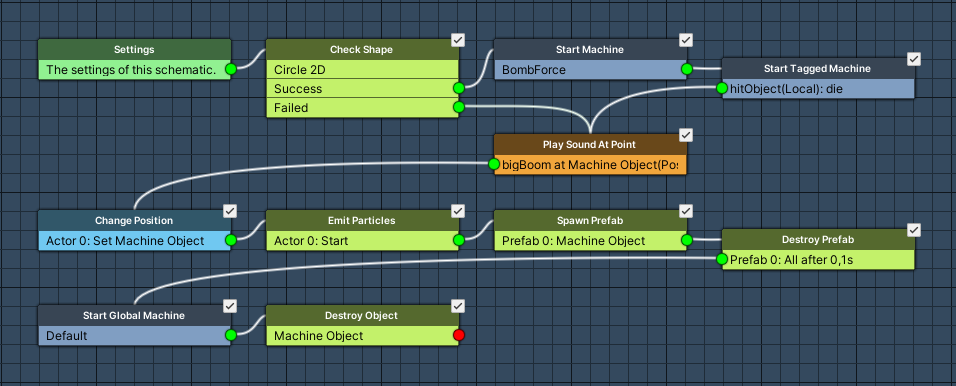
Check Shape #
Add Node > Game Object > Raycast > Check Shape
We’ll use this node to get all enemies within a circle around the bomb.
Shape Settings #
- Check All
Enable this setting. - Single Objects
Enable this setting. - Shape
Select Circle 2D.
The Origin defines where the center of the circle is – it’ll be the bomb’s position.
- Vector3 Type
Select Game Object > Game Object. - Object
Select Machine Object. - Value Origin
Select Position.
The Radius defines the size of the explosion.
- Float Type
Select Variable > Float Variable. - Variable Key
Set to radius. - Variable Origin
Select Local.
The Layer Mask defines which layers we’ll check for objects.
- Float Type
Select Value > Layer Mask and the Enemies layer.
We’ll use Filter Game Objects to only use game objects tagged Enemy.
- Use Filter
Enable this setting.
Click on Add Object Check to add a filter.
- Check Type
Select Tag. - Name
Set to Enemy. - Check Type
Select Is Equal. - Is Valid
Enable this setting.
Hit Game Object #
We need to use the found game objects in the next steps, so we’ll set them to the local selected data hitObject.
- Use Hit Object
Select Selected Data. - Data Key
Set to hitObject. - Data Origin
Select Local. - Change Type
Select Set.
Start Machine #
Add Node > Machine > Start Machine
We’ll use this node to push away the enemies with the BombForce schematic.
This node is connected to the Success slot of the Check Shape node (i.e. we’ve found enemies in the explosion radius).
- Schematic Asset
Select BombForce. - Execution Type
Select Single. - Update Type
Select Update. - Share Local Variables
Disable this setting. - Share Selected Data
Disable this setting. - Wait Between
Disable this setting.
Machine Object #
- Object
Select Selected Data. - Data Key
Set to hitObject. - Data Origin
Select Local.
Starting Object #
- Object
Select Machine Object.
Start Tagged Machine #
Add Node > Machine > Start Tagged Machine
We’ll use this node to kill the enemies by starting their tagged machine with the die tag.
- Share Local Variables
Disable this setting. - Wait Between
Disable this setting.
Machine Object #
- Object
Select Selected Data. - Data Key
Set to hitObject. - Data Origin
Select Local.
Starting Object #
- Object
Select Machine Object.
Tag Settings #
Click on Add Tag to add a starting tag.
- Tag
Set to die.
Play Sound At Point #
Add Node > Audio > Audio > Play Sound At Point
We’ll use this node to play an explosion sound.
This node is connected to the Next slot of the previous node and the Failed slot of the Check Shape node (i.e. we didn’t find enemies, but the bomb still explodes).
Position #
- Vector3 Type
Select Game Object > Game Object. - Object
Select Machine Object. - Value Origin
Select Position.
Audio Settings #
- Audio Clip
Select Select Audio Clip and bigBoom.
The audio clip can be found at Assets/Tutorial Resources/Audio/FX/. - Wait
Disable this setting. - Volume
Set to 1 (Value).
Change Position #
Add Node > Movement > Movement > Change Position
We’ll use this node to place the explosion particle actor at the bomb’s position.
Moving Object #
- Object
Select Actor 0.
Target Position #
- To Object
Enable this setting. - Object
Select Machine Object.
Emit Particles #
Add Node > Game Object > Component > Emit Particles
We’ll use this node to start the explosion particle effect.
- Emit
Enable this setting. - Stop Before Start
Enable this setting.
Target Object #
- Object
Select Actor 0: explosionParticle. - Scope
Select Single.
Spawn Prefab #
Add Node > Game Object > Prefab > Spawn Prefab
We’ll use this node to spawn the circle prefab.
- Prefab
Select Prefab 0: Circle. - Target Type
Select Object.
Target Object #
- Object
Select Machine Object.
Destroy Prefab #
Add Node > Game Object > Prefab > Destroy Prefab
We’ll use this node to destroy the circle prefab after 0.1 seconds.
- Prefab
Select Prefab 0: Circle. - Spawned Prefab ID
Set to -1. - Destroy After Time
Enable this setting. - Time (s)
Set to 0.1 (Value). - Wait
Disable this setting.
Start Global Machine #
Add Node > Machine > Start Global Machine
We’ll use this node to start the global machine handling the pickup spawning – we’ll set it up later, so just select the first global machine that we’ll use later. Exploding the bomb will result in the next pickup being spawned after some time.
- Global Machine
Select 0: Default. - Wait
Disable this setting.
Machine Object #
- Object
Select Player.
Starting Object #
- Object
Select Player.
Destroy Object #
Add Node > Game Object > Game Object > Destroy Object
Finally, we’ll destroy the bomb – since we’ll also use this schematic on the bomb crate (which can explode when hit by a rocket), we’ll destroy the bomb from the root, in case the crate is still attached to the parachute.
- Object
Select Machine Object. - Use Root
Enable this setting.
And that’s it for the schematic – click on Save Schematic and save it as BombExplosion in Assets/Schematics/.
The next tutorial will handle laying bombs and bomb prefabs.


