
Learn more about the dialogue importer.
The schematic node editor (Schematics section) offers a tool to import multiple dialogues as a series of Show Dialogue nodes from provided text data.
Dialogue Importer #
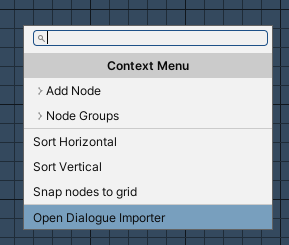
You can open the Dialogue Importer using the context menu in the schematic node editor: Open Dialogue Importer
When dialogue nodes are created, they’ll be added the same way as adding nodes via Add Node – i.e. connected to the currently selected node/slot or at the position the context menu was called (if no node is selected).
Opening the dialogue importer will change the Makinom editor to display only the dialogue importer:
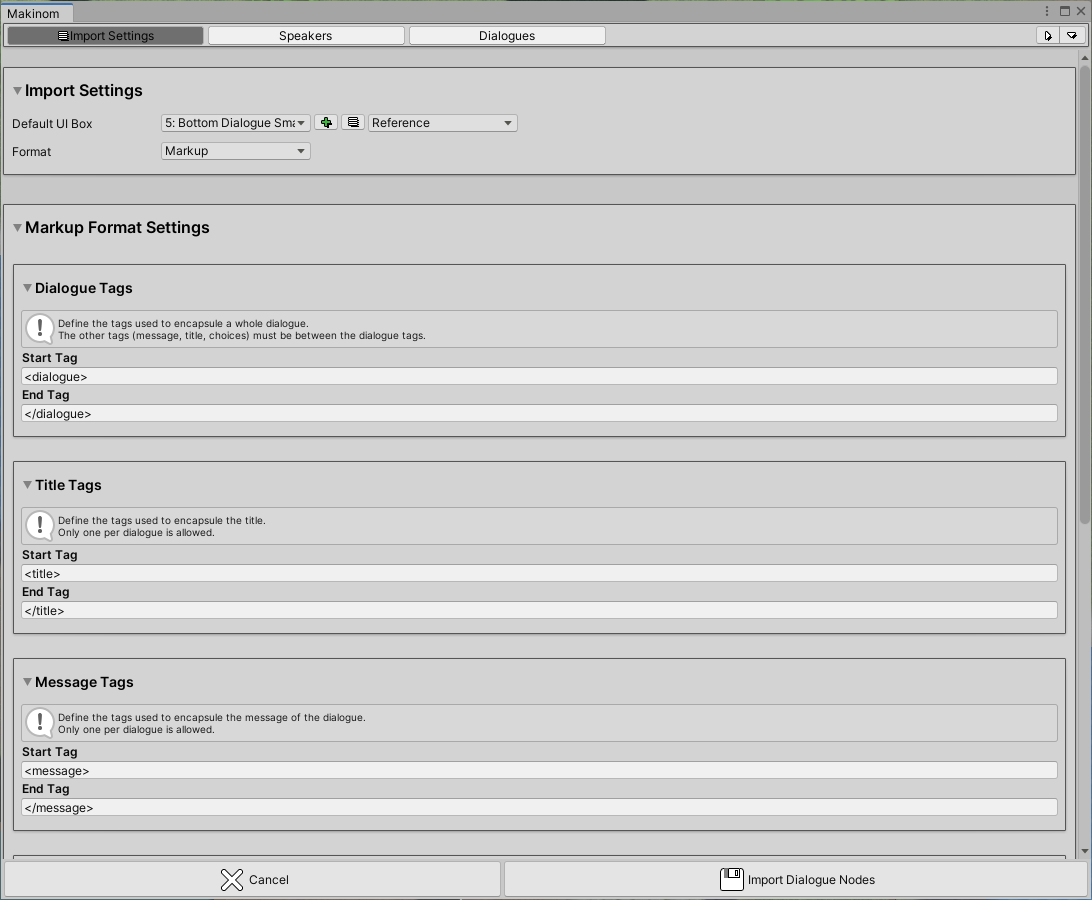
Replacing the section tabs at the top you’ll find the dialogue importer tabs:
- Import Settings
- Speakers
- Dialogues
Speakers and Dialogues is only available after processing provided text data to create dialogue information.
At the bottom, you’ll have the Cancel and Import Dialogue Nodes buttons. Cancel will close the importer without importing anything. Import Dialogue Nodes is only available after processing a text into dialogue information and imports the found dialogues as Show Dialogue nodes.
Import Settings #
The import settings tab is used to define how and which data is used to create the dialogues.
Settings #
The Default UI Box will be used as the UI box for all speakers/dialogues after processing the text. When reviewing the data in the Speakers and Dialogues tabs you’ll be able to change it for individual speakers or dialogues.
The Format setting defines the format that will be processed. The importer comes with 2 formats:
- Separator
Recognizes dialogues, speakers and choices based on defined separator texts. - Markup
Dialogues, speakers and choices are encapsuled by identifier tags.
You can find more information on the formats below.
The importer can be extended with custom formats by descending your class from BaseDialogueImportFormat.
The rest of the settings depend on the used format.
Processing Text #
For the built-in formats, you’ll define the text data in a text area – e.g. copy/pasting data from a text file there.
After pasting text into the text area, it’s recommended to click on the Preprocess Text button (if available). This’ll use the processing options on the text and display the cleaned up text. E.g. using the Trim Spaces and Unified New Line options to remove empty spaces and a single new line character per new line (e.g. some text formats use 2, which can mess with text editing in case you want to change the text in the text area).
When you’re satisfied with the processing text, click on the Process Dialogues button. This’ll process the text and create speakers and dialogues that where found.
In case there was an issue with the text (e.g. not matching the defined format settings), you’ll be notified by a warning in the Unity console.
Speakers #
The speakers tab lists all of the found speakers after processing the text data.
It offers the same settings as a Show Dialogue node’s speaker settings, e.g. using an actor or showing portraits. These settings will be used for the created nodes that use the speaker.
Dialogues #
The dialogues tab lists all of the found dialogues after processing the text data.
You can define if and which of the found speakers will be used, as well as the message of the dialogue.
If choices where found for a dialogue, they’ll be listed as well (with their text).
Dialogues and choices can define the next dialogue that’ll be used after them. They’re automatically set to use the next dialogue after processing the text data. This’ll be used to create node connections when importing the Show Dialogue nodes.
Importing into the Schematic #
When you’re satisfied with the speakers and dialogues, click on the Import Dialogue Nodes button at the bottom of the editor.
This’ll create a Show Dialogue node for each found dialogue, using their speaker’s settings. Additionally, this’ll save the current import settings (excluding the text that’s being processed) to reuse the next time you open the dialogue importer.
The dialogue importer will be closed after importing the nodes.
Formats #
The Format setting of the Import Settings define which text format is used to process the text data.
The importer comes with 2 formats – Separator and Markup. You can extend the importer with custom formats.
Separator #
Dialogues and their content (title, text, choices) will be recognized by defined separator texts.
It offers the following settings:
- Dialogue Separator
The text used to separate dialogues.
Default setup is 3 empty lines. - Title Separator (Optional)
The text used to separate the title from the rest of the dialogue (text, choices)
Default setup is ‘:‘ and a new line afterwards. - Choice Separator (Optional)
The text used to separate individual choices from the text and each other.
Default setup is a new line followed by ‘>:‘.
Format Example #
Here’s an example using the default setup of the Separator format.
Speaker A:
Text.
>: Choice 1
>: Choice 2


Speaker B:
Text.
Markup #
Dialogues and their content are encapsuled by identifier tags (e.g. ‘<dialogue><title>Speaker</title><message>Text</message></dialogue>‘.
It offers the following settings:
- Dialogue Tags
The start and end tag that encapsule a whole dialogue (including their title, message and choice tags).
Default setup is ‘<dialogue>’ start tag and ‘</dialogue>’ end tag. - Title Tags
The start and end tag that encapsule the title/speaker (must be within the dialogue tags, 1 per dialogue).
Default setup is ‘<title>’ start tag and ‘</title>’ end tag. - Message Tags
The start and end tag that encapsule the message (must be within the dialogue tags, 1 per dialogue).
Default setup is ‘<message>’ start tag and ‘</message>’ end tag. - Choice Tags
The start and end tag that encapsule a choice (must be within the dialogue tags, multiple per dialogue).
Default setup is ‘<choice>’ start tag and ‘</choice>’ end tag.
Format Example #
Here’s an example using the default setup of the Markup format.
<dialogue>
<title>Speaker A</title>
<message>Text.</message>
<choice>Choice 1</choice>
<choice>Choice 2</choice>
</dialogue>
<dialogue>
<title>Speaker B</title>
<message>Text.</message>
</dialogue>
Custom Formats #
The importer can be extended with custom formats by descending your class from BaseDialogueImportFormat.
The BaseDialogueImportFormat class can be found in the GamingIsLove.Makinom.Editor namespace.
Properties and Functions #
A custom format must override 1 property and 1 function for the text processing, and can override an additional property and function for text preprocessing.
- bool CanProcess
This property must be overridden.
When returning true, the text can be processed. - bool CanPreprocessText
This property is optional.
When returning true, preprocessing is available. - void PreprocessText()
This function is optional and called by the Preprocess Text button.
Only needed when overriding CanPreprocessText. - DialogueImportContent ProcessText()
This function must be overridden and is called by the Process Dialogues button.
You will process your text data here and return a DialogueImportContent class instance with the speakers and dialogues that where found.
Example Code #
Here’s a code example for a custom format:
using GamingIsLove.Makinom.Editor;

public class CustomDialogueImportFormat : BaseDialogueImportFormat
{
    public override bool CanProcess
    {
        // return 'true' if processing is possible, otherwise 'false'
        // e.g. check if text or file is available to process
        get { return true; }
    }

    public override bool CanPreprocessText
    {
        // return 'true' if prerocessing is available, otherwise 'false'
        get { return true; }
    }

    public override void PreprocessText()
    {
        // preprocessing
        // used by the preprocess text button
    }

    public override DialogueImportContent ProcessText()
    {
        DialogueImportContent content = new DialogueImportContent();
        // process data and create speaker/dialogue content
        return content;
    }
}
For details on how to create the DialogueImportContent and fill it with content, please check out the code for the built-in formats.


