
Setting up the player’s movement controls and camera.
In this tutorial we’ll do the basic player setup and create a schematic to control the movement. Additionally, we’ll let the camera follow the player’s movement.
Basic Player Setup #
The player’s basic setup involves adding object variables to store the player’s attributes and adding a simple schematic to set the player. Select the Player game object in the scene (it’s an already added instance of the Player prefab found at Assets/Tutorial Resources/Prefabs/) and add the following components.
Object Variables #
First, we’ll add object variables to the player’s game object. Add an Object Variables component (e.g. using the component menu: Makinom > Scenes > Object Variables).
Change the following settings of the object variables component.
- Local Variables
Disable this setting. - Object ID
Set to player. - Always Initialize
Enable this setting.
Click on Add Variable to add a new variable to the object variables. This variable will be used to store the player’s health. When the health reaches 0, the player’s ship will be destroyed.
- Variable Key
Set to health.
Select the Value string type. - Type
Select Int. - Operator
Select Set. - Float Value
Set to 100 (Value).
Again, click on Add Variable. This variable will be used to store the player’s fire rate (i.e. time between shots).
- Variable Key
Set to fireTimeout.
Select the Value string type. - Type
Select Float. - Operator
Select Set. - Float Value
Set to 0.15 (Value).
Setting Player Schematic #
Now, we’ll use a schematic to set the player when the level starts and add it with an Auto Machine component.
Follow the steps in this schematic tutorial – it explains how to create the schematic and add an auto machine to the game object.
Player Movement: Schematic #
Next, we’ll create a schematic to handle the player’s movement control. Open the Makinom editor, navigate to Schematics and create a new schematic.
The player’s game object will be moved using the Rigidbody component’s MovePosition function. Additionally, we’ll play/stop the walking animation in the game object’s Animator component (Mecanim).

Settings #
We’ll set up a local variable as Machine Start Variable for easy setup in the machine component at a later time. When using the schematic in a machine component, the defined start variables will be added automatically, using their default values.
Machine Start Variables #
Click on Add Start Variable to add a local start variable that will be exposed to the machine component’s inspector.
- Variable Key
Set to speed. - Type
Select Float. - Default Value
Set to 6.
Move #
Add Node > Movement > Movement > Move
This node is used to move a game object each frame. We’ll use it to move the player using it’s rigidbody component.
Moving Object #
- Object
Select Machine Object. - Movement Component
Select Rigidbody. - Move Function
Select Move Position.
Move Change #
- Vector3 Type
Select Value > Set Axis. - X-Axis
Select Input > Input Key Axis and Horizontal. - Y-Axis
Set to 0 (Value). - Z-Axis
Select Input > Input Key Axis and Vertical.
Speed Settings #
The speed will be defind by the local start variable speed.
- Speed
Select Variable > Float Variable. - Variable Key
Set to speed. - Variable Origin
Select Local. - Add Gravity
Disable this setting. - Use Delta Time
Enable this setting.
Rotate To #
Add Node > Movement > Rotation > Rotate To
This node is used to rotate a game object toward something (i.e. look at). We’ll use it to rotate the player toward the mouse cursor.
Rotating Object #
- Object
Select Machine Object. - Rotation Component
Select Auto. - Lock Rotation
Enable the X and Z settings.
Rotation Target Settings #
- Rotation Target
Select Mouse Position.
Upward Direction #
- Vector3 Type
Select Value > Direction. - Direction
Select Up.
Raycast Settings #
This settings define how the mouse cursor position in world space will be found.
- Distance
Set to 100 (Value). - Layer Mask
Select Floor.
To only select the Floor layer, select Nothing first.
Check Speed #
Add Node > Movement > Movement > Check Speed
This node is used to check the movement speed of a game object. We’ll use it to determine if we’ll play the walk animation.
- Object
Select Machine Object. - Movement
Select Horizontal. - Check Type
Select Is Greater. - Check Value
Set to 0.1 (Value).
Play Mecanim Animation #
Add Node > Animation > Mecanim > Play Mecanim Animation
This node is used to play an animation or set parameters of an animator. We’ll use it to play the walking animation of the player by setting the IsWalking bool parameter.
This node is connected to the Success slot of the Check Speed node.
- Object
Select Machine Object. - Play Mode
Select None.
We’ll play the animation by setting a parameter.
Click on Add Parameter to add an parameter that will be changed.
- Parameter Name
Set to IsWalking. - Parameter Type
Select Bool. - Bool Value
Enable this setting.
Play Mecanim Animation #
Add Node > Animation > Mecanim > Play Mecanim Animation
Copy the previous Play Mecanim Animation node and connect it to the Failed slot of the Check Speed node.
We’ll use it to stop the walking animation – change the following setting.
- Bool Value
Disable this setting.
And that’s it for the schematic – click on Save Schematic and save it as PlayerMovement in Assets/Schematics/.
Player Movement: Tick Machine #
The player is moved using a Rigidbody component, i.e. we’ll need to Fixed Update for the physics updates.
Add a Tick Machine component to the player’s game object (e.g. using the component menu: Makinom > Machines > Tick Machine). Change the following settings.
Start Settings #
- Fixed Update
Enable this setting.
The machine will be started in the fixed framerate frame.
Machine Execution Settings #
- Schematic Asset
Select PlayerMovement. - Execution Type
Select Single.
The machine can only be executed once at a time. - Update Type
Select Fixed Update.
Condition Settings #
We’ll only want the controls to work while the player is alive, i.e. we need to check the health of the player using our template.
Click on Add Condition, we’ll set up the variable condition here.
- Auto Check
Select None.
We don’t need to automatically check this when enabling or first initializing the game object.
The conditions will be checked upon each start of the machine anyway.
In the added Condition 0, we’ll set up our variable condition.
- Condition Type
Select Variable.
Click on Add Variable.
- Condition Type
Select Template. - Template
Select Is Alive. - Game Object (User Object)
Select User.
This’ll check the machine’s game object, i.e. the player.
Local Start Variables #
The Machine Start Variable we’ve set up in the schematic is automatically added here with its default values. Make sure the variable is enabled.
- speed
We can keep the default value of 6.
And that’s it for the player for now – apply the changes to the prefab by clicking on Overrides > Apply All (top of the inspector).
Camera Follow: Schematic #
We want the camera to follow the player’s movement, so we’ll set up a simple schematic to do that.
Open the Makinom editor, navigate to Schematics and create a new schematic. Change the following settings.
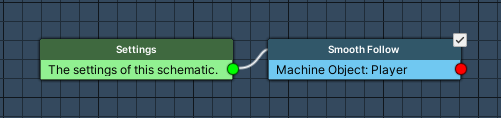
Smooth Follow #
Add Node > Movement > Movement > Smooth Follow
This node is used to let one game object follow another game object each frame. We’ll use it to let the camera follow the player.
Move Object #
- Object
Select Machine Object.
Follow Object #
- Object
Select Player. - Smoothing Time
Set to 0.3 (Value).
Position Offset #
- Vector3 Type
Select Value > Value. - Value
Set to X=1, Y=15, Z=-22. - Follow X/Y/Z Rotation
Disable these settings.
And that’s it for the schematic – click on Save Schematic and save it as CameraFollow in Assets/Schematics/.
Camera Follow: Tick Machine #
Finally, we’ll add the CameraFollow schematic to the camera using a tick machine. Select the Main Camera game object in the scene hierarchy.
Add a tick machine component to the camera’s game object (e.g. using the component menu: Makinom > Machines > Tick Machine). Change the following settings.
Start Settings #
- Fixed Update
Enable this setting.
Usually we’ll use Late Update for camera controls, but this will give us a smoother looking camera change since we’re also moving our player in Fixed Update.
Machine Execution Settings #
- Schematic Asset
Select CameraFollow. - Execution Type
Select Single. - Update Type
Select Late Update.
And that’s it for now – don’t forget to save the scene.
Testing #
Click on Play to test the game. You’ll be able to move the player around using the arrow keys and change the rotation using the mouse cursor. The camera will follow the player.
The next tutorial will handle the player’s weapon control.


