
Setting up some game mechanics.
In this tutorial we’ll set up walls that can be chopped down by the player, food that can be collected by the player and the exit that loads the next level.
Wall: Schematic #
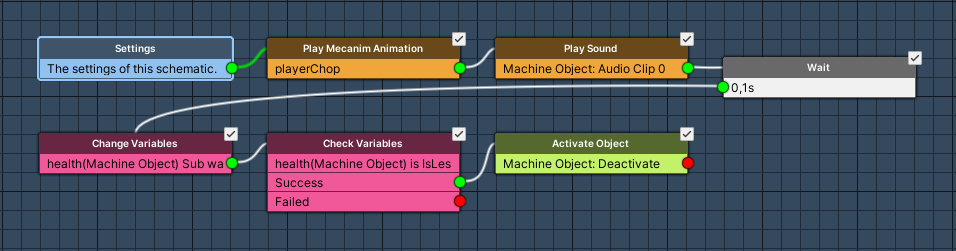
First, we’ll set up the schematic to handle destroyable walls.
Open the Makinom editor, navigate to Schematics and create a new schematic. Change the following settings.
Settings #
We’ll add an audio clip resource to play a random chopping sound effect.
Audio Clips #
Click on Add Audio Clip Resource to add an audio clip resource.
- Name
Set to Chop. - Use Order
Select Random.
We need 2 audio clips, add the needed amount by clicking on Add Audio Clip.
- Audio Clip
Select scavengers_chop1 and scavengers_chop2.
The audio clips can be found at Assets/Tutorial Resources/Audio/.
Play Mecanim Animation #
Add Node > Animation > Mecanim > Play Mecanim Animation
This node plays a Mecanim animations or sets parameters. We’ll use it to play the chop animation of the player by setting the playerChop trigger parameter.
- Object
Select Player. - Play Mode
Select None.
Click on Add Parameter to add an parameter that will be changed.
- Parameter Name
Set to playerChop. - Parameter Type
Select Trigger.
Play Sound #
Add Node > Audio > Audio > Play Sound
We’ll use this node to play the chop sound with a random pitch.
Play On #
- Object
Select Machine Object.
Audio Settings #
- Audio Clip
Select 0: Chop. - Play One Shot
Enable this setting. - Volume
Set to 1. - Set Pitch
Enable this setting. - Random Pitch
Enable this setting. - Pitch
Set to 0.95. - Pitch 2
Set to 1.05.
Wait #
Add Node > Base > Wait
This node waits for a defined amount of time. We’ll use it to wait for 0.1 seconds to give the animation/sound some time to play for a better visual result.
- Time (s)
Set to 0.1.
Change Variables #
Add Node > Value > Variable > Change Variables
We’ll use this node to reduce the wall’s health by 1. The health will be stored in the object variable health on the wall. The damage done by the player is stored in a global variable.
Click on Add Variable to add a variable change.
- Change Type
Select Variable. - Variable Key
Set to health. - Variable Origin
Select Object. - Object
Select Machin Object. - Type
Select Int. - Operator
Select Sub. - Float Value
Select Variable > Int Variable. - Variable Key
Set to wallDamage. - Variable Origin
Select Global.
Check Variables #
Add Node > Value > Variable > Check Variables
We’ll use this node to check if the wall’s health reached 0.
Click on Add Variable to add a variable condition.
- Condition Type
Select Variable. - Variable Key
Set to health. - Variable Origin
Select Object. - Object
Select Machine Object. - Is Valid
Enable this setting. - Exists
Enable this setting. - Type
Select Int. - Check Type
Select Is Less Equal. - Check Value
Set to 0 (Value).
Activate Object #
Add Node > Game Object > Game Object > Activate Object
This node is used to enable/disable game objects. We’ll use it to disable the wall when the health reached 0.
This node is connected to the Success slot of the Check Variables node.
- Set Active
Disable this setting. - Object
Select Machine Object.
That’s it for the schematic – click on Save Schematic and save it as Wall in Assets/Schematics/.
Setting up the Walls #
Now, we’ll set up object variables and a tagged machine handling the wall’s destruction on the wall prefabs. The following steps are the same for all prefabs (Wall1 to Wall8, you can find the prefabs at Assets/Tutorial Resources/Prefabs/).
You can e.g. set up the components on one prefab and copy them by right clicking on the name of the component and selecting Copy Component. Select the other wall prefabs and paste the component by right clicking on a component’s name and selecting Paste Component As New – this will paste the component on all selected prefabs.
Object Variables #
First, we’ll add an Object Variables component to store the wall’s health. Add the component to the prefab (e.g. using the component menu: Makinom > Scenes > Object Variables) and change the following settings.
- Local Variables
Enable this setting. - Always Initialize
Enable this setting.
Click on Add Variable to add a variable to the object variables.
- Variable Key
Set to health.
Select the Value string type. - Type
Select Int. - Operator
Select Set. - Float Value
Set to 3 (Value).
Tagged Machine #
Now, we’ll add the Wall schematic with a tagged machine. Add the component to the prefab (e.g. using the component menu: Makinom > Machines > Tagged Machine) and change the following settings.
Start Settings #
Click on Add Starting Tag to add a tag that can start this machine.
- Starting Tag
Set to wall.
Machine Execution Settings #
- Schematic Asset
Select Wall. - Execution Type
Select Single. - Update Type
Select Update.
That’s it for the wall prefabs – since we’ve worked directly on the prefabs, we don’t need to apply the changes.
Food: Schematic #
Next, we’ll set up the schematic to collect food.
Open the Makinom editor, navigate to Schematics and create a new schematic. Change the following settings.

Settings #
We’ll set up a local variable as Machine Start Variable for easy setup in the machine component at a later time. When using the schematic in a machine component, the defined start variables will be added automatically, using their default values.
Machine Start Variables #
Click on Add Start Variable to add a local start variable that will be exposed to the machine component’s inspector.
- Variable Key
Set to foodChange. - Type
Select Int. - Default Value
Set to 20.
Audio Clips #
We’ll add an audio clip resource to play a random consume sound effect – the actual audio clips will be added through resource overrides. Click on Add Audio Clip Resource to add an audio clip resource.
- Name
Set to Consume. - Use Order
Select Random.
Play Sound #
Add Node > Audio > Audio > Play Sound
We’ll use this node to play the consume sound with a random pitch.
Play On #
- Object
Select Starting Object.
This will be the player – we’re not playing it on the machine object, because that will be gone immediately after the schematic.
Audio Settings #
- Audio Clip
Select 0: Consume. - Play One Shot
Enable this setting. - Volume
Set to 1. - Set Pitch
Enable this setting. - Random Pitch
Enable this setting. - Pitch
Set to 0.95. - Pitch 2
Set to 1.05.
Change Variables #
Add Node > Value > Variable > Change Variables
We’ll use this node to increase the player’s food by a local start variable foodChange. This will be set in the trigger machine starting this schematic.
Click on Add Variable to add a variable change.
- Change Type
Select Variable. - Variable Key
Set to food. - Variable Origin
Select Global. - Type
Select Int. - Operator
Select Add. - Float Value
Select Variable > Int Variable. - Variable Key
Set to foodChange. - Variable Origin
Select Local.
That’s it for the schematic – click on Save Schematic and save it as Food in Assets/Schematics/.
Food: Trigger Machine #
The food will be collected when the player walks on it – i.e. we’ll use trigger machines to react to that. The setup is the same for both the Food and Soda prefab (found at Assets/Tutorial Resources/Prefabs/).
Add a trigger machine component to the prefab (e.g. using the component menu: Makinom > Machines > Trigger Machine) and change the following settings.
Start Settings #
- Trigger Enter
Enable this setting.
Machine Execution Settings #
- Schematic Asset
Select Food. - Execution Type
Select Single. - Update Type
Select Update. - Machine End Action
Select Disable.
This will disable the game object after the machine finished running.
Resource Overrides #
Expand the Resource Overrides to change the used audio clip.
- Override Audio Clips
Enable this setting.
We’ll need 2 audio clips, add them by clicking on Add Audio Clip.
- Audio Clip
Food: Select scavengers_fruit1 and scavengers_fruit2.
Soda: Select scavengers_soda1 and scavengers_soda2.
Local Start Variables #
The Machine Start Variables we’ve set up in the schematic are automatically added here with their default values, so all we need to do is adjust them to our needs. Make sure both variables are enabled.
- foodChange
Food: Set to 10.
Soda: Set to 20.
That’s it for the food prefabs – since we’ve worked directly on the prefabs, we don’t need to apply the changes.
Exit: Schematic #
Next, we’ll create the schematic that handles loading the next level when the player reached the exit.
Open the Makinom editor, navigate to Schematics and create a new schematic. Change the following settings.
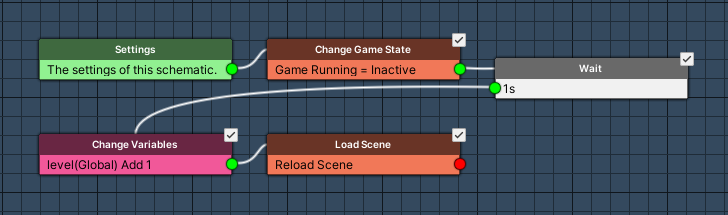
Change Game State #
Add Node > Game > Game > Change Game State
We’ll use this node to stop the gameplay by inactivating the Game Running state.
Click on Add Game State to add a game state change.
- Game State
Select Game Running. - Set State
Select Inactive.
Wait #
Add Node > Base > Wait
We’ll use this node to wait for a second.
- Time (s)
Set to 1.
Change Variables #
Add Node > Value > Variable > Change Variables
We’ll use this node to increase the level by 1.
Click on Add Variable to add a variable change.
- Change Type
Select Variable. - Variable Key
Set to level. - Variable Origin
Select Global. - Type
Select Int. - Operator
Select Add. - Float Value
Set to 1 (Value).
Load Scene #
Add Node > Game > Scene > Load Scene
This node is used to load a scene. We’ll use it to reload the current scene – which will start generating a new level.
- Reload Scene
Enable this setting. - Position Type
Select None.
The player is already in the scene, Makinom doesn’t handle spawning it.
We only want to fade out the screen, since our level generation will do the fade in for us. We’ll use a custom screen fade, overruling the default screen fade settings for scene changes (which are defined in Game > Game Settings).
- Own Screen Fade
Enable this setting. - Fade In
Disable this setting.
Fading in will be handled by the BoardManager schematic, fading in the screen after the level has been set up (and the Day X message).
That’s it for the schematic – click on Save Schematic and save it as Exit in Assets/Schematics/.
Exit: Trigger Machine #
Finally, we’ll add the Exit schematic to the Exit prefab using a trigger machine. The prefab can be found at Assets/Tutorial Resources/Prefabs/.
Add a trigger machine component to the prefab (e.g. using the component menu: Makinom > Machines > Trigger Machine) and change the following settings.
Start Settings #
- Trigger Enter
Enable this setting.
Machine Execution Settings #
- Schematic Asset
Select Exit. - Execution Type
Select Single. - Update Type
Select Update.
And that’s it for now – since we’ve worked directly on the prefabs, we don’t need to apply the changes.
The next tutorial will handle the game manager and UI setup.


