
Setting up the follow camera and background parallax.
In this tutorial we’ll create schematics to let the camera follow the player and handling the background parallax animation.
Object Variables
First, we’ll add object variables to the camera – we’ll use them to store the last camera position to use it in the background parallax to calculate the parallax effect due to the camera movement since the last frame. Select the mainCamera game object in the scene hierarchy and add an Object Variables component (e.g. using the component menu: Makinom > Scenes > Object Variables).
Change the following settings of the object variables component.
- Local Variables
Disable this setting. - Object ID
Set to player. - Always Initialize
Enable this setting.
Click on Add Variable to add a new variable to the object variables. We’ll store the camera’s current position as an object variable.
- Variable Key
Set to previousCamPos. - Type
Select Vector3. - Operator
Select Set. - Vector3 Type
Select Game Object. - Object
Select User. - Value Origin
Select Position
Camera Follow: Schematic
Now, we’ll create the schematic to let the camera follow the player. Additionally, the camera will also stop at the edges of the level.
Open the Makinom editor, navigate to Schematics and create a new schematic. Change the following settings.

Smooth Follow
Add > Movement > Movement > Smooth Follow
We’ll use this node to let the camera follow the player.
Move Object
- Object
Select Machine Object.
Follow Object
- Object
Select Player. - Follow Z Position
Disable this setting.
Following the Z position in 2D envirnoments could result in unforseen issues, e.g. sprites being hidden to the camera. - Smoothing Time
Set to 0.3 (Value).
Rotation Offset
- Follow X/Y/Z Rotation
Disable these settings.
Clamp Transform
Add > Movement > Movement > Clamp Transform
We’ll use this node to force the camera to stay within a defined area, i.e. it will stop following the player when reaching the edges of the level.
The min/max values we’ll use for that will be set by the machine playing the schematic as local start variables.
Clamp Object
- Object
Select Machine Object. - Value Origin
Select Position.
Clamp X-Axis
- Clamp X-Axis
Enable this setting. - X-Axis Minimum
Select Vector3 Variable and X. - Variable Key (X-Axis Minimum)
Set to min. - Variable Origin (X-Axis Minimum)
Select Local. - X-Axis Maximum
Select Vector3 Variable and X. - Variable Key (X-Axis Maximum)
Set to max. - Variable Origin (X-Axis Maximum)
Select Local.
Clamp Y-Axis
- Clamp Y-Axis
Enable this setting. - Y-Axis Minimum
Select Vector3 Variable and Y. - Variable Key (Y-Axis Minimum)
Set to min. - Variable Origin (Y-Axis Minimum)
Select Local. - Y-Axis Maximum
Select Vector3 Variable and Y. - Variable Key (Y-Axis Maximum)
Set to max. - Variable Origin (Y-Axis Maximum)
Select Local.
That’s it for this schematic – click on Save Schematic and save it as CameraFollow in Assets/Schematics/.
Camera Follow: Tick Machine
Next, we’ll add the schematic to the camera using a tick machine. We’ll stop the camera from following the player when the player died through changing the In Control game state.
Add a tick machine component to the mainCamera game object (e.g. using the component menu: Makinom > Machines > Tick Machine) and change the following settings.
Start Settings
- Late Update
Enable this setting. - Check Game States
Enable this setting.
Click on Add Game State to add a game state condition.
- Condition Type
Select Game State. - Game State
Select In Control. - Check State
Select Active.
Machine Execution Settings
- Asset Type
Select Schematics. - Schematics Asset
Select CameraFollow. - Execution Type
Select Single. - Update Type
Select Late Update.
Local Start Variables
- Set Start Variables
Enable this setting.
Click on Add Variable to add a start variable.
- Variable Key
Set to min.
Use the Value string type. - Type
Select Vector3. - Operator
Select Set. - Value
Set to X=-5, Y=-5, Z=0.
Click on Add Variable to add a start variable.
- Variable Key
Set to max.
Use the Value string type. - Type
Select Vector3. - Operator
Select Set. - Value
Set to X=5, Y=5, Z=0.
Formula for Parallax
Before we’ll create the schematics for the background parallax, we’ll set up a formula to calculate the parallax factor of the current background level – this will determine how much the background will be moved. We could also do this in a schematic – but why not use a formula this time?
Formulas are used to calculate float values and can be used in every float value field. A formula uses 2 game object – the user and the target – and shares local variables with the schematic that uses the formula. This allows a formula to return different results depending on the used game objects and schematics.
Like schematics, formulas are created in a node editor. Each node will either manipulate the current value of the formula (e.g. adding 1 to it, multiplying it using a local variable) or do a check to determine the next node.
Now, open the Makinom editor, navigate to Game > Formulas and change the following settings in the default formula.
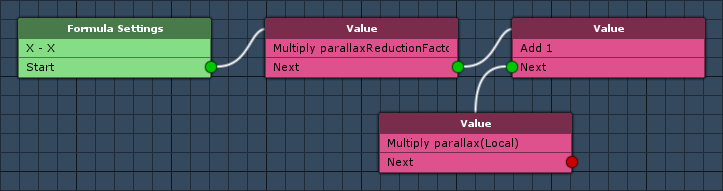
Formula Settings
Like the Settings node of a schematic, this node contains the formula’s base settings.
We’ll be setting the start value of the formula using a local int variable that’s passed on from the schematic. The parallaxLevel defines the current level of the parallax we’ll be calculating the formula for – in the end, this influences how much the background is moved based on the parallax level.
- Name
Set to Parallax. - Start Value
Select Int Variable. - Variable Key
Set to parallaxLevel. - Variable Origin
Select Local.
Value
Add > Value > Value
This node is used to change the current formula’s value with another value. We’ll use it to multiply the start value with the parallaxReductionFactor (local start variable from the schematic).
- Operator
Select Multiply. - Value
Select Float Variable. - Variable Key
Set to parallaxReductionFactor. - Variable Origin
Select Local.
Value
Add > Value > Value
Next, we’ll just add 1 to the formula value.
- Operator
Select Add. - Value
Set to 1 (Value).
Value
Add > Value > Value
Finally, we’ll multiply the value again, this time with the parallax calculated from the previous camera position in relation to the current position (this will be done in the schematic).
- Operator
Select Multiply. - Value
Select Float Variable. - Variable Key
Set to parallax. - Variable Origin
Select Local.
That’s it for the formula – click on Save Settings to save the settings.
Background Parallax Level
Next, we’ll create a schematic that will handle moving a background level using the formula we just created. This schematic will be started by another schematic for each background game object that will be moved in the parallax animation – we wont use tagged machines for this, but directly start the schematic using a Start Machine node.
Navigate to Schematics, create a new schematic and change the following settings.

Change Variables
Add > Value > Variable > Change Variables
We’ll use this node to set the new position we’ll be using.
Click on Add Variable to add a variable change.
- Change Type
Select Variable. - Variable Key
Set to position. - Variable Origin
Select Local. - Type
Select Vector3. - Operator
Select Set. - Vector3 Type
Select Game Object. - Object
Select Machine Object. - Value Origin
Select Position.
Click on Add Variable again to add another variable change. Now we’ll add the result of the formula to the X-axis.
- Change Type
Select Variable. - Variable Key
Set to position. - Variable Origin
Select Local. - Type
Select Axis Vector3. - Axis
Select X. - Operator
Select Add. - Float Value
Select Formula and Parallax. - Formula User Object
Select Machine Object. - Formula Target Object
Select Machine Object.
Vector3 Lerp
Add > Value > Vector > Vector3 Lerp
We’ll use this node to fade the background’s current position to the new position over time – using smoothing that we’ll define as a local start variable in the machine.
Variable Settings
These settings handle where we’ll store the result of the lerp.
- Variable Key
Set to position. - Variable Origin
Select Local. - Operator
Select Set.
From
These settings define from which Vector3 we’ll start.
- Vector3 Type
Select Game Object. - Object
Select Machine Object. - Value Origin
Select Position.
To
These settings define the target of the lerp.
- Vector3 Type
Select Vector3 Variable. - Variable Key
Set to position. - Variable Origin
Select Local.
By Fraction
These settings define the time used for the lerp – we’ll use this to smooth the lerp.
- Delta Time
Enable this setting.
We’ll be multiplying the fraction value by the delta time. - Fraction
Select Float Variable. - Variable Key
Set to smoothing. - Variable Origin
Select Local.
Change Position
Add > Movement > Movement > Change Position
We’ll use this node to set the background’s position.
Moving Object
- Object
Select Machine Object. - Move Component
Select Transform.
Position
- Vector3 Type
Select Vector3 Variable. - Variable Key
Set to position. - Variable Origin
Select Local.
That’s it for this schematic – click on Save Schematic and save it as ParallaxBackgroundLevel in Assets/Schematics/.
Background Parallax: Schematic
This schematic will be started by a tick machine on the camera and starts the BackgroundParallaxLevel schematic for background game objects added as actors. To make things easy, we’ll add the various backgrounds as a single actor – the Start Machine node we’ll use to start the schematic on the background objects allows us to set an int variable as counter of started machins, which we’ll use to set the parallax level.
In short – much magic happening in a single step!
Create a new schematic and change the following settings.
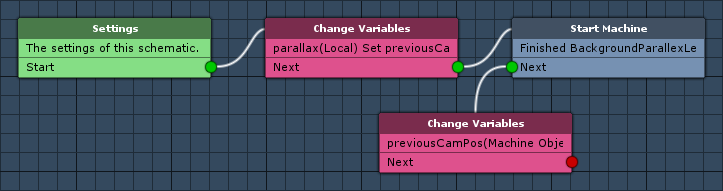
Settings
We’ll add a single actor – the actual game objects used by the actor will be added in the machine component later.
Actors
Click on Add Actor to add an actor.
- Type
Select Game Object. - Find Object
Disable this setting.
Change Variables
Add > Value > Variable > Change Variables
We’ll use this node to set the parallax float variable we’ll use in the formula – this will use the previous camera position in relation to the current position to set a parallax factor.
Click on Add Variable to add a variable change.
- Change Type
Select Variable. - Variable Key
Set to parallax. - Variable Origin
Select Local. - Type
Select Float. - Operator
Select Set. - Float Value
Select Vector3 Variable and X. - Variable Key
Set to previousCamPos. - Variable Origin
Select Object. - Object
Select Machine Object.
Copy the previous variable change and change the following settings in the new variable change.
- Operator
Select Sub. - Float Value
Select Game Object and X. - Object
Select Machine Object. - Value Origin
Select Position.
Again, copy the previous variable change and change the following settings in the new variable change.
- Operator
Select Multiply. - Float Value
Select Float Variable. - Variable Key
Set to parallaxScale.
This will be set as local start variable. - Variable Origin
Select Local.
Start Machine
Add > Machine > Start Machine
This node is used to start schematics on game objects without going through a tagged machine like we usually do. The Start Tagged Machine node is used for cases where you want to start something on another game object, which depends on the game object that is used – e.g. a tag could start an explosion on one game object and nothing on another.
The Start Machine node however will start the used schematic on each used machine – i.e. each combination of selected machine object and start object will be used. Additionally, we can set an int variable as counter for started machines – the 1st started machine will have counter 0, the 2nd started machine counter 1, etc. – this allows you to do different things in the started schematic based on which number is running. In our case, we’ll use this to set the parallaxLevel, which influences how big the position change of the background object will be.
Let’s get to it!
- Schematic Asset
Select BackgroundParallaxLevel. - Execution Type
Select Single. - Update Type
Select Update. - Share Local Variables
Enable this setting. - Wait
Enable this setting.
Int Variable Counter
- Set Counter
Enable this setting. - Variable Key
Set to parallaxLevel. - Variable Origin
Select Local.
Machine Object
- Object
Select Actor 0.
Starting Object
- Object
Select Machine Object.
Change Variables
Add > Value > Variable > Change Variables
Finally, we’ll store the current camera position into the previousCamPos variable to use it in the next frame.
Click on Add Variable to add a variable change.
- Change Type
Select Variable. - Variable Key
Set to previousCamPos. - Variable Origin
Select Object. - Object
Select Machine Object. - Type
Select Vector3. - Operator
Select Set. - Vector3 Type
Select Game Object. - Object
Select Machine Object. - Value Origin
Select Position.
And that’s it for the schematic – click on Save Schematic and save it as BackgroundParallax in Assets/Schematics/.
Background Parallax: Tick Machine
We’ll add the background parallax schematic to the camera using a tick machine. Add a tick machine component to the mainCamera game object (e.g. using the component menu: Makinom > Machines > Tick Machine) and change the following settings.
Start Settings
- Update
Enable this setting. - Check Game States
Enable this setting.
Machine Execution Settings
- Asset Type
Select Schematics. - Schematics Asset
Select BackgroundParallax. - Execution Type
Select Single. - Update Type
Select Update.
We need 4 game objects for Actor 0, so add the needed amount.
Select the following 4 game objects in this order (they’re child objects of the backgrounds game object in the scene hierarchy):
- env_bg
- env_Gherkin
- env_BigBen
- env_Bank
Local Start Variables
- Set Start Variables
Enable this setting.
Click on Add Variable to add a start variable.
- Variable Key
Set to parallaxScale.
Use the Value string type. - Type
Select Float. - Operator
Select Set. - Float Value
Set to 0.5.
Copy the previous variable and change the following settings.
- Variable Key
Set to parallaxReductionFactor. - Float Value
Set to 0.4.
Copy the previous variable and change the following settings.
- Variable Key
Set to smoothing. - Float Value
Set to 8.
And that’s it – don’t forget to save the scene.
Testing
Click on Play to test the game. The camera will now follow the player around and stops at the edges of the level – also, the background will slightly move in a parallax effect when the camera moves left or right.
The next tutorial will handle shooting rockets.