
Setting up the player’s weapon controls.
In this tutorial we’ll create a schematic to let rockets hit other game objects (we’ll use that later when setting up our enemies and bomb crates) and add the fire controls to the PlayerControl schematic.
Rocket: Schematic
First, we’ll set up the schematic that lets the rocket hit other game objects.
Open the Makinom editor, navigate to Schematics and create a new schematic. Change the following settings.

Settings
We need to add the rocket’s explosion prefab.
Prefabs
Click on Add Prefab Resource to add a prefab resource.
- Prefab
Select rocketExplosion.
This prefab can be found at Assets/Tutorial Resources/Prefabs/Pickups/.
Check Object Name
Add > Game Object > Game Object > Check Object Name
We’ll use this node to check if the object that was hit was another rocket – in that case, we don’t want to explode.
The rocket prefab uses the tag Bullet, so we’ll check for that.
- Check Tag
Enable this setting. - Check Value
Set to Bullet. - Check Type
Select Is Equal. - Object
Select Starting Object.
Is Player
Add > Game > Player > Is Player
We’ll use this node to check if we hit the player – we also don’t want to explode in that case.
This node is connected to the Failed slot of the Check Object Name node.
- Object
Select Starting Object.
Start Tagged Machine
Add > Machine > Start Tagged Machine
We’ll use this node to start a tagged machine on the game object we hit. The rocketHit tag will either damage an enemy or explode a bomb crate that was hit – other game objects wont do anything.
This node is connected to the Failed slot of the Is Player node.
- Share Local Variables
Disable this setting. - Wait
Disable this setting.
Machine Object
- Object
Select Starting Object.
Starting Object
- Object
Select Machine Object.
Tag Settings
Click on Add Tag to add a starting tag.
- Tag
Set to rocketHit.
Play Sound At Point
Add > Animation + Audio > Audio > Play Sound At Point
We’ll use this node to play an explosion sound at the current position of the rocket (i.e. where we hit something).
Position
- Vector3 Type
Select Game Object. - Object
Select Machine Object. - Value Origin
Select Position.
Audio Settings
- Audio Clip
Select Select Audio Clip and rocketExplode.
You can find this audio clip at Assets/Tutorial Resources/Audio/FX/. - Wait
Disable this setting. - Volume
Set to 1 (Value).
Spawn Prefab
Add > Game Object > Prefab > Spawn Prefab
We’ll use this node to spawn the explosion effect prefab.
- Prefab
Select Prefab 0: rocketExplosion. - Target Type
Select Object.
Target Object
- Object
Select Machine Object.
Change Rotation
Add > Movement > Rotation > Change Rotation
We’ll use this node to set the spawned prefab’s Z-axis rotation to a random value between 0 and 360.
Rotating Object
- Object
Select Prefab 0: rocketExplosion and set to -1.
The 2nd field is the prefab ID field – setting it to -1 will use all spawned instances of the selected prefab that are alive in the currently running schematic.
Rotation
- Vector3 Type
Select Set Axis. - X-Axis, Y-Axis
Set to 0 (Value). - Z-Axis
Select Random and set the 1st field to 0 and the 2nd field to 360.
Destroy Prefab
Add > Game Object > Prefab > Destroy Prefab
We’ll use this node to destroy the prefab after some time.
- Prefab
Select Prefab 0: rocketExplosion. - Spawned Prefab ID
Set to -1. - Destroy After Time
Enable this setting. - Time (s)
Set to 0.5. - Wait
Disable this setting.
Destroy Object
Add > Game Object > Game Object > Destroy Object
Finally, we’ll destroy the rocket at the end.
- Object
Select Machine Object.
That’s it for this schematic – click on Save Schematic and save it as Rocket in Assets/Schematics/.
Rocket: Trigger Machine
Now, we’ll add the schematic to the rocket prefab using a trigger machine. You can find the prefab in Assets/Tutorial Resources/Prefabs/.
Add a trigger machine component (e.g. using the component menu: Makinom > Machines > Trigger Machine) and change the following settings.
Start Settings
- Trigger Enter
Enable this setting. - Start By Other
Enable this setting.
Machine Execution Settings
- Asset Type
Select Schematics. - Schematics Asset
Select Rocket. - Execution Type
Select Single. - Update Type
Select Update.
That’s it for the rocket prefab – since we’re working on the prefab, we don’t need to apply the changes.
Player Control: Updating the Schematic
Next, we’ll add the weapon fire controls to the PlayerControl schematic – you probably have saved it in Assets/Schematics/ if you’ve followed the tutorial.
You can open the schematic directly by double clicking on it or by clicking on the Edit Schematic button in the inspector (when the schematic is selected).
Settings
First, we’ll add the rocket prefab to the schematic.
Prefabs
Click on Add Prefab Resource to add a prefab resource.
- Name
Set to Rocket. - Prefab
Select rocket.
Can be found at Assets/Tutorial Resources/Prefabs/.
Now, we’ll change to layer 2 (Shoot) that we added as a last step when creating the schematic.
The following nodes are placed in layer 2: Shoot. In this layer, we’ll handle the player’s weapon fire.
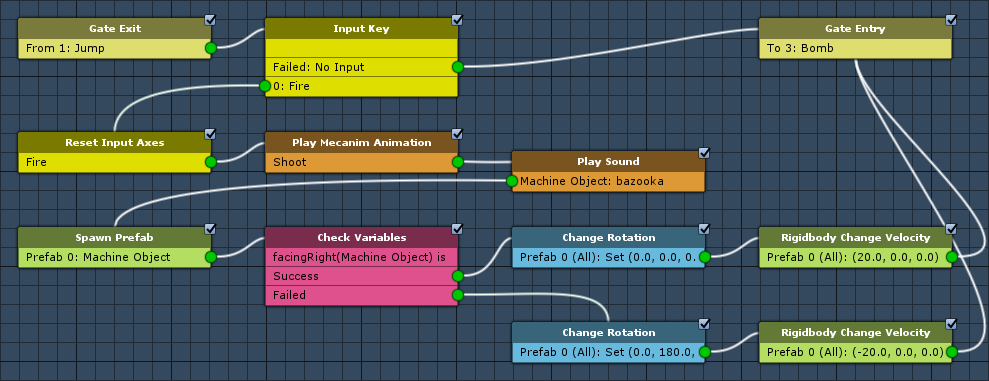
Input Key
Add > Input > Input Key
We’ll use this node to check if the player pressed the Fire input key.
This node is connected to the Next slot of the Gate Exit from layer 1.
- Input Key
Select Fire.
Reset Input Axes
Add > Input > Reset Input Axes
Since we’re running this in a Fixed Update tick machine, it’s possible that it’ll run more than once per frame. To prevent firing multiple rockets, we’ll reset the Fire input key.
This node is connected to the Fire slot of the Input Key node.
- Reset All
Disable this setting. - Input Key
Select Fire.
Play Mecanim Animation
Add > Animation + Audio > Mecanim > Play Mecanim Animation
We’ll use this node to play the shooting animation of the player by setting the Shoot trigger parameter.
- Object
Select Machine Object. - Play Mode
Select None.
Click on Add Parameter to add an parameter that will be changed.
- Parameter Name
Set to Shoot. - Parameter Type
Select Trigger.
Play Sound
Add > Animation + Audio > Audio > Play Sound
We’ll use this node to play a firing sound on the player.
Play On
- Object
Select Machine Object.
Audio Settings
- Audio Clip
Select Select Audio Clip and bazooka.
The audio clip can be found at Assets/Tutorial Resources/Audio/FX/. - Wait
Disable this setting. - Play One Shot
Enable this setting. - Volume
Set to 1.
Spawn Prefab
Add > Game Object > Prefab > Spawn Prefab
We’ll use this node to spawn the rocket prefab at the player’s gun.
- Prefab
Select Prefab 0: Rocket. - Target Type
Select Object.
Target Object
- Object
Select Machine Object. - Child Object
Set to Gun.
Check Variables
Add > Value > Variable > Check Variables
We’ll use this node to check if the player is facing right – we’ll need to decide in which direction to move the rocket.
Click on Add Variable to add a variable condition.
- Condition Type
Select Variable. - Variable Key
Set to facingRight. - Variable Origin
Select Object. - Object
Select Machine Object. - Is Valid
Enable this setting. - Exists
Enable this setting. - Type
Select Bool.
Change Rotation
Add > Movement > Rotation > Change Rotation
We’ll use this node to set the rotation of the rocket.
This node is connected to the Success slot of the Check Variables node (i.e. we’re facing right).
Rotating Object
- Object
Select Prefab 0: Rocket and set to -1.
Rotation
- Vector3 Type
Select Set Axis. - X-Axis, Y-Axis, Z-Axis
Set to 0 (Value).
Rigidbody Change Velocity
Add > Game Object > Rigidbody > Rigidbody Change Velocity
We’ll use this node to set the velocity of the rocket.
Rigidbody Object
- Object
Select Prefab 0: Rocket and set to -1.
Velocity
- Value
Set to X=20, Y=0, Z=0.
Change Rotation
Add > Movement > Rotation > Change Rotation
Copy the previous Change Rotation node and connect it to the Failed slot of the Check Variables node (i.e. we’re facing left).
Change the following settings.
Rotation
- Vector3 Type
Select Set Axis. - X-Axis, Z-Axis
Set to 0 (Value). - Y-Axis
Set to 180.
Rigidbody Change Velocity
Add > Game Object > Rigidbody > Rigidbody Change Velocity
Copy the previous Rigidbody Change Velocity node and connect it to the 2nd Change Rotation node.
Velocity
- Value
Set to X=-20, Y=0, Z=0.
Gate Entry (Layer Gate)
Finally, we’ll add a Layer Gate node to the reach the next layer. This node is connected to the Failed slot of the Input Key node and both Next slots of the Rigidbody Change Velocity nodes.
Right click on one of the slots and select Add > Gate to Layer > Add New Layer. This will create a new layer and add a layer gate to it.
To display the new layer, either double click on the on the node’s title or select it in the layer popup field in the upper right corner of the editor.
You can rename the layer by clicking on the Rename Layer icon right of the popup field – e.g. name the layer Bomb. Clicking on the icon again will stop editing the layer’s name.
This layer will handle laying bombs, we’ll continue here at a later time. For now, this schematic is finished – click on Save Schematic to save the changes.
Testing
Click on Play to test the game. You’ll now be able to fire rockets when pressing the Fire key – they’ll explode when hitting something.
The next tutorial will handle the enemy mechanics.