
Setting up the player controls.
In this tutorial we’ll do the basic player setup and create 2 schematics for the player’s controls – one for moving the player left and right, one for shooting the ball at the start.
Basic Player Setup
We’ll add a simple schematic to set the player – select the Paddle game object in the scene (it’s an already added instance of the Paddle prefab found at Assets/Tutorial Resources/Prefabs/).
Setting Player Schematic
We’ll use a schematic to set the player when the level starts or the player is spawned, and add it using an Auto Machine component.
Follow the steps in this schematic tutorial – it explains how to create the schematic and add an auto machine to the game object.
Paddle: Schematic
Next, we’ll create a schematic to handle the player’s movement control. The control will simply move the player left and right within defined bounds.
Open the Makinom editor, navigate to Schematics and create a new schematic. Change the following settings.

Settings
We’ll set up local variables as Machine Start Variables for easy setup in the machine component at a later time. When using the schematic in a machine component, the defined start variables will be added automatically, using their default values.
Machine Start Variables
Click on Add Start Variable to add a local start variable that will be exposed to the machine component’s inspector.
- Variable Key
Set to speed. - Type
Select Float. - Default Value
Set to 25.
Copy the previous start variable.
- Variable Key
Set to xMin. - Default Value
Set to -8.
Again, copy the previous start variable.
- Variable Key
Set to xMax. - Default Value
Set to 8.
Move
Add > Movement > Movement > Move
We’ll use this node to move the paddle left and right based on the Horizontal input key. The movement speed of the paddle will be stored in a local start variable of the Tick Machine that will play the schematic.
Moving Object
- Object
Select Machine Object. - Move Component
Select Transform.
Move Change
- Vector3 Type
Select Set Axis.
The X-axis will be changed by using the Horizontal input key.
- Float Type
Select Input Key Axis. - Input Key
Select Horizontal.
The Y and Z-axis will not be changed.
- Y-Axis
Set to 0 (Value). - Z-Axis
Set to 0 (Value).
Speed Settings
- Float Type
Select Float Variable. - Variable Key
Set to speed. - Variable Origin
Select Local.
The movement will be based on the delta time, i.e. the time until the last frame.
- Use Delta Time
Enable this setting.
Clamp Transform
Add > Movement > Movement > Clamp Transform
We’ll use this node to clamp the paddle’s position along the X-axis to stay within the level. The minimum and maximum values are stored in local start variables of the Tick Machine that plays the schematic.
Clamp Object
- Object
Select Machine Object. - Value Origin
Select Position.
Clamp X-Axis
- Clamp X-Axis
Enable this setting. - Is Rotation Clamp
Disable this setting.
The X-Axis Minimum is stored in a local start variable named xMin.
- Float Type
Select Float Variable. - Variable Key
Set to xMin. - Variable Origin
Select Local.
The X-Axis Maximum is stored in a local start variable named xMax.
- Float Type
Select Float Variable. - Variable Key
Set to xMax. - Variable Origin
Select Local.
We don’t need to clamp on the Y and Z axis.
That’s it for this schematic – click on Save Schematic and save it as Paddle in Assets/Schematics/.
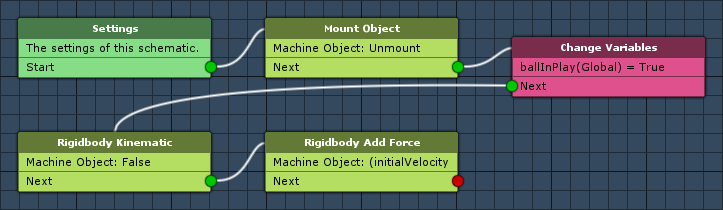
Ball: Schematic
Next, we’ll create the schematic to shoot the ball to start the game. The ball is mounted to the paddle first, in order to move it with the paddle before firing it. In this schematic, we’ll unmount the ball from the paddle, set a bool variable to not perform the machine again and send the ball flying through rigidbody force.
Create a new schematic and change the following settings.
Settings
We’ll set up local variables as Machine Start Variables for easy setup in the machine component at a later time. When using the schematic in a machine component, the defined start variables will be added automatically, using their default values.
Machine Start Variables
Click on Add Start Variable to add a local start variable that will be exposed to the machine component’s inspector.
- Variable Key
Set to initialVelocity. - Type
Select Float. - Default Value
Set to 600.
Mount Object
Add > Game Object > Game Object > Mount Object
We’ll use this node to unmount the ball from the paddle.
- Mount
Disable this setting.
Object
- Object
Select Machine Object.
Change Variables
Add > Value > Variable > Change Variables
We’ll now set a global bool variable that’s used by the machine as condition – otherwise we’d be able to fire the ball again and again.
Click on Add Variable to add a variable change.
- Change Type
Select Variable. - Variable Key
Set to ballInPlay. - Variable Origin
Select Global. - Type
Select Bool. - Bool Type
Select Value. - Bool Value
Enable this setting.
Rigidbody Kinematic
Add > Game Object > Rigidbody > Rigidbody Kinematic
At first, the ball’s kinematic option is enabled, we’ll need to disable it in order to have it bounce off walls.
Rigidbody Object
- Object
Select Machine Object.
Enable/Disable Kinematic
- Bool Type
Select Value. - Bool Value
Disable this setting.
Rigidbody Add Force
Add > Game Object > Rigidbody > Rigidbody Add Force
We’ll use this node to add a force to the ball – the force value is stored in a local start variable of the Interaction Machine that plays the schematic.
Rigidbody Object
- Object
Select Machine Object.
Force
- Vector3 Type
Select Set Axis.
The X-axis of the force comes from the local start variable initialVelocity.
- Float Type
Select Float Variable. - Variable Key
Set to initialVelocity. - Variable Origin
Select Local.
The Y-axis of the force comes from the local start variable initialVelocity.
- Float Type
Select Float Variable. - Variable Key
Set to initialVelocity. - Variable Origin
Select Local.
The Z-axis should be 0.
- Z-Axis
Set to 0 (Value).
And that’s it for this schematic – click on Save Schematic and save it as Ball in Assets/Schematics/.
Paddle: Tick Machine
Next, we’ll add the Paddle schematic (moving the paddle) to the Paddle game object in the scene using a Tick Machine.
We’ll stop the player control when the Game Running game state is Inactive – it’ll be set inactive when the player won or lost all lives (game over).
Add a tick machine component to the Paddle game object (e.g. using the component menu: Makinom > Machines > Tick Machine) and change the following settings.
Start Settings
- Update
Enable this setting. - Check Game States
Enable this setting.
Click on Add Game State to add a game state condition.
- Condition Type
Select Game State. - Game State
Select Game Running. - Check State
Select Active.
Machine Execution Settings
- Asset Type
Select Schematics. - Schematics Asset
Select Paddle. - Execution Type
Select Single. - Update Type
Select Update.
Local Start Variables
The Machine Start Variables we’ve set up in the schematic are automatically added here with their default values – since the default values are already what we need, we don’t have more to do here. Make sure all variables are enabled.
Ball: Interaction Machine
Finally, we’ll add the Ball schematic (moving the paddle) to the Ball game object (child object of the Paddle) using an Interaction Machine.
Like the previous machine, we’ll stop this machine when the Game Running game state is Inactive. Additionally, we’ll use the ballInPlay global bool variable that marks if the ball has been fired already in a variable condition to prevent the machine from starting again.
Add an interaction machine component to the Ball game object (e.g. using the component menu: Makinom > Machines > Interaction Machine) and change the following settings.
Start Settings
- Key Press
Enable this setting. - Input Key
Select Fire. - Check Game States
Enable this setting.
Click on Add Game State to add a game state condition.
- Condition Type
Select Game State. - Game State
Select Game Running. - Check State
Select Active.
Machine Execution Settings
- Asset Type
Select Schematics. - Schematics Asset
Select Ball. - Execution Type
Select Single. - Update Type
Select Update.
Variable Conditions
We’ll check if ballInPlay is false, otherwise the machine shouldn’t start.
- Check Variables
Enable this setting.
Click on Add Variable to add a variable condition.
- Condition Type
Select Variable. - Variable Key
Set to ballInPlay.
Use the Value string type. - Variable Origin
Select Global. - Is Valid
Disable this setting. - Exists
Disable this setting. - Type
Select Bool.
Local Start Variables
The Machine Start Variable we’ve set up in the schematic is automatically added here with its default value. Make sure the variable is enabled.
And that’s it for now – apply the changes to the Paddle prefab by clicking on Apply (top of the inspector).
Testing
Hit Play to test the game. You can now move the paddle left and right (until the walls) and shoot the ball once by pressing the Fire key (space). Not much happening yet …
The next tutorial will handle the bricks.