
Setting up the game controller spawning the enemy waves.
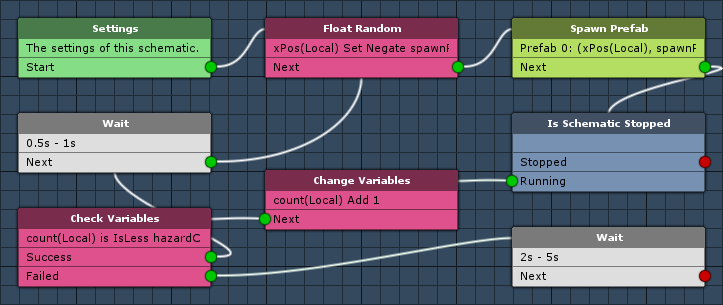
The game controller is responsible for spawning the enemy waves. For now, we’ll only use the 3 asteroids as enemies – enemy ships will be added later. The game controller will run in a repeating auto machine component and use Wait nodes to wait between spawning enemies and waves.
Game Controller: Schematic
Open the Makinom editor, navigate to Schematics and create a new schematic. Change the following settings.
Settings
We’ll set up local variables as Machine Start Variables for easy setup in the machine component at a later time. When using the schematic in a machine component, the defined start variables will be added automatically, using their default values.
Machine Start Variables
Click on Add Start Variable to add a local start variable that will be exposed to the machine component’s inspector.
- Variable Key
Set to spawnPosition. - Type
Select Vector3. - Default Value
Set to X=6, Y=0, Z=16.
Again, click on Add Start Variable to add another local start variable.
- Variable Key
Set to hazardCount. - Type
Select Int. - Default Value
Set to 10.
Prefabs
We’ll add the asteroid prefabs as a single prefab resource to randomly spawn one of them. Click on Add Prefab Resource to add a prefab resource. Make sure that Destroy Prefabs is disabled.
- Name
Set to Hazards. - Use Order
Select Random.
Change the first prefab’s settings.
- Prefab
Select Asteroid 1.
Can be found at Assets/Tutorial Resources/Prefabs/. - Use Pooling
Enable this setting.
Click on Add Prefab to add another prefab to the resource.
- Prefab
Select Asteroid 2.
Can be found at Assets/Tutorial Resources/Prefabs/. - Use Pooling
Enable this setting.
Click on Add Prefab to add another prefab to the resource.
- Prefab
Select Asteroid 3.
Can be found at Assets/Tutorial Resources/Prefabs/. - Use Pooling
Enable this setting.
Float Random
Add > Value > Float > Float Random
This node will store a random float value into a variable. We’ll use it to create a random X-position for the spawning enemy.
Variable Settings
- Variable Key
Set to xPos. - Variable Origin
Select Local. - Operator
Select Set.
Minimum Value
- Minimum Value
Select Vector3 Variable and X. - Variable Key
Set to spawnPosition. - Variable Origin
Select Local. - Math Function
Select Negate.
Maximum Value
- Maximum Value
Select Vector3 Variable and X. - Variable Key
Set to spawnPosition. - Variable Origin
Select Local. - Math Function
Select None.
Spawn Prefab
Add > Game Object > Prefab > Spawn Prefab
We’ll spawn a prefab using the random X position we just created.
- Prefab
Select Prefab 0: Hazards. - Target Type
Select Position.
Position
- Vector3 Type
Select Set Axis.
The X position will use the random float value we created.
- X-Axis
Select Float Variable. - Variable Key
Set to xPos. - Variable Origin
Select Local.
The Y position will use the Y position of the local start variable spawnPosition.
- Y-Axis
Select Vector3 Variable and Y. - Variable Key
Set to spawnPosition. - Variable Origin
Select Local.
The Y position will use the Z position of the local start variable spawnPosition.
- Z-Axis
Select Vector3 Variable and Z. - Variable Key
Set to spawnPosition. - Variable Origin
Select Local.
Is Schematic Stopped
Add > Machine > Is Schematic Stopped
This node checks if the schematic is stopped, e.g. due to the machine object being destroyed. We’ll use it to prevent looping through the enemy spawns when the level is reloaded after game over.
There are no additional settings.
Change Variables
Add > Value > Variable > Change Variables
We’ll change a local int variable used as counter to count the number of spawned enemies. This node is connected to the Running slot of the Is Schematic Stopped node.
Click on Add Variable to add a new variable that will be changed.
- Change Type
Select Variable. - Variable Key
Set to count. - Variable Origin
Select Local. - Type
Select Int. - Operator
Select Add. - Float Value
Set to 1 (Value).
Check Variables
Add > Value > Variable > Check Variables
Now, we’ll check if the count exceeds the number of enemies we’re spawning. The number of enemies is stored in the local start variable hazardCount.
Click on Add Variable to add a variable condition.
- Condition Type
Select Variable. - Variable Key
Set to count. - Variable Origin
Select Local. - Is Valid
Enable this setting. - Exists
Enable this setting. - Type
Select Int. - Check Type
Select Is Less. - Check Value
Select Int Variable. - Variable Key
Set to hazardCount. - Variable Origin
Select Local.
Wait
Add > Base > Wait
This node will wait for a defined amount of time. We’ll wait for a random time between 0.5 and 1 seconds before spawning the next enemy.
This node is connected to the Success slot of the Check Variables node and connects back to the Float Random node. This will repeat spawning a prefab as long as the count hasn’t reached the required number.
- Random
Enable this setting. - Time (s)
Set to 0.5. - Time 2 (s)
Set to 1.
Wait
Add > Base > Wait
We’ll wait for a random time between 2 and 5 seconds until the schematic ends (which will restart the machine, spawning the next wave).
This node is connected to the Failed slot of the Check Variables node.
- Random
Enable this setting. - Time (s)
Set to 2. - Time 2 (s)
Set to 5.
And that’s it for the schematic – click on Save Schematic and save it as GameController in Assets/Schematics/.
Game Controller: Auto Machine
Now, we’ll add the Game Controller schematic to the scene. Create a new empty object (e.g. using the Unity menu: GameObject > Create Empty), rename it to Game Controller and place it at X=-12, Y=0, Z=0.
Add an auto machine component to the game object (e.g. using the component menu: Makinom > Machines > Auto Machine) and change the following settings.
Start Settings
- Start
Enable this setting. - Start Delay (s)
Set to 1. - Repeat Execution
Enable this setting.
The machine will retry executing after it ended.
Machine Execution Settings
- Asset Type
Select Schematic. - Schematic Asset
Select GameController. - Execution Type
Select Single. - Update Type
Select Update.
Local Start Variables
The Machine Start Variables we’ve set up in the schematic are automatically added here with their default values – since the default values are already what we need, we don’t have more to do here. Make sure all variables are enabled.
And that’s it for now – don’t forget to save the scene.
Testing
Click on Play to test the game. Now, the game controller will spawn waves of 10 asteroids (spawning randomly one of the 3 asteroids) and you’ll be able to destroy them by firing bolts on them. When the player is hit, the game will just keep running with the player being gone – we’ll take care of this later.
The next tutorial will handle the HUD.