
Schematics are the core of Makinom – learn what you can do with them!
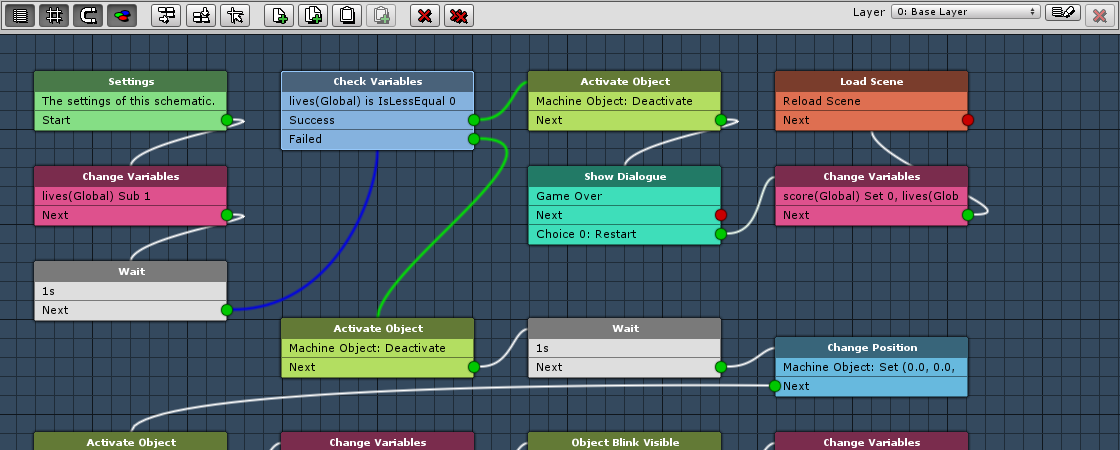
A schematic is a reusable blueprint for what you want to do. It consists of connected nodes that work similar to a flow chart – each node performs a task and decides the next node that’ll be executed. There is a huge number of nodes for different tasks, and you can add new nodes via scripting.
Schematics are created in the Makinom editor in the Schematics section using the node editor.
So, what can you do with schematics? Pretty much everything, e.g.:
- player controls
- camera controls
- animation handling
- animating a cut-scene
- procedurally/randomly create a level
- various game mechanics, e.g. managing player health
- menus, dialogues, …
- enemy AI and behaviours
- level handling
- audio management
- communication with 3rd party software
- and much more!
All of this is done by adding and connecting nodes, without writing a single line of code! You can find examples for different use cases and game mechanics and in the schematics tutorials.
Playing Schematics
Schematics are played by machines and other schematics. Machines are components used to play schematics, you can learn more about them in this how-to.
Playing schematics by other schematics allows breaking down tasks into several schematics, making them reusable and shorten the time needed to create your game mechanics.
E.g. change the health of the player (or any other character in the game) and check for a death condition in a separate schematic allows reusing it wherever needed (like different attack schematics, for damaging and recovering health through items, etc.).
If something needs to be changed later, you only need to change it in this one schematic and not in all places where this game mechanic is used.
Actors
Actors are Game Objects that are already present in the scene. You’ll use actors in many nodes to perform a task, e.g. moving an actor to a position, playing a sound on an actor or change values on an actor’s component.
There are default objects are available without adding actors:
- Machine Object
The game object the machine component is running on. - Starting Object
The game object that started the machine (e.g. the player). - Camera
The camera game object used by the schematic (by default the Main Camera). - Selected Data
Game objects stored in Selected Data.
This can optionally be limited to only use stored game objects – otherwise it’ll also use game objects from stored components, etc.
Depending on the Data Origin, the list is either only available in the running schematic (Local), everywhere (Global) or through a game object (Object, Object ID).
E.g. you can add game objects by finding them through their name or when they where hit by a raycast. - Selected Object
The currently selected game object.
Game objects with a Selectable Object component attached can be selected, e.g. by clicking on them or pressing a defined input key.
See Base/Controls > Game Controls > Object Selection for details and settings related to selected objects.
If you need additional game objects of the scene, add them as an actor to the schematic. Beside selecting the actor in the machine component, you can also let the schematic find a game object or multiple game objects by name, tag or an attached component.
Assets and Resources
Schematics can use different Unity assets, currently supported are:
- Prefabs
E.g. to spawn prefabs in the scene. - Audio Clips
E.g. to play an audio clip on a game object. - Audio Mixers
E.g. to change an audio mixer’s values. - Audio Mixer Groups
E.g. to change the output audio mixer group of an Audio Source. - Sprites
E.g. to change the sprite of a game object. - Textures
E.g. to change the texture of a game object. - Materials
E.g. to change the material of a renderer. - Physic Materials
E.g. to change the physic material of a collider. - Physics Material 2Ds
E.g. to change the physics material 2D of a collider 2D.
While you can add those resources directly in the node you want to use them, you can use advanced functionality by adding them as resources to a schematic in the schematic’s settings (i.e. the start node). A single resource can use multiple assets that can be used in sequence, reversed sequence or randomly.
Example
A single audio clip resource will be used as footstep sounds. Adding mutiple audio clips to the resource and using the Random use order will randomly play one of the added audio clips when used in a Play Sound node.
Resource overrides
By adding assets as resources to a schematic, you can override them in machine components. This further increases the reusability of schematics, as you can create more generic schematics that perform a task, but use different assets on different occasions.
Example
Overriding the previous footstep audio clip resource in machine components allows having different random footsteps for different game objects, e.g. a small character having light footsteps while a big character stomps quite loudly.