
Learn more about the node editor.
The node editor is part of the Makinom editor and is used to create schematics and formulas.
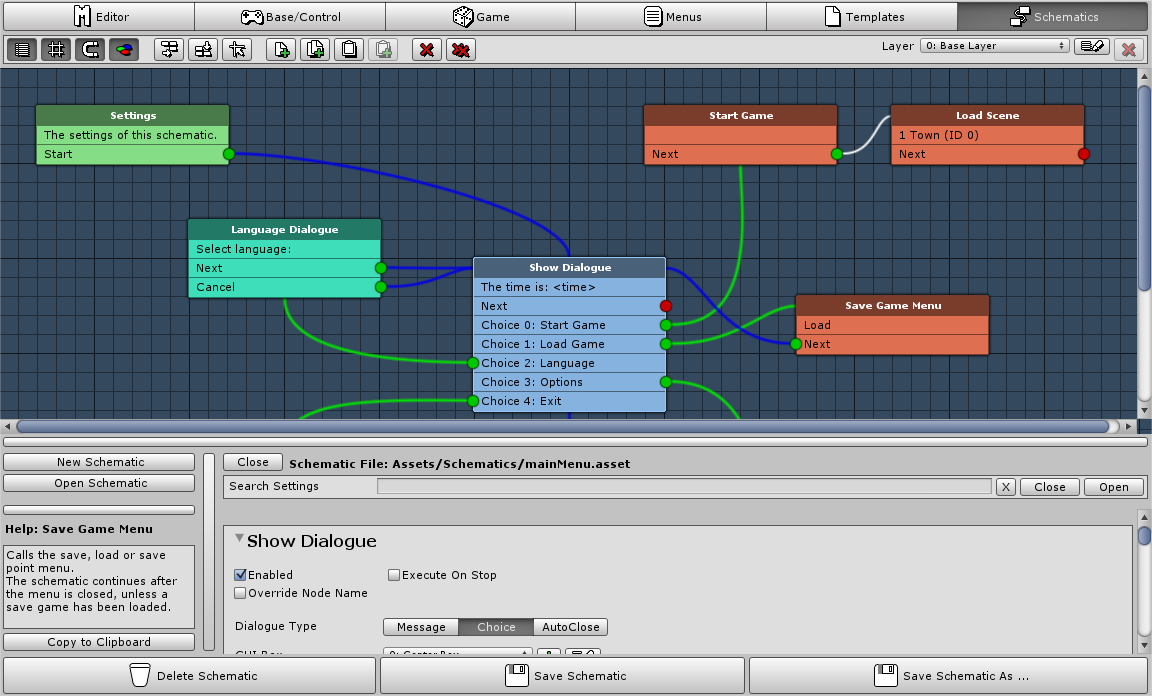
The node editor is separated into 2 parts – the settings area and the node grid. The position of the settings area when editing schematics can be changed in the Makinom editor (Editor > Editor Settings) by the Schematic Editor Menu.
Settings Area
The settings area displays the settings of the currently selected node.
Schematic Settings Area
When editing schematics, the settings area also displays the editor help and buttons to create new schematics or open existing scematics. At the bottom of the editor you’ll find buttons to save or delete the schematic asset instead of the project save buttons. When using Save Schematic As … you can save an existing schematic using a new name.
Node Grid
The node grid is used to add, move, connect and delete nodes. A the top of the node grid, you can see a button bar that is used to manage the nodes – you can also do this with the context menu (right mouse click).
You can navigate on the grid by through the scroll bars or by clicking and dragging the scroll wheel.
The button bar contains functionality to manage your nodes.
![]()
From left to right, the buttons are:
- Show Settings
Shows or hides the settings area. - Show Grid
Shows or hides the grid background. - Snap to Grid
Toggles if nodes will be placed neatly when moving them on and off. - Colorize Nodes
Toggles if nodes are colorized on and off.
The nodes are tintend using the colors defined in Editor > Editor Settings. - Sort Horizontally
Sorts the nodes horizontally from the selected node onwards.
If no node is selected, all nodes will be sorted starting from the Settings node (start node). - Sort Vertically
Sorts the nodes vertically from the selected node onwards.
If no node is selected, all nodes will be sorted starting from the Settings node (start node). - Place on Grid
Places all nodes neatly on the grid. - Add Node
Displays a menu to add nodes.
The nodes are separated into several sub-menus (e.g. Inputs, Machines, etc.).
If a node is selected, the node will be added as next node to the selected slot or the first free slot of the node.
If no node is selected, the node will be added without a connection. - Copy
Copies the selected node and adds it without a connection. - Copy to Clipboard
Copies the node to the clipboard. - Paste from Clipboard
Pastes the a node copied to the clipboard.
If a node is selected, the node will be added as next node to the selected slot or the first free slot of the node.
If no node is selected, the node will be added without a connection. - Remove Node
Removes the selected node. - Remove Chain
Removes the selected node and all following (connected) nodes.
Node Layers
The node layer selection is located at the right side of the button bar. You can use node layers to bring order into your schematic by separating them on different layers.
![]()
The node layer popup also allows adding new nodes by selecting Add New Node. You can change the name of a layer by clicking on the Rename Layer button on the right side of the popup – this changes the node layer popup into a text field. To stop editing the name, click on the Rename Layer button again.
To remove a layer, click on the Remove Layer button – this will remove the layer and all nodes (and layer gates) to it.
To connect nodes between layers, you can add Layer Gate nodes.
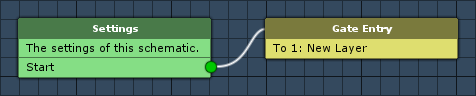
A Layer Gate node is visible on both layers that are connected by it. On the layer the connection starts, a Gate Entry node is displayed. On the layer the connection the connection ends, a Gate Exit node is displayed.
You can also move nodes and node changes between layers using the context menu.
Double clicking on a Gate Entry or Gate Exit title will take you to the layer it connects to.
Anatomy of a Node
A node consists of 3 parts – title, info and slots.
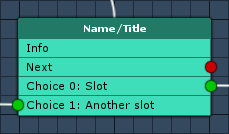
- Title
The name/title of the node is displayed at the top of the node (darker area of the node).
Double clicking on the node’s title will limit the node grid view to only display the node and following nodes (node chain).
To leave the limited view, either double click on the title again or double click somewhere on the grid.
Hovering the mouse above the title will display the help text of the node.
You can move the node by dragging it after clicking on the title. - Info
The info of the node displays parts of the settings made in the node.
The info text is displayed below the title – hovering the mouse above it will display the info text in the help text (displays more text). - Slots
The slots are used to connect nodes – depending on the node you’ll have 0, 1 or multiple slots.
A connected slot will have a green circle.
A not connected slot will have a red circle.
To change a node’s settings, select it by clicking on it. The settings area will display the node’s settings.
Connecting Nodes
Nodes are connected by clicking and holding the left mouse button on a slot. Drag the line on another node and release the mouse button above the node. You can also double click on a slot and click on another node to connect them.
Connections can be removed through the context menu when right clicking on a slot and selecting Remove Connection.
The context menu is opened by a click on the right mouse button. Depending on where you’ve clicked, you will have different options available.
Click on Grid
Right clicking on the grid will allow:
- Adding nodes without connecting them.
- Paste a node from the clipboard (works like adding a new node).
- Sort all nodes horizontally or vertically.
- Snap all nodes to the grid.
Click on Node
Right clicking on a node (title/info) will allow:
- Adding nodes connected to the first free slot of the node.
When there is no free slot, connects the node to the first slot and the previously connected node to the new node’s first slot. - Copy the node or copy it to the clipboard.
- Paste a node from the clipboard (works like adding a new node).
- Removing the node or node chain.
- Sorting the node and all following nodes (chain) horizontally or vertically.
- Snap the node and all following nodes (chain) to the grid.
- Move the node and all following nodes to a different node layer.
This will automatically create a Layer Gate node and connect it to the previous node. - Limit the node view (same as double clicking on the title) or view all nodes.
Click on Slot
Right clicking on a slot will allow:
- Adding nodes connected to the slot.
When there already is a connection, the new node will be connected to the slot and the previously connected node to the new node’s first slot. - Copy the node or copy it to the clipboard.
- Paste a node from the clipboard (works like adding a new node).
- Removing the slot’s connection.
- Removing the node or node chain.
- Sorting the node and all following nodes (chain) horizontally or vertically.
- Snap the node and all following nodes (chain) to the grid.
- Move the node and all following nodes to a different node layer.
This will automatically create a Layer Gate node and connect it to the previous node. - Limit the node view (same as double clicking on the title) or view all nodes.