
Setting up game mechanics to hit and destroy enemies and the player.
Hitting game objects (e.g. a player bolt hitting an enemy ship or an asteroid hitting the player) and destroying them (when their health is down to 0) will be handled by 2 schematics that will be reused on many different game objects.
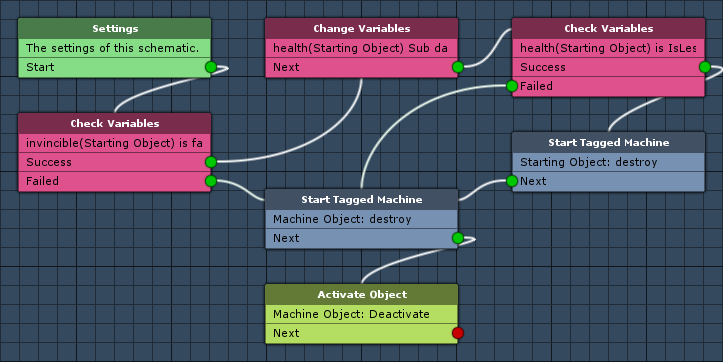
Hit: Schematic
The schematic handling hitting a game object will reduce the health of the game object that was hit and trigger it’s destruction, when the health is down to 0.
Open the Makinom editor, navigate to Schematics and create a new schematic.
Settings
We’ll set up a local variable as Machine Start Variable for easy setup in the machine component at a later time. When using the schematic in a machine component, the defined start variables will be added automatically, using their default values.
Machine Start Variables
Click on Add Start Variable to add a local start variable that will be exposed to the machine component’s inspector.
- Variable Key
Set to damage. - Type
Select Int. - Default Value
Set to 1.
Check Variables
Add > Value > Variable > Check Variables
This node will check variable conditions. We’ll use it to check if the game object that was hit (i.e. the starting object) is marked invincible through an object bool variable.
Click on Add Variable to add a variable condition.
- Condition Type
Select Variable. - Variable Key
Set to invincible. - Variable Origin
Select Object. - Object
Select Starting Object. - Is Valid
Disable this setting. - Exists
Disable this setting. - Type
Select Bool.
Change Variables
Add Value > Variable > Change Variables
This node is connected to the Success slot of the previous node.
This node will change variables. We’ll change the object int variable health of the starting object using the local variable damage (start variable of the machine component).
Click on Add Variable to add a new variable that will be changed.
- Change Type
Select Variable. - Variable Key
Set to health. - Variable Origin
Select Object. - Object
Select Starting Object. - Type
Select Int. - Operator
Select Sub. - Float Value
Select Int Variable. - Variable Key
Set to damage. - Variable Origin
Select Local.
Check Variables
Add > Value > Variable > Check Variables
Now, we’ll check if the starting object’s health is 0 or less.
Click on Add Variable to add a variable condition.
- Condition Type
Select Variable. - Variable Key
Set to health. - Variable Origin
Select Object. - Object
Select Starting Object. - Is Valid
Enable this setting. - Exists
Enable this setting. - Type
Select Int. - Check Type
Select Is Less Equal. - Check Value
Set to 0 (Value).
Start Tagged Machine
Add > Machine > Start Tagged Machine
This node is connected to the Success slot of the previous node.
This node will try starting a tagged machine added to a game object. We’ll use it to start a tagged machine with the tag destroy on the starting object when the health is 0 or less.
Machine Object
This is the game object with the tagged machine component.
- Object
Select Starting Object.
Starting Object
This is the game object that will be used as starting object by the tagged machine.
- Object
Select Machine Object.
Start Tagged Machine
Add > Machine > Start Tagged Machine
Now, we’ll also trigger the destruction of the machine object. E.g. an asteroid colliding with the player will cause both to be destroyed.
This node is also connected to the Failed slots of both Check Variables nodes.
Machine Object
- Object
Select Machine Object.
Starting Object
This is the game object that will be used as starting object by the tagged machine.
- Object
Select Starting Object.
Activate Object
Add > Game Object > Game Object > Activate Object
This node will enable or disable game objects. We’ll use it to disable the machine object (in case it wont be disabled by the destroy tagged machine).
- Set Active
Disable this setting. - Object
Select Machine Object.
That’s it for the hit schematic – click on Save Schematic and save it as Hit in Assets/Schematics/.
Bolt Hit: Trigger Machine
We’ll add the Hit schematic to the Bolt prefab to allow the player’s bolt to damage and destroy other game objects. You can find the prefab at Assets/Tutorial Resources/Prefabs/.
Add a trigger machine component (e.g. using the component menu: Makinom > Machines > Trigger Machine). Change the following settings.
Start Settings
- Trigger Enter
Enable this setting. - Start By Other
Enable this setting. - Limit Layers
Enable this setting.
We’ll limit the bolt to only hit game objects on a defined layer. - Layer Mask
Select only the Enemy layer.
E.g. first select the Nothing and afterwards Enemy.
If there is no Enemy layer, please add one.
Machine Execution Settings
- Asset Type
Select Schematics. - Schematics Asset
Select Hit. - Execution Type
Select Single. - Update Type
Select Update.
Local Start Variables
The Machine Start Variable we’ve set up in the schematic is automatically added here with its default value. Make sure the variable is enabled.
That’s it for the Bolt prefab. Since we added the component directly on the prefab, we don’t need to apply the changes.
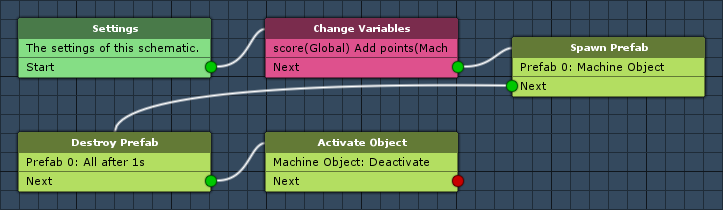
Destroy: Schematic
The schematic handling the destruction of a game object will spawn a prefab (particle effect) and play an audio clip before deactivating the game object. It’ll also increase the player’s score (when the destroyed object has an object variable points).
Open the Makinom editor, navigate to Schematics and create a new schematic. Change the following settings.
Settings
We’ll add a prefab and an audio clip resource to allow resource overrides in the machine component that’ll use the schematic. This allows us the reuse the schematic on different game objects, playing different particle effects and audio clips.
Prefabs
Click on Add Prefab Resource to add a prefab resource. Make sure that Destroy Prefabs is disabled.
- Prefab
Select explosion_asteroid.
The prefab can be found at Assets/Tutorial Resources/Prefabs/. - Use Pooling
Enable this setting.
Audio Clips
Click on Add Audio Clip Resource to add an audio clip resource.
- Audio Clip
Select explosion_asteroid.
The clip can be found at Assets/Tutorial Resources/Audio/.
Change Variables
Add > Value > Variable > Change Variables
We’ll change the player’s score (global variable) using an object variable points of the destroyed object (i.e. the machine object). Both are int variables.
Click on Add Variable to add a variable that will be changed.
- Change Type
Select Variable. - Variable Key
Set to score. - Variable Origin
Select Global. - Type
Select Int. - Operator
Select Add. - Float Value
Select Int Variable. - Variable Key
Select points. - Variable Origin
Select Object. - Object
Select Machine Object.
Spawn Prefab
Add > Game Object > Prefab > Spawn Prefab
This node will spawn the prefab.
- Prefab
Select Prefab 0: explosion_asteroid. - Target Object
Select Object.
Target Object
- Object
Select Machine Object. - Local Space
Enable this setting. - Offset
Set to X=0, Y=0, Z=0. - Use Rotation
Enable this setting. - Rotation Offset
Set to X=0, Y=0, Z=0.
Audio Settings
- Play Audio
Enable this setting. - Audio Clip
Select 0: explosion_asteroid. - Play One Shot
Enable this setting. - Volume
Set to 1.
Destroy Prefab
Add > Game Object > Prefab > Destroy Prefab
This node will destroy prefabs spawned by the schematic. We’ll use it to destroy the prefab after some time.
- Prefab
Select Prefab 0: explosion_asteroid. - Spawned Prefab ID
Set to -1.
This will destroy all spawned instances of the prefab (that where spawned while playing this schematic). - Destroy After Time
Enable this setting. - Time (s)
Set to 1.
The prefab will be destroyed after 1 second. - Wait
Disable this setting.
We don’t want to wait until the prefab is destroyed and continue with the schematic right away.
Activate Object
Add > Game Object > Game Object > Activate Object
This node will enable or disable game objects. We’ll use it to disable the machine object.
- Set Active
Disable this setting. - Object
Select Machine Object.
That’s it for the destroy schematic – click on Save Schematic and save it as Destroy in Assets/Schematics/.
Player Destroy: Tagged Machine
We’ll add a tagged machine component to the player’s game object. Select the Player game object in the scene and add a tagged machine component (e.g. using the component menu: Makinom > Machines > Tagged Machine). Change the following settings.
Start Settings
Click on Add Starting Tag to add a tag that can start this machine.
- Starting Tag
Set to destroy.
Machine Execution Settings
- Asset Type
Select Schematics. - Schematics Asset
Select Destroy. - Execution Type
Select Single. - Update Type
Select Update. - Stop On Destroy
Disable this setting.
This will allow the machine to continue when the game object was destroyed or disabled.
Resource Overrides
Expand the Resource Overrides to change the used prefab and audio clip.
First, we’ll override Prefab 0 used by the schematic.
- Override Prefabs
Enable this setting.
Click on Add Prefab to add a prefab that will be used.
- Prefab
Select explosion_player.
Now, we’ll override Audio Clip 0 used by the schematic.
- Override Audio Clips
Enable this setting.
Click on Add Audio Clip to add an audio clip that will be used.
- Audio Clip
Select explosion_player.
And that’s it for now. Don’t forget to save apply the changes to the player’s prefab and save the scene.
The next tutorial will handle the asteroids.