
A simple mouse orbit camera following the player.
In this tutorial we’ll create a schematic to control a camera following the player. The camera angle/orbit can be changed by holding the right mouse button and moving the mouse horizontally. Additionally, the camera can be zoomed using the scroll wheel.
You can download the finished schematic here – if the schematic is missing the script reference after importing it into your project, just select the MakinomSchematicAsset class in the missing script field.
Input Keys
First, let’s take a look at the input keys we’ll be using. Open the Makinom editor and navigate to Base/Control > Input Keys.
We’ll need the mouse’s horizontal movement, the right mouse button and the scroll wheel – horizonal movement and scroll wheel will be coming from the Unity Input Manager, the default input setup in Unity contains the needed inputs (Mouse X and Mouse ScrollWheel).
If you don’t already have input keys like that in your project, add them and change the following settings.
Mouse X
- Name
Set to Mouse X. - Input Origin
Select Unity Input Manager. - Input Name
Set to Mouse X.
This must match the name of the input in the Unity input manager.
- Name
Set to Right Mouse Button. - Input Origin
Select Mouse. - Mouse Button
Set to 1. - Click Count
Set to 1. - Input Handling
Select Hold.
ScrollWheel
- Name
Set to ScrollWheel. - Input Origin
Select Unity Input Manager. - Input Name
Set to Mouse ScrollWheel. - Is Joypad Axis
Enable this setting. - Input Handling
Select Any.
That’s it for the input keys – click on Save Settings to save your changes.
Mouse Orbit Camera: Schematic
Now, we’ll create the schematic handling the camera control. The schematic will use some object variables that we’ll add to the camera to control the horizontal offset and zoom.
Navigate to Schematics, create a new schematic and change the following settings.
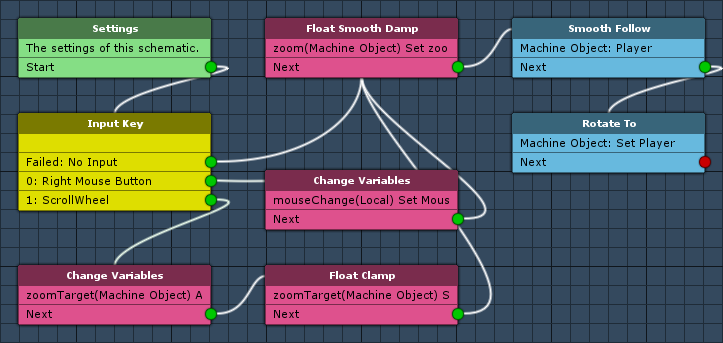
Input Key
Add > Input > Input Key
First, we’ll check if the right mouse button is held or the scroll wheel was used.
Click on Add Input Key to add a new input key check.
Input Key 0
- Input Key
Select Right Mouse Button.
Again, click on Add Input Key to add another check.
Input Key 1
- Input Key
Select ScrollWheel.
Change Variables
Add > Value > Variable > Change Variables
In case the right mouse button is held down, we’ll use this node to add the mouse movement to the horizontal offset (stored in the float object variable yOffset). Since the mouse movement alone is pretty slow, we’ll first store it in a local variable and multiply it by 10 before adding it to the offset.
This node is connected to the Right Mouse Button slot of the Input Key node.
Click on Add Variable to add a variable change.
Change Variable 0
- Change Type
Select Variable. - Variable Key
Set to mouseChange. - Variable Origin
Select Local. - Type
Select Float. - Operator
Select Set. - Float Value
Select Input Key Axis and Mouse X.
Copy the previous variable change and change the following settings.
Change Variable 1
- Operator
Select Multiply. - Float Value
Set to 10 (Value).
Click on Add Variable to add another variable change.
Change Variable 2
- Change Type
Select Variable. - Variable Key
Set to yOffset. - Variable Origin
Select Object. - Object
Select Machine Object. - Type
Select Float. - Operator
Select Add. - Float Value
Select Float Variable. - Variable Key
Set to mouseChange. - Variable Origin
Select Local.
Change Variables
Add > Value > Variable > Change Variables
In case the scroll wheel has been used, we’ll use this node to update the zoom target (float object variable we’ll use for smooth zooming).
This node is connected to the ScrollWheel slot of the Input Key node.
Click on Add Variable to add a variable change.
Change Variable 0
- Change Type
Select Variable. - Variable Key
Set to zoomTarget. - Variable Origin
Select Object. - Object
Select Machine Object. - Type
Select Float. - Operator
Select Add. - Float Value
Select Input Key Axis and ScrollWheel.
Float Clamp
Add > Value > Float > Float Clamp
After updating the zoom target, we’ll clamp it between 2 values to add minimum and maximum zoom the player can reach. To make things easy, we’ll just define values here – feel free to use variables to easily adjust the zoom limits (e.g. using local start variables).
Variable Settings
- Variable Key
Set to zoomTarget. - Variable Origin
Select Object. - Object
Select Machine Object. - Operator
Select Set.
Value
- Float Type
Select Float Variable. - Variable Key
Set to zoomTarget. - Variable Origin
Select Object. - Object
Select Machine Object.
Minimum Value
- Minimum Value
Set to 3 (Value).
Maximum Value
- Maximum Value
Set to 15 (Value).
Float Smooth Damp
Add > Value > Float > Float Smooth Damp
We’ll use this node for smooth zoom changes from the current zoom to the zoom target.
Since we’ll do this in any case, this node is connected to the Failed slot of the Input Key node and the Next slots of the Change Variables node (right mouse button) and Float Clamp node (scroll wheel).
Variable Settings
- Variable Key
Set to zoom. - Variable Origin
Select Object. - Object
Select Machine Object. - Operator
Select Set.
Current Value
- Float Type
Select Float Variable. - Variable Key
Set to zoom. - Variable Origin
Select Object. - Object
Select Machine Object.
Target Value
- Float Type
Select Float Variable. - Variable Key
Set to zoomTarget. - Variable Origin
Select Object. - Object
Select Machine Object.
Smooth Time
- Smooth Time
Set to 0.3 (Value).
Smooth Follow
Add > Movement > Movement > Smooth Follow
We’ll use this node to update the camera’s position, using the horizontal offset (yOffset) and zoom.
Move Object
- Object
Select Machine Object.
Follow Object
- Object
Select Player. - Smooth Rotation
Enable this setting.
Position Offset
- Vector3 Type
Select Set Axis. - X-Axis
Set to 0 (Value).
As Y-Axis, we’ll use the zoom.
- Float Type
Select Float Variable. - Variable Key
Set to zoom. - Variable Origin
Select Object. - Object
Select Machine Object.
As Z-Axis, we’ll use the negated zoom.
- Float Type
Select Float Variable. - Variable Key
Set to zoom. - Variable Origin
Select Object. - Object
Select Machine Object. - Math Function
Select Negate.
Y Rotation Offset
- Follow Y Rotation
Enable this setting. - Float Type
Select Float Variable. - Variable Key
Set to yOffset. - Variable Origin
Select Object. - Object
Select Machine Object.
Rotate To
Add > Movement > Rotation > Rotate To
We’ll use this node to let the camera look at the player. This will usually look at the feet of the player, but you can define a child object as target, e.g. the head or right shoulder.
Rotating Object
- Object
Select Machine Object. - Rotation Component
Select Auto.
Rotation Target Settings
- Rotation Target
Select Game Object. - Object
Select Player.
That’s it for the schematic – click on Save Schematic and save it e.g. as MouseOrbitCamera.
Camera Setup
Finally, we’ll need to add some components to the camera – the object variables component to store the used variables and a tick machine playing the schematic.
Select the camera’s game object in the scene.
Object Variables
Add an Object Variables component (e.g. using the component menu: Makinom > Scenes > Object Variables).
Change the following settings of the object variables component.
- Local Variables
Disable this setting. - Object ID
Set to camera.
Click on Add Variable to add a new variable to the object variables.
- Variable Key
Set to yOffset. - Type
Select float. - Operator
Select Set. - Float Value
Set to 0 (Value).
Copy the previous variable change and change the following settings.
- Variable Key
Set to zoom. - Float Value
Set to 5 (Value).
Again, copy the last variable and change the following settings.
- Variable Key
Set to zoomTarget.
Tick Machine
Add a tick machine component to the camera (e.g. using the component menu: Makinom > Machines > Tick Machine) and change the following settings.
Start Settings
- Late Update
Enable this setting.
Machine Execution Settings
- Asset Type
Select Schematics. - Schematics Asset
Select MouseOrbitCamera. - Execution Type
Select Single. - Update Type
Select Late Update.
And that’s it!