
Learn more about timelines and what you can use them for.
Timelines can be started by most machine components instead of schematics. They aren’t available for animation state machines or template machines. You can learn more about machines in this how-to.
Instead of playing a single schematic, a timeline can start multiple schematics, tagged machines and global machines based upon points in time relative to the start of the timeline’s machine. E.g. point 0 is the moment the machine starts, point 1.5 is 1.5 seconds after the machin’s start. Timelines can be used to create complex, time driven events – like cut-scenes, a nice series of explosion effects or spawning enemy waves.
Using Timelines
A timeline is unique for the machine component it’s used by and can’t be shared or saved as a separate asset like schematics. Timelines use game objects that are already present in the scene to start schematics/machines, so it may result in unstarted machines when using them in prefabs.
If you want to make a prefab out of a game object with a timeline, make sure to use game objects that are not selected from the scene, i.e. you should use the machine object, starting object, player or finding objects.
Since timelines can start tagged machines, you can use also use timelines to start other timelines (set up on tagged machines). This can be used to break down a complex timeline into several timelines handling different tasks.
E.g. a timeline is used to spawn enemy waves. Instead of using a single timeline, each wave is spawned in its own timeline.
- Enemy Wave A
Spawns enemies at 0, 1, 2 and 2.5 seconds. - Enemy Wave B
Spawns enemies at 0, 2.5, 5 and 10 seconds. - Enemy Wave C
Spawns enemies at 0, 2, 4, 6 and 8 seconds.
The timeline will start wave A at 5 seconds, wave B at 10 seconds and wave C at 30 seconds. By using timelines for the waves as well, you can adjust the start time of the waves without needing to adjust the individual enemy spawns as well.
Starting the timeline, enemies are spawned at (start wave A) 5, 6, 7, 7.5, (start wave B) 10, 12.5, 15, 20, (start wave C) 30, 32, 34, 36 and 38 seconds.
Points in Time
The timeline starts other machines based on points in time, and each point can have multiple events.
Events
An event can start a single schematic, tagged machine or global machine using two game objects, one as machine and one as starting game object.
The following game objects are available for selection:
- Machine Object
Uses the game object the of the timeline’s machine component. - Starting Object
Uses the game object that started the timeline’s machine (e.g. the player). - Game Object
Uses either a defined game object available in the scene, or searches for a game object by name, tag or attached component.
Searching for a game object can optionally be limited to a defined range around the timeline’s machine. - Player
Uses the player’s game object.
This requires for a game object to be set as player, e.g. using a Set Player node.
The schematic/machine will be started for all possible combinations of the selected machine and starting game object.
An event will start a schematic with the following objects:
- Machine Object
Uses Game Object and finds all game objects named Cube.
There are 5 game objects named Cube in the scene. - Starting Object
Uses Machine Object (i.e. the timeline’s machine).
The event will start 5 machines using the schematic. Once on each cube, using the timeline’s machine as starting object.
When starting schematics or tagged machines, the timeline can optionally share the Local Start Variables defined in the timeline’s machine component. Enable Set Start Variables in the event to share local start variables.
A schematic or tagged machine started by the timeline will initialize the local variables to the same values as the timeline’s machine, additionally to the local start variables defind in the schematic or tagged machine.
Example
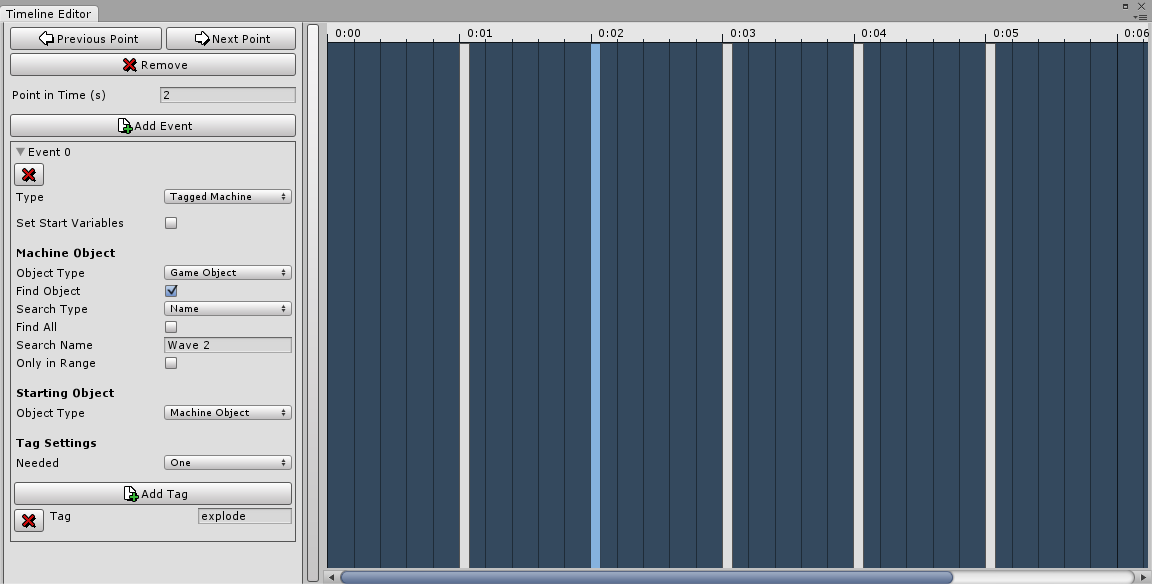
A timeline is used to time explosion effects in 3 waves, using 3 points in time.
- Point in Time 0
Finds all game objects named Wave 1 and uses them as machine objects for a schematic that plays the exposion effects. - Point in Time 2.5
Finds all game objects named Wave 2 and uses them as machine objects for a schematic that plays the exposion effects. - Point in Time 4.25
Finds all game objects named Wave 3 and uses them as machine objects for a schematic that plays the exposion effects.
Time timeline will play the explosion effect on all Wave 1 game objects at the start of the timeline. Wave 2 game objects will explode after 2.5 seconds and Wave 3 starts after 4.25 seconds.
There’s no extra setup needed on the wave game objects, the timeline will handle starting the machines. Additional explosions are easily added by just adding another game object named like one of the waves, and the explosion times can be adjusted as needed.
Timeline Editor
To use a timeline in a machine component, set the Asset Type to Timeline in the Machine Execution Settings. You can open the timeline editor by clicking on the Edit Timeline button.
The timeline editor is separated into two areas. The left side holds the settings for the currently selected Point in Time, the right side displays the points in time on the timeline.
Adding Points in Time
To add a new point in time, right-click on the timeline and select Add Point in the context menu. The new point in time will be added at the time you’ve clicked in the timeline.
By holding Shift while right-clicking, the new point in time will be snapped to the nearest nice time, based on the current zoom level (e.g. in zoom level 1s to the nearest 1/10th of a second, like 1.1 or 2.5).
Selecting Points in Time
A point in time can be selected by clicking on the point’s box in the timeline, or by clicking on the Previous Point or Next Point buttons in the settings area.
Removing Points in Time
To remove a point in time, either select it and click on the Remove button in the settings area, or right-click on the point in time in the timeline and select Remove Point in the context menu. When a point in time is selected, you can also remove it by pressing the Delete key.
Moving Points in Time
A point in time can be moved by left-clicking on it in the timeline and dragging it to the position you want to place it.
By holding Shift while releasing the mouse button, the time will be snapped to the nearest nice time, based on the current zoom level.
Zooming the Timeline
The timeline can be zoomed by either using the mouse scroll wheel, or by right-clicking and selecting the zoom level in the context menu. The smallest zoom level is 0.1 seconds, the largest 60 seconds.
The zoom level defines the time that is displayed beteween two time markers (the dark lines with the time label above). This influences the nice time snapping when moving and adding points in time. The time is snapped to the nearest line or center between two lines, i.e. there are 10 snap times available between two markers.