
Setting up the game over mechanic.
In this tutorial we’ll create a schematic to check the player’s food and end the game if the food is gone. Game over will display a dialogue and restart the game.
Check Game Over: Schematic
First, we’ll create the schematic to check and handle game over.
Open the Makinom editor, navigate to Schematics and create a new schematic. Change the following settings.
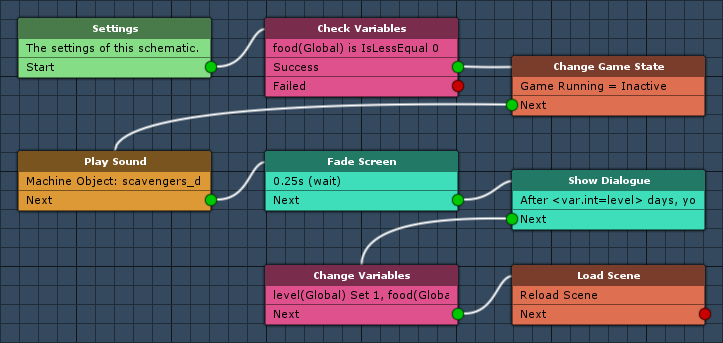
Check Variables
Add > Value > Variable > Check Variables
We’ll use this node to check if the player’s food is gone.
Click on Add Variable to add a variable condition.
- Condition Type
Select Variable. - Variable Key
Set to food. - Variable Origin
Select Global. - Is Valid
Enable this setting. - Exists
Enable this setting. - Type
Select Int. - Check Type
Select Is Less Equal. - Check Value
Set to 0 (Value).
Change Game State
Add > Game > Game > Change Game State
We’ll use this node to start stop the game from running.
Click on Add Game State to add a game state change.
- Game State
Select Game Running. - Set State
Select Inactive.
Play Sound
Add > Animation + Audio > Audio > Play Sound
We’ll use this node to play a death sound.
Play On
- Object
Select Machine Object.
Audio Settings
- Audio Clip
Select Select Audio Clip and scavengers_die.
The audio clip can be found at Assets/Tutorial Resources/Audio/. - Play One Shot
Enable this setting. - Volume
Set to 1.
Fade Screen
Add > UI > Fade Screen
Now it’s time to fade in the screen.
- Wait
Enable this setting. - Time (s)
Set to 0.25. - Fade Alpha
Enable this setting. - Start Color
Select a black color without alpha (R=0, G=0, B=0, A=0). - End Color
Select a black color with full alpha (R=0, G=0, B=0, A=255).
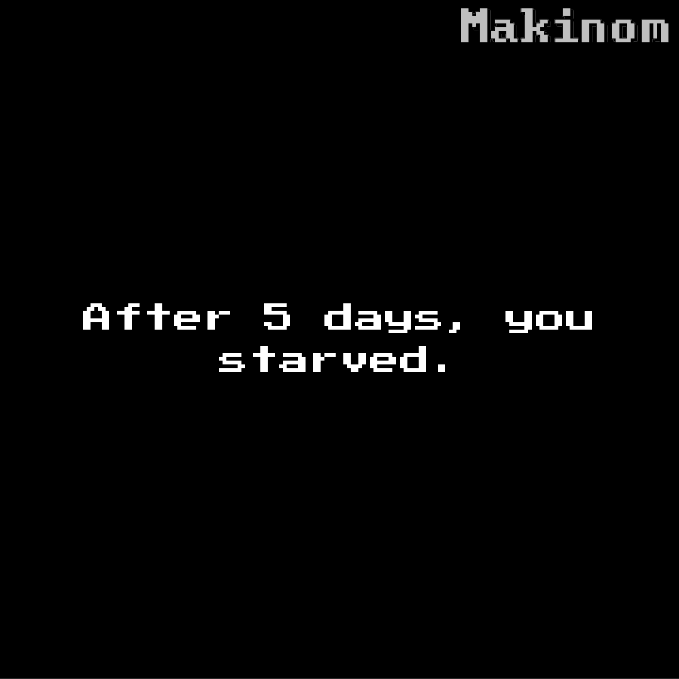
Show Dialogue
Add > UI > Dialogue > Show Dialogue
This node is used to show a dialogue. We’ll use it to display the current day (level).
- Dialogue Type
Select Auto Close.
The dialogue will close automatically after some time. - GUI Box
Select Message. - Message (English)
Set to:
After <var.int=level> days, you starved. - Block Accept Button
Enable this setting. - Close After (s)
Set to 3. - Wait
Enable this setting.
Change Variables
Add > Value > Variable > Change Variables
We’ll use this node to reset the level to 1 and the food to 100.
Click on Add Variable to add a variable change.
- Change Type
Select Variable. - Variable Key
Set to level. - Variable Origin
Select Global. - Type
Select Int. - Operator
Select Set. - Float Value
Set to 1 (Value).
Copy the previous variable and change the following settings.
- Variable Key
Set to food. - Float Value
Set to 100 (Value).
Load Scene
Add > Game > Scene > Load Scene
We’ll use this node to reload the current scene – which will start generating a new level.
- Reload Scene
Enable this setting. - Position Type
Select None. - Fade Out
Disable this setting.
The screen is already faded out. - Fade In
Disable this setting.
Fading in will be handled by the BoardManager schematic, fading in the screen after the level has been set up (and the Day X message).
That’s it for the schematic – click on Save Schematic and save it as CheckGameOver in Assets/Schematics/.
Check Game Over: Tagged Machine
Finally, we’ll add the game over mechanic to the Player game object in the scene using a tagged machine. The machine will be started by enemy attacks and consuming food per turn.
Add a tagged machine component to the player (e.g. using the component menu: Makinom > Machines > Tagged Machine) and change the following settings.
Start Settings
Click on Add Starting Tag to add a tag that can start this machine.
- Starting Tag
Set to checkGameOver.
Machine Execution Settings
- Asset Type
Select Schematic. - Schematic Asset
Select CheckGameOver. - Execution Type
Select Single. - Update Type
Select Update.
And that’s it – apply the changes to the player’s prefab by clicking on Apply (top of the inspector).
Don’t forget to save the scene.
Testing
Click on Play to test the game. You’ll now be able to die when running out of food.
This concludes the 2D roguelike game tutorial series. You can add additional content to the game, e.g. bigger levels (setting columns and rows in the machine starting the BoardManager schematic) or power ups for the player to chop through walls faster (changing the global variable wallDamage).