
Setting up the bomb prefabs and adding bomb laying to player controls.
In this tutorial we’ll set up the bomb crate and bomb prefabs, and add laying bomb to the player control schematic.
Bomb Crate Prefab
First, we’ll set up the bombCrate prefab – the setup is similar to the health crate. We’ll add an object variable component, a trigger machine (BombPickup schematic), and 2 tagged machines (BombExplosion when being hit by a rocket, CrateLand when the crate lands on the ground). The bombCrate prefab can be found at Assets/Tutorial Resources/Prefabs/Pickups/.
We’ll add the components to the crate child object of the bombCrate prefab.
Object Variables
Add an object variable component to the prefab (e.g. using the component menu: Makinom > Scenes > Object Variables) and change the following settings.
- Local Variables
Enable this setting. - Always Initialize
Enable this setting.
Click on Add Variable to add an object variable. This variable will store the amount of health that will be restored if the pickup is collected.
- Variable Key
Set to bombCount.
Select the Value string type. - Type
Select Int. - Operator
Select Set. - Float Value
Set to 1 (Value).
Bomb Pickup: Trigger Machine
Next, we’ll add a trigger machine that will handle the bomb pickup by the player (or landing the crate if it’s not the player). Add a trigger machine component to the prefab (e.g. using the component menu: Makinom > Machines > Trigger Machine) and change the following settings.
Start Settings
- Trigger Enter
Enable this setting. - Start By Other
Enable this setting.
Machine Execution Settings
- Asset Type
Select Schematic. - Schematic Asset
Select BombPickup. - Execution Type
Select Single. - Update Type
Select Update.
Bomb Explosion: Tagged Machine
In case the crate is hit by a rocket, we need it to explode – so we’ll add the BombExplosion schematic with a tagged machine.
Add a tagged machine component to the prefab (e.g. using the component menu: Makinom > Machines > Tagged Machine) and change the following settings.
Start Settings
Click on Add Tag to add a starting tag
- Tag
Set to rocketHit.
Machine Execution Settings
- Asset Type
Select Schematic. - Schematic Asset
Select BombExplosion. - Execution Type
Select Single. - Update Type
Select Update.
Local Start Variables
- Set Start Variables
Enable this setting.
Click on Add Variable to add a start variable.
- Variable Key
Set to radius. - Type
Select to Float. - Operator
Select Set. - Float Value
Set to 10 (Value).
Land Crate: Tagged Machine
Finally, we’ll add a tagged machine that will handle landing the crate. Add a tagged machine component to the prefab (e.g. using the component menu: Makinom > Machines > Tagged Machine) and change the following settings.
Start Settings
Click on Add Tag to add a starting tag
- Tag
Set to land.
Machine Execution Settings
- Asset Type
Select Schematic. - Schematic Asset
Select LandCrate. - Execution Type
Select Single. - Update Type
Select Update.
That’s it for the bomb crate – we don’t need to apply the changes, since we’ve worked on the prefab directly.
Bomb Prefab
Next, we’ll set up the bomb prefab – we’ll only need an auto machine handling the BombExplosion schematic. The bomb will explode automatically after it was laid by the player. You can find the bomb prefab at Assets/Tutorial Resources/Prefabs/Pickups/.
Add an auto machine component to the prefab (e.g. using the component menu: Makinom > Machines > Auto Machine) and change the following settings.
Start Settings
- Start
Enable this setting. - Start Delay (s)
Set to 1.5.
Machine Execution Settings
- Asset Type
Select Schematic. - Schematic Asset
Select BombExplosion. - Execution Type
Select Single. - Update Type
Select Update.
Local Start Variables
- Set Start Variables
Enable this setting.
Click on Add Variable to add a start variable.
- Variable Key
Set to radius. - Type
Select to Float. - Operator
Select Set. - Float Value
Set to 10 (Value).
That’s it for the bomb – we don’t need to apply the changes, since we’ve worked on the prefab directly.
Player Control: Updating the Schematic
Finally, we’ll add the lay bomb controls to the PlayerControl schematic – you probably have saved it in Assets/Schematics/ if you’ve followed the tutorial.
You can open the schematic directly by double clicking on it or by clicking on the Edit Schematic button in the inspector (when the schematic is selected).
Settings
First, we’ll add the bomb prefab to the schematic.
Prefabs
Click on Add Prefab Resource to add 2nd prefab resource.
- Name
Set to Bomb. - Prefab
Select bomb.
Can be found at Assets/Tutorial Resources/Prefabs/.
Now, we’ll change to layer 3 (Bomb) that we added as a last step when adding the rocket fire controls
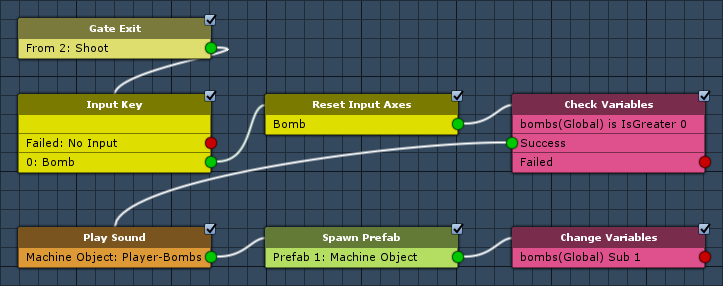
The following nodes are placed in layer 3: Bomb. In this layer, we’ll handle the player laying bombs.
Input Key
Add > Input > Input Key
We’ll use this node to check if the player pressed the Bomb input key.
This node is connected to the Next slot of the Gate Exit from layer 2.
- Input Key
Select Bomb.
Reset Input Axes
Add > Input > Reset Input Axes
Since we’re running this in a Fixed Update tick machine, it’s possible that it’ll run more than once per frame. To prevent laying multiple bombs, we’ll reset the Bomb input key.
This node is connected to the Bomb slot of the Input Key node.
- Reset All
Disable this setting. - Input Key
Select Bomb.
Check Variables
Add > Value > Variable > Check Variables
We’ll use this node to check if the player has bombs.
Click on Add Variable to add a variable change.
- Condition Type
Select Variable. - Variable Key
Set to bombs. - Variable Origin
Select Global. - Is Valid
Enable this setting. - Exists
Enable this setting. - Type
Select Int. - Check Type
Select Is Greater. - Check Value
Set to 0 (Value).
Play Sound
Add > Animation + Audio > Audio > Play Sound
We’ll use this node to play a sound on the player.
This node is connected to the Success slot of the Check Variables node.
Play On
- Object
Select Machine Object.
Audio Settings
- Audio Clip
Select Select Audio Clip and Player-BombsAway. - Wait
Disable this setting. - Play One Shot
Enable this setting. - Volume
Set to 1.
Spawn Prefab
Add > Game Object > Prefab > Spawn Prefab
We’ll use this node to spawn the bomb prefab and play an audio clip on it.
- Prefab
Select Prefab 1: Bomb. - Target Type
Select Object.
Target Object
- Object
Select Machine Object.
Audio Settings
- Play Audio
Enable this setting. - Audio Clip
Select Select Audio Clip and bombFuse. - Play One Shot
Enable this setting. - Volume
Set to 1.
Change Variables
Add > Value > Variable > Change Variables
Finally, we’ll reduce the bombs of the player by 1.
Click on Add Variable to add a variable change.
- Change Type
Select Variable. - Variable Key
Set to bombs. - Variable Origin
Select Global. - Type
Select Int. - Operator
Select Sub. - Float Value
Set to 1 (Value).
And that’s it – click on Save Schematic to save the changes.
Testing
If you want to test your bombs, just drag a bomb crate prefab into the scene and click on Play. The bomb crate will float down and land on the ground – the player can pick it up on the ground or in the air. After picking up the bomb, the player can lay a bomb using the Bomb key, or shoot on the crate to explode it.
The next tutorial will handle the pickup spawner.