
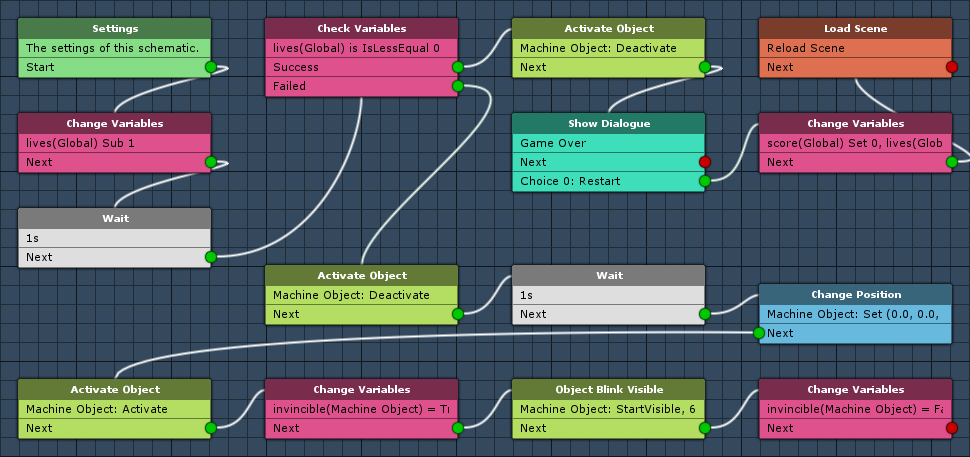
Setting up a schematic to handle the player’s destruction.
While the player is already destroyed in a nice explosion, we’ll need additional game logic when that happens. The player’s lives must be reduced – if he still has lives left, he’ll need to respawn, otherwise game over needs to be called.
We’ll handle this in another schematic that’ll be called by a tagged machine on the player, just like the Destroy schematic.
Player Destroyed: Schematic
Open the Makinom editor, navigate to Schematics and create a new schematic. Change the following settings.
Change Variables
Add > Value > Variable > Change Variables
We’ll reduce the player’s live (global int variable lives) here. Click on Add Variable to add a variable change.
- Change Type
Select Variable. - Variable Key
Set to lives. - Variable Origin
Select Global. - Type
Select Int. - Operator
Select Sub. - Float Value
Set to 1 (Value).
Wait
Add > Base > Wait
We’ll wait for 1 second here – this will give the Destroy schematic enough time to finish.
- Time (s)
Set to 1.
Check Variables
Add > Value > Variable > Check Variables
Now, we’ll check if the player has used up all lives. Click on Add Variable to add a variable condition.
- Condition Type
Select Variable. - Variable Key
Set to lives. - Variable Origin
Select Global. - Is Valid
Enable this setting. - Type
Select Int. - Check Type
Select Is Less Equal. - Float Value
Set to 0 (Value).
Next, we’ll handle the game over case, i.e. the player used all lives.
Activate Object
Add > Game Object > Game Object > Activate Object
We’ll deactivate the player’s game object.
This node is connected to the Success slot of the Check Variables node.
- Set Active
Disable this setting. - Object
Select Machine Object.
Show Dialogue
Add > UI > Dialogue > Show Dialogue
This node will display a dialogue using a GUI box. We’ll display the game over message as a choice dialogue.
- Dialogue Type
Select Choice. - GUI Box
Select Game Over. - Message (English)
Set to:
Game Over
Click on Add Choice to add a choice. We’ll display a single choice for the player to restart the game.
- Choice Text (English)
Set to:
Restart
Change Variables
Add > Value > Variable > Change Variables
We’ll reset the score to 0 and the lives to 3. Click on Add Variable to add a variable change.
This node is connected to the Choice 0 slot of the Show Dialogue node.
- Change Type
Select Variable. - Variable Key
Set to score. - Variable Origin
Select Global. - Type
Select Int. - Operator
Select Set. - Float Value
Set to 0 (Value).
Copy the variable change and change the following settings.
- Variable Key
Set to lives. - Float Value
Set to 3 (Value).
Load Scene
Add > Game > Scene > Load Scene
This node will load a scene. We’ll use it to reload the current scene.
- Reload Scene
Enable this setting. - Load Type
Select Load Level. - Position Type
Select None.
Since we already have the player in our scene, we don’t need Makinom to spawn the game object.
The default settings for the screen fade out and fade in will be enough for our little game.
Next, we’ll handle the respawn case, i.e. the player still has some lives left.
Activate Object
Add > Game Object > Game Object > Activate Object
We’ll deactivate the player’s game object.
This node is connected to the Failed slot of the Check Variables node.
- Set Active
Disable this setting. - Object
Select Machine Object.
Wait
Add > Base > Wait
We’ll wait for 1 second before respawning.
- Time (s)
Set to 1.
Change Position
Add > Movement > Movement > Change Position
This node will set a game object’s position (or move it there over time). We’ll place the player back at the starting position.
Moving Object
- Object
Select Machine Object. - Movement Component
Select Transform.
Target Position
- To Object
Disable this setting. - Vector3 Type
Select Value. - Value
Set to X=0, Y=0, Z=0.
Activate Object
Add > Game Object > Game Object > Activate Object
Now, we’ll activate the player’s game object again.
- Set Active
Enable this setting. - Object
Select Machine Object.
Change Variables
Add > Value > Variable > Change Variables
We’ll set the bool object variable invincible to make the player invincible after respawn. Click on Add Variable to add a variable change.
- Change Type
Select Variable. - Variable Key
Set to invincible. - Variable Origin
Select Object. - Object
Select Machine Object. - Type
Select Bool. - Bool Value
Enable this setting.
Object Blink Visible
Add > Game Object > Renderer > Object Blink Visible
This node will blink a game object’s visibility, i.e. it will enable/disable all renderers and projectors. We’ll blink the player’s game object 6 times (i.e. 3x invisible-visible, one blink is changing from visible to invisible or invisible to visible).
- Start Visible
Enable this setting.
The blinking starts in the visible state. - Object
Select Machine Object. - Wait
Enable this setting. - Blink Count
Set to 6 (Value). - Visible Time (s)
Set to 0.25 (Value). - Invisible Time (s)
Set to 0.25 (Value).
Change Variables
Add > Value > Variable > Change Variables
We’ll disable invincible after blinking the player’s game object. Click on Add Variable to add a variable change.
- Change Type
Select Variable. - Variable Key
Set to invincible. - Variable Origin
Select Object. - Object
Select Machine Object. - Type
Select Bool. - Bool Value
Disable this setting.
And that’s it for the schematic – click on Save Schematic and save it as PlayerDestroyed in Assets/Schematics/.
Player Destroyed: Tagged Machine
Now we’ll add the schematic with a tagged machine to the player’s game object. The tagged machine will be started by the same tag (destroy) as the already added machine, so it will be triggered by the Hit schematic as well.
Since the Destroy schematic will disable the game object, we’ll need to make sure that the PlayerDestroyed schematic is started before that. For this, we’ll need to place the new tagged machine above the Destroy tagged machine.
Select the Player game object in the scene and scroll down in the inspector to the already added tagged machine (using the Destroy schematic). Instead of adding a new tagged machine from scratch, we’ll just copy the one we already have and change the schematic. Right-click on the tagged machine’s name and select Copy Component in the context menu. Right-click on the name again and select Paste Component As New. Now the Destroy tagged machine is added twice.
Change the following settings on the first (i.e. upper) tagged machine.
Machine Execution Settings
- Schematic Asset
Select PlayerDestroyed.
And that’s it – don’t forget to save the scene and apply the changes to the player’s prefab.
Testing
Click on Play to test the game. Now, the player will lose lives when destroyed. When the last live was lost, the game over dialogue will be displayed – reloading the scene when accepted.

The next lesson will handle the enemy ship mechanics.