
Setting up the player’s movement controls.
In this tutorial we’ll do the basic player setup and create a schematic to control the movement.
Basic Player Setup
The player’s basic setup involves adding object variables to store the player’s attributes and adding a simple schematic to set the player. Place the Player prefab (found at Assets/Tutorial Resources/Prefabs/) in the scene and position it at X=0, Y=0, Z=0.
Object Variables
First, we’ll add object variables to the player’s game object. Add an Object Variables component (e.g. using the component menu: Makinom > Scenes > Object Variables).
Change the following settings of the object variables component.
- Local Variables
Disable this setting. - Object ID
Set to player. - Always Initialize
Enable this setting.
Click on Add Variable to add a new variable to the object variables. This variable will be used to store the player’s health. When the health reaches 0, the player’s ship will be destroyed.
- Variable Key
Set to health. - Type
Select Int. - Operator
Select Set. - Float Value
Set to 1 (Value).
Again, click on Add Variable. This variable will be used to store the player’s fire rate (i.e. time between shots).
- Variable Key
Set to fireRate. - Type
Select Float. - Operator
Select Set. - Float Value
Set to 0.25 (Value).
Setting Player Schematic
Now, we’ll use a schematic to set the player when the level starts and add it with an Auto Machine component.
Follow the steps in this schematic tutorial – it explains how to create the schematic and add an auto machine to the game object.
Player Mover: Schematic
Next, we’ll create a schematic to handle the player’s movement control. Open the Makinom editor, navigate to Schematics and create a new schematic. There are is no additional setup needed in the schematic’s Settings.
The player’s game object will be moved by changing the Rigidbody component’s velocity. Additionally, we’ll tilt the game object according to the horizontal movement.
Please note that the machine component used to play the schematic will set up some of the used local variables.
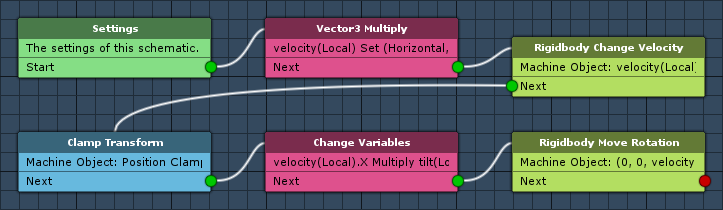
Settings
We’ll set up local variables as Machine Start Variables for easy setup in the machine component at a later time. When using the schematic in a machine component, the defined start variables will be added automatically, using their default values.
Machine Start Variables
Click on Add Start Variable to add a local start variable that will be exposed to the machine component’s inspector.
- Variable Key
Set to speed. - Type
Select Float. - Default Value
Set to 10.
Copy the previous start variable and change the following settings.
- Variable Key
Set to tilt. - Default Value
Set to –5.
Again, copy the previous start variable and change the following settings.
- Variable Key
Set to xMin. - Default Value
Set to -6.
Again, copy the previous start variable and change the following settings.
- Variable Key
Set to xMax. - Default Value
Set to 6.
Again, copy the previous start variable and change the following settings.
- Variable Key
Set to zMin. - Default Value
Set to -4.
Again, copy the previous start variable and change the following settings.
- Variable Key
Set to zMax. - Default Value
Set to 8.
Vector3 Multiply
Add > Value > Vector > Vector3 Multiply
This node will multiply a Vector3 value with a float value and store it into a Vector3 variable.
We’ll use the player’s input as a Vector3 value, multiply it by the movement speed (will be defined as start variable in the machine component) and store it into a local Vector3 variable. This will be the velocity used to move the player’s game object.
Variable Settings
The Variable Settings define where the Vector3 value will be stored.
- Variable Key
Set to velocity. - Variable Origin
Select Local. - Operator
Select Set.
Vector3 Value
Now, we’ll define the Vector3 value using the player’s input.
- Vector3 Type
Select Set Axis.
This allows us to individually define the X, Y and Z axis if the Vector3. - X-Axis
Select Input Key Axis and Horizontal. - Y-Axis
Set to 0 (Value). - Z-Axis
Select Input Key Axis and Vertical.
Multiply By
Finally, we’ll multiply the defined Vector3 value by a float value, using a local variable.
- Multiply By
Select Float Variable. - Variable Key
Set to speed. - Variable Origin
Select Local.
Rigidbody Change Velocity
Add > Game Object > Rigidbody > Rigidbody Change Velocity
This node will set the velocity of a rigidbody component. We’ll set the player’s velocity to the Vector3 value we’ve just stored into the local Vector3 variable velocity.
Rigidbody Object
- Object
Select Machine Object.
Velocity
- Vector3 Type
Select Vector3 Variable. - Variable Key
Set to velocity. - Variable Origin
Select Local.
Clamp Transform
Add > Movement > Movement > Clamp Transform
This node will make sure the player’s position stays within a defined area. We’ll use local float variables defined as start variables in the machine component for that.
Clamp Object
- Object
Select Machine Object. - Value Origin
Select Position.
We’ll clamp the position of the game object.
Clamp X-Axis
- Clamp X-Axis
Enable this setting. - X-Axis Minimum
Select Float Variable. - Variable Key (X-Axis Minimum)
Set to xMin. - Variable Origin (X-Axis Minimum)
Select Local. - X-Axis Maximum
Select Float Variable. - Variable Key (X-Axis Maximum)
Set to xMax. - Variable Origin (X-Axis Maximum)
Select Local.
Clamp Z-Axis
- Clamp Z-Axis
Enable this setting. - Z-Axis Minimum
Select Float Variable. - Variable Key (Z-Axis Minimum)
Set to zMin. - Variable Origin (Z-Axis Minimum)
Select Local. - Z-Axis Maximum
Select Float Variable. - Variable Key (Z-Axis Maximum)
Set to zMax. - Variable Origin (Z-Axis Maximum)
Select Local.
Change Variables
Add > Value > Variable > Change Variables
This node will change variables. We’ll multiply the X-axis of the velocity by the local float variable tilt (start variable).
Click on Add Variable to add a variable change.
- Change Type
Select Variable.
We’ll directly define a variable change. - Variable Key
Select velocity. - Variable Origin
Select Local. - Type
Select Axis Vector3.
This allows to change an individual axis of a Vector3 variable. - Axis
Select X. - Operator
Select Multiply. - Float Value
Select Float Variable. - Variable Key
Set to tilt. - Variable Origin
Select Local.
Rigidbody Move Rotation
Add > Game Object > Rigidbody > Rigidbody Move Rotation
This node will rotate the rigidbody. We’ll only rotate it on the Z-axis, using the X-axis of the velocity variable.
Rigidbody Object
- Object
Select Machine Object.
Rotation
- Vector3 Type
Select Set Axis. - X-Axis
Set to 0 (Value). - Y-Axis
Set to 0 (Value). - Z-Axis
Select Vector3 Variable and X. - Variable Key
Set to velocity. - Variable Origin
Select Local.
And that’s it for the schematic – click on Save Schematic and save it as PlayerMover in Assets/Schematics/.
Player Mover: Tick Machine
The player is moved using a Rigidbody component, i.e. we’ll need to Fixed Update for the physics updates.
Add a Tick Machine component to the player’s game object (e.g. using the component menu: Makinom > Machines > Tick Machine). Change the following settings.
Start Settings
- Fixed Update
Enable this setting.
The machine will be started in the fixed framerate frame.
Machine Execution Settings
- Asset Type
Select Schematic. - Schematic Asset
Select PlayerMover. - Execution Type
Select Single.
The machine can only be executed once at a time. - Update Type
Select Fixed Update.
Local Start Variables
The Machine Start Variables we’ve set up in the schematic are automatically added here with their default values – since the default values are already what we need, we don’t have more to do here. Make sure all variables are enabled.
And that’s it for now – apply the changes to the prefab by clicking on Apply (top of the inspector).
Testing
Click on Play to test the game. You’ll be able to move the player around in a limited area of the screen.
The next tutorial will handle the player weapon controls.