
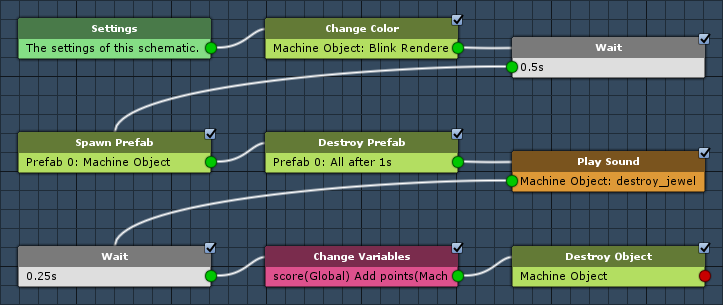
Setting up the schematic to handle the destruction of a jewel.
In this tutorial we’ll create the schematic that’s started (by a tagged machine on the individual jewels) when a jewel is destroyed. It’ll handle animating the destruction (blinking and spawning a particle effect), increasing the player’s score (the points of each jewel are stored in an object variable on the jewel) and destroying the game object.
In case you want to add special jewels (e.g. destroying a whole row/column or all nearby jewels), this is where you’d add the functionality, either directly in this schematic or creating new schematic and using them in the tagged machine on the jewel.
Destroy Jewel: Schematic
Open the Makinom editor, navigate to Schematics and create a new schematic. Change the following settings.
Settings
We need a prefab resource for the particle effect.
Prefabs
Click on Add Prefab Resource to add a prefab resource.
- Prefab
Select Destroy Particles.
The prefabs can be found at Assets/Tutorial Resources/Prefabs/.
Change Color
Add > Game Object > Renderer > Change Color
We’ll use this node to start blinking the object by fading it’s alpha (color) value.
- Color Type
Select Renderer. - Fade
Select Blink. - Wait
Disable this setting. - Time (s)
Set to 0.25 (Value). - Fade Alpha
Enable this setting. - Fade Red/Green/Blue
Disable these settings. - Start Color
Set to R=0, G=0, B=0, A=255. - End Color
Set to R=0, G=0, B=0, A=0.
Game Object
- Object
Select Machine Object.
Wait
Add > Base > Wait
We’ll wait for 0.5 seconds to give the game object some time for blinking.
- Time (s)
Set to 0.5 (Value).
Spawn Prefab
Add > Game Object > Prefab > Spawn Prefab
Now, we’ll spawn the particle effect.
- Prefab
Select Prefab 0: Destroy Particles. - Target Type
Select Object.
Target Object
- Object
Select Machine Object.
Destroy Prefab
Add > Game Object > Prefab > Destroy Prefab
Next, we’ll destroy the particle effect (after 1 second).
- Prefab
Select Prefab 0: Destroy Particles. - Spawned Prefab ID
Set to -1.
This will destroy all spawned instances of the prefab. - Destroy After Time
Enable this setting. - Time (s)
Set to 1. - Wait
Disable this setting.
Play Sound
Add > Animation + Audio > Audio > Play Sound
We’ll play a destruction sound.
Play On
- Object
Select Machine Object. - Use Root
Enable this setting.
Since the machine object is a cell’s game object, the root is the grid’s root game object.
We’re using this, because the machine object will be destroyed shortly (stopping the sound), and to prevent potentially dozen of sounds being played.
Audio Settings
- Use Sound Type
Disable this setting. - Audio Clip
Select Select Audio Clip and destroy_jewel.
The audio clip can be found at Assets/Tutorial Resources/Audio/. - Wait
Disable this setting.
Wait
Add > Base > Wait
We’ll wait for 0.25 seconds for the particle effect and audio to play a bit before destroying the game object. Also, this allows the blinking to fade from full alpha to no alpha (due to blink duration of 0.25 and already having waited for 0.5 seconds).
- Time (s)
Set to 0.25 (Value).
Change Variables
Add > Value > Variable > Change Variables
We’ll use this node to increase the player’s score (global int variable) by the points of the jewel (local int variable).
Click on Add Variable to add a variable change.
- Change Type
Select Variable. - Variable Key
Set to score. - Variable Origin
Select Global. - Type
Select Int. - Operator
Select Add. - Float Type
Select Int Variable. - Variable Key
Set to points. - Variable Origin
Select Object. - Object
Select Machine Object.
Destroy Object
Add > Game Object > Game Object > Destroy Object
Finally, we’ll destroy the machine object (jewel).
Destroy Object
- Object
Select Machine Object.
And that’s it for the schematic – click on Save Schematic and save it as DestroyJewel in Assets/Schematics/.
The next tutorial will handle the game controls.