
Setting up the bricks.
In this tutorial we’ll set up 2 schematics for counting and destroying the bricks. Destroying a brick will additionally check if all bricks have been destroyed and display a victory notification in that case.
Bricks will have a health, i.e. we can control how many times a brick has to be hit by the ball to be destroyed – the health will be stored in the object int variable health. We’ll set up 3 different bricks.
Brick Count: Schematic
First, we’ll create the schematic to count the bricks. This schematic will be added to the bricks and simply increase the global int variable bricks by 1. We could also just set the global variable to the number of bricks when starting the game, but this would result in having to adjust it each time we change the number of bricks (e.g. in additional levels). By having the bricks count themselfs when the level starts, we don’t need to manually do this for each level.
Open the Makinom editor, navigate to Schematics and create a new schematic. Change the following settings.

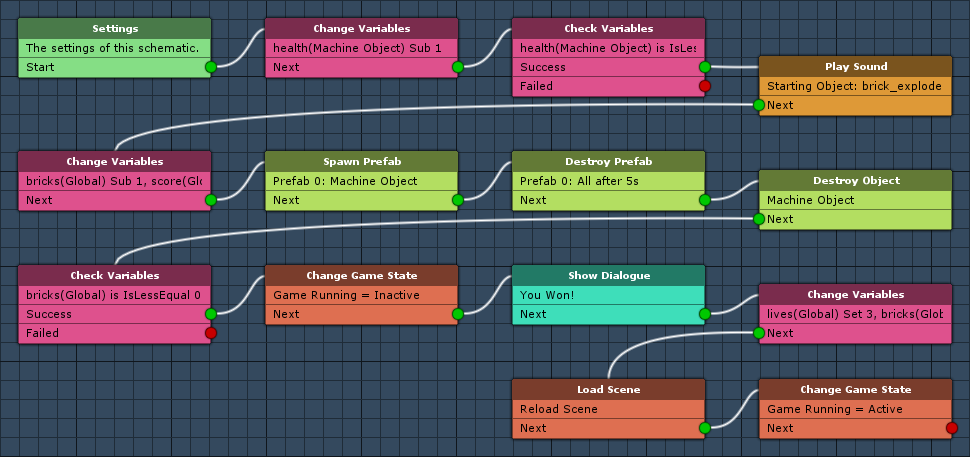
Change Variables
Add > Value > Variable > Change Variables
We’ll use this node to increase the global variable bricks by 1.
Click on Add Variable to add a variable change.
- Change Type
Select Variable. - Variable Key
Set to bricks. - Variable Origin
Select Global. - Type
Select Int. - Operator
Select Add. - Float Value
Set to 1 (Value).
That’s it for this schematic – click on Save Schematic and save it as BrickCount in Assets/Schematics/.
Brick: Schematic
Next, we’ll create the schematic handling the destruction of the brick. After the brick is destroyed (when the health was reduced to 0), it’ll check if all bricks have been destroyed. If all bricks are destroyed, a victory notification is displayed and the level is reloaded.
Create a new schematic and change the following settings.
Settings
A particle effect should be displayed when a brick is destroyed, we’ll add it as a prefab.
Prefabs
Click on Add Prefab Resource to add a prefab resource.
- Prefab
Select Brick Particles.
Change Variables
Add > Value > Variable > Change Variables
We’ll use this node to reduce the health of the brick by 1.
Click on Add Variable to add a variable change.
- Change Type
Select Variable. - Variable Key
Set to health. - Variable Origin
Select Object. - Object
Select Machine Object. - Type
Select Int. - Operator
Select Sub. - Float Value
Set to 1 (Value).
Check Variables
Add > Value > Variable > Check Variables
We’ll use this node to check if the health has reached 0.
Click on Add Variable to add a variable condition.
- Condition Type
Select Variable. - Variable Key
Set to health. - Variable Origin
Select Object. - Object
Select Machine Object. - Is Valid
Enable this setting. - Exists
Enable this setting. - Type
Select Int. - Check Type
Select Is Less Equal. - Check Value
Set to 0 (Value).
Play Sound
Add > Animation + Audio > Audio > Play Sound
We’ll use this node to play an explosion sound effect when the brick is destroyed.
This node is connected to the Success slot of the previous Check Variables node (i.e. the health has reached 0).
Play On
- Object
Select Starting Object.
We’ll play the sound on the starting object (i.e. the ball), because the machine object (the brick) will be destroyed, which would stop the sound.
Audio Settings
- Audio Clip
Select Select Audio Clip and brick_explode. - Wait
Disable this setting. - Play One Shot
Enable this setting. - Volume
Set to 1.
Change Variables
Add > Value > Variable > Change Variables
Now that the brick is destroyed, we’ll reduce the number of bricks and increase the player’s score. The points the player earns for a brick is stored in the object int variable points.
Click on Add Variable to add a variable change.
- Change Type
Select Variable. - Variable Key
Set to bricks. - Variable Origin
Select Global. - Type
Select Int. - Operator
Select Sub. - Float Value
Set to 1 (Value).
Copy the previous variable change and change the following settings.
- Variable Key
Set to score. - Operator
Select Add. - Float Type
Select Int Variable. - Variable Key
Set to points. - Variable Origin
Select Object. - Object
Select Machine Object.
Spawn Prefab
Add > Game Object > Prefab > Spawn Prefab
We’ll use this step to spawn the particle effect.
- Prefab
Select Prefab 0: Brick Particles. - Target Type
Select Object.
Target Object
- Object
Select Machine Object.
Destroy Prefab
Add > Game Object > Prefab > Destroy Prefab
Next, we’ll destroy the prefab after 5 seconds.
- Prefab
Select Prefab 0: Brick Particles. - Spawned Prefab ID
Set to -1. - Destroy After Time
Enable this setting. - Time (s)
Set to 5. - Wait
Disable this setting.
Destroy Object
Add > Game Object > Game Object > Destroy Object
We’ll use this node to destroy the brick (machine object). We’ll need to disable Stop On Destroy in the Collision Machine used to play this schematic to prevent it from being stopped here.
- Object
Select Machine Object.
Check Variables
Add > Value > Variable > Check Variables
Now, we’ll check if all bricks have been destroyed.
Click on Add Variable to add a variable condition.
- Condition Type
Select Variable. - Variable Key
Set to bricks. - Variable Origin
Select Global. - Is Valid
Enable this setting. - Exists
Enable this setting. - Type
Select Int. - Check Type
Select Is Less Equal. - Check Value
Set to 0 (Value).
Change Game State
Add > Game > Game > Change Game State
All bricks have been destroyed – we’ll use this node to set Game Running to Inactive.
This node is connected to the Success slot of the previous Check Variables node (i.e. all bricks have been destroyed).
Click on Add Game State to add a state change.
- Game State
Select Game Running. - Set State
Select Inactive.
Show Dialogue
Add > UI > Dialogue > Show Dialogue
We’ll use this node to display a victory notification to the player. It’ll be displayed for 3 seconds and automatically close afterwards.
- Dialogue Type
Select Auto Close. - GUI Box
Select Message. - Message
Set to:
You Won!
Auto Close Settings
- Block Accept Button
Enable this setting. - Close After (s)
Set to 3. - Wait
Enable this setting.
Change Variables
Add > Value > Variable > Change Variables
Before reloading the level, we’ll reset the global variables used for the game (lives to 3, bricks to 0, ballInPlay to false).
Click on Add Variable to add a variable change.
- Change Type
Select Variable. - Variable Key
Set to lives. - Variable Origin
Select Global. - Type
Select Int. - Operator
Select Set. - Float Value
Set to 3 (Value).
Copy the previous variable change and change the following settings.
- Variable Key
Set to bricks. - Float Value
Set to 0 (Value).
Click on Add Variable again to add another variable change.
- Change Type
Select Variable. - Variable Key
Set to ballInPlay. - Variable Origin
Select Global. - Type
Select Bool. - Bool Type
Select Value. - Bool Value
Disable this setting.
Load Scene
Add > Game > Scene > Load Scene
We’ll use this node to reload the scene.
- Reload Scene
Enable this setting.
Change Game State
Add > Game > Game > Change Game State
Finally, we’ll set Game Running to Active again – the game continues.
Click on Add Game State to add a state change.
- Game State
Select Game Running. - Set State
Select Active.
And that’s it for this schematic – click on Save Schematic and save it as Brick in Assets/Schematics/.
Setting up the Bricks
The setup for all 3 bricks is the same (except for minimal differences in the Object Variables). The following component setup can be repeated for all brick prefabs, or you can just copy the components and paste them on the other bricks.
You can copy a component by right-clicking on the component’s name and selecting Copy Component in the context menu. To paste the component on a game object, right-click on any component’s name and select Paste Component As New in the context menu.
The brick prefabs (Brick 1, Brick 2 and Brick 3) can be found at Assets/Tutorial Resources/Prefabs/.
Object Variables
First, we’ll set up the object variables of the bricks. Add an object variable component to the prefabs (e.g. using the component menu: Makinom > Scenes > Object Variables). Change the following settings.
- Local Variables
Enable this setting. - Always Initialize
Enable this setting.
Click on Add Variable to add an object variable.
- Variable Key
Set to health.
Select the Value string type. - Type
Select Int. - Operator
Select Set. - Float Value
Brick 1: Set to 1 (Value).
Brick 2: Set to 2 (Value).
Brick 3: Set to 3 (Value).
The bricks will have different health values, i.e. brick 1 will need 1 hit to be destroyed, brick 3 will need 3 hits.
Copy the variable and change the following settings.
- Variable Key
Set to points. - Float Value
Brick 1: Set to 10 (Value).
Brick 2: Set to 25 (Value).
Brick 3: Set to 50 (Value).
The bricks will add different points to the score.
That’s it for the object variables.
Brick Count: Auto Machine
Next, we’ll add the Brick Count schematic using an auto machine component. The schematic will increase the bricks count by 1 for each brick that’s added to the scene.
Add the component to the brick prefabs (e.g. using the component menu: Makinom > Machines > Auto Machine). Change the following settings.
Start Settings
- Start
Enable this setting.
Machine Execution Settings
- Asset Type
Select Schematic. - Schematic Asset
Select BrickCount. - Execution Type
Select Single. - Update Type
Select Update.
Brick: Collision Machine
Finally, we’ll add the Brick schematic using a collision machine component.
Add the component to the brick prefabs (e.g. using the component menu: Makinom > Machines > Collision Machine). Change the following settings.
Start Settings
- Collision Enter
Enable this setting. - Start By Other
Enable this setting.
This allows the machine to start by colliding with other objects than the player (in our case: the ball).
Machine Execution Settings
- Asset Type
Select Schematic. - Schematic Asset
Select Brick. - Execution Type
Select Single. - Update Type
Select Update. - Stop On Destroy
Disable this setting.
Since the brick (machine object) is destroyed in the schematic, we need to make sure the schematic isn’t stopped by that.
And that’s it for the prefabs – we don’t need to apply the changes, since we worked on the prefabs directly. The bricks in the scene should have been updated automatically with the new components.
Testing
Hit Play to test the game. You can now destroy the bricks by hitting them with the ball – some bricks take more hits and give more points than others.
When all bricks have been destroyed, a message is displayed and the level reloads. But we’re not done yet, if you miss the ball, it just continues falling down, making the game unplayable.
The next tutorial will handle loosing a life.