
Setting up the enemy’s movement.
In this tutorial we’ll set up a schematic to handle the enemy’s movement and attacking the player.
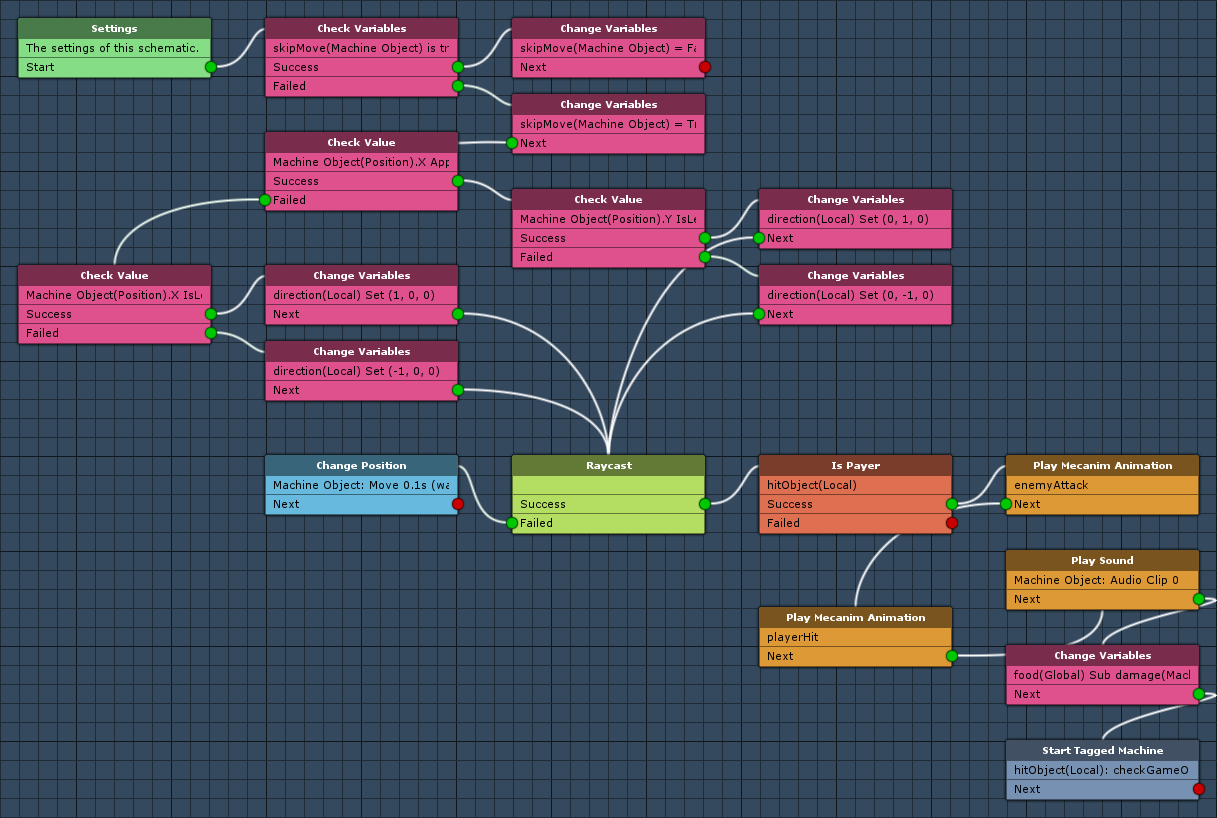
Enemy: Schematic
First, we’ll set up the schematic handling the enemy mechanics. Enemies will only move every 2nd turn, i.e. they’ll skip turns (marked by a bool object variable). The movement of the enemy will depend on the position in relation to the player. If the enemy is beside the player, he will attack him (when not skipping a turn).
Open the Makinom editor, navigate to Schematics and create a new schematic. Change the following settings.
Settings
We’ll add an audio clip resource to play a random attack sound effect.
Audio Clips
Click on Add Audio Clip Resource to add an audio clip resource.
- Name
Set to Attack. - Use Order
Select Random.
We need 2 audio clips, add the needed amount by clicking on Add Audio Clip.
- Audio Clip
Select scavengers_enemy1 and scavengers_enemy2.
The audio clips can be found at Assets/Tutorial Resources/Audio/.
Check Variables
Add > Value > Variable > Check Variables
We’ll use this node to check if the enemy will skip this turn.
Click on Add Variable to add a variable condition.
- Condition Type
Select Variable. - Variable Key
Set to skipMove. - Variable Origin
Select Object. - Object
Select Machine Object. - Is Valid
Enable this setting. - Exists
Disable this setting. - Type
Select Bool.
Change Variables
Add > Value > Variable > Change Variables
We’ll use this node to disable skipMove – the enemy will move the next turn.
This node is connected to the Success slot of the Check Variables node.
Click on Add Variable to add a variable change.
- Change Type
Select Variable. - Variable Key
Set to skipMove. - Variable Origin
Select Object. - Object
Select Machine Object. - Type
Select Bool. - Bool Type
Select Value. - Bool Value
Disable this setting.
Change Variables
Add > Value > Variable > Change Variables
Copy the previous Change Variables node – we’ll use this node to enable skipMove to skip the next turn.
This node is connected to the Failed slot of the Check Variables node.
Change the following settings.
- Bool Value
Enable this setting.
Check Value
Add > Value > Check Value
This node is used to check 2 values against each other. We’ll use it to check the X-axis position of player and enemy to determine if the enemy will move vertically or horizontally.
- Value
Select Game Object and X. - Object
Select Machine Object. - Value Origin
Select Position. - Check Type
Select Approximately. - Check Value
Select Game Object and X. - Object
Select Player. - Value Origin
Select Position.
Check Value
Add > Value > Check Value
We’ll use it to check if the Y-axis position of player and enemy to determine the enemy’s vertical movement.
This node is connected to the Success slot of the previous Check Value node.
- Value
Select Game Object and Y. - Object
Select Machine Object. - Value Origin
Select Position. - Check Type
Select Is Less Equal. - Check Value
Select Game Object and Y. - Object
Select Player. - Value Origin
Select Position.
Change Variables
Add > Value > Variable > Change Variables
We’ll use this node to set the enemy’s move direction (local Vector3 variable) – we’ll move upwards (vertical movement).
This node is connected to the Success slot of the previous Check Value node (checking if enemy Y is less equal player Y).
Click on Add Variable to add a variable change.
- Change Type
Select Variable. - Variable Key
Set to direction. - Variable Origin
Select Local. - Type
Select Vector3. - Vector3 Type
Select Set Axis. - X-Axis
Set to 0 (Value). - Y-Axis
Set to 1 (Value). - Z-Axis
Set to 0 (Value).
Change Variables
Add > Value > Variable > Change Variables
We’ll use this node to set the enemy’s move direction (local Vector3 variable) – we’ll move downwards (vertical movement).
This node is connected to the Failed slot of the previous Check Value node (checking if enemy Y is less equal player Y).
Click on Add Variable to add a variable change.
- Change Type
Select Variable. - Variable Key
Set to direction. - Variable Origin
Select Local. - Type
Select Vector3. - Vector3 Type
Select Set Axis. - X-Axis
Set to 0 (Value). - Y-Axis
Set to -1 (Value). - Z-Axis
Set to 0 (Value).
Check Value
Add > Value > Check Value
We’ll use it to check if the X-axis position of player and enemy to determine the enemy’s horizontal movement.
This node is connected to the Failed slot of the first Check Value node (checking enemy X approximately player X).
- Value
Select Game Object and X. - Object
Select Machine Object. - Value Origin
Select Position. - Check Type
Select Is Less Equal. - Check Value
Select Game Object and X. - Object
Select Player. - Value Origin
Select Position.
Change Variables
Add > Value > Variable > Change Variables
We’ll use this node to set the enemy’s move direction (local Vector3 variable) – we’ll move right (horizontal movement).
This node is connected to the Success slot of the previous Check Value node (checking if enemy X is less equal player X).
Click on Add Variable to add a variable change.
- Change Type
Select Variable. - Variable Key
Set to direction. - Variable Origin
Select Local. - Type
Select Vector3. - Vector3 Type
Select Set Axis. - X-Axis
Set to 1 (Value). - Y-Axis
Set to 0 (Value). - Z-Axis
Set to 0 (Value).
Change Variables
Add > Value > Variable > Change Variables
We’ll use this node to set the enemy’s move direction (local Vector3 variable) – we’ll move left (horizontal movement).
This node is connected to the Failed slot of the previous Check Value node (checking if enemy X is less equal player X).
Click on Add Variable to add a variable change.
- Change Type
Select Variable. - Variable Key
Set to direction. - Variable Origin
Select Local. - Type
Select Vector3. - Vector3 Type
Select Set Axis. - X-Axis
Set to -1 (Value). - Y-Axis
Set to 0 (Value). - Z-Axis
Set to 0 (Value).
Raycast
Add > Game Object > Raycast > Raycast
We’ll use this node to check if something is on the tile the enemy is moving to.
We will store the game object we’ve hit with the raycast.
Raycast Settings
- Raycast Origin
Select Game Object. - Distance
Set to 1. - Layer Mask
Select BlockingLayer.
To only select the BlockingLayer layer, select Nothing first. - Object
Select Machine Object. - Vector3 Type (Direction)
Select Vector3 Variable. - Variable Key
Set to direction. - Variable Origin
Select Local.
We need to make sure that the enemy isn’t found by the raycast, so we’ll use Filter Game Objects.
- Use Filter
Enable this setting.
Click on Add Excluded Object to add a game object that will be ignored by the raycast.
- Object
Select Machine Object.
Hit Game Object
We want the game object that was hit to be used as Selected Data. We’ll use the found game object in the following nodes.
- Use Hit Object
Select Selected Data. - Data Key
Set to hitObject. - Data Origin
Select Local. - Change Type
Select Set.
Change Position
Add > Movement > Movement > Change Position
We’ll use this node to move the enemy (fading) on the next tile.
This node is connected to the Failed slot of the Raycast node – i.e. when the enemy can move.
Moving Object
- Object
Select Machine Object. - Move Component
Select Rigidbody 2D. - Move Function
Select Move Position.
Target Position
- To Object
Disable this setting.
Position
- Vector3 Type
Select Vector3 Variable. - Variable Key
Set to direction. - Variable Origin
Select Local. - Local Position
Enable this setting.
We’ll use the direction we’ve set using the input keys as an offset to the current position of the player.
Move Settings
- Move
Enable this setting. - Wait
Enable this setting. - Apply Gravity
Disable this setting. - Move By Speed
Disable this setting. - Time (s)
Set to 0.1.
Is Player
Add > Game > Player > Is Player
This node is used to check if a game object is the player. We’ll use it to check the game object we hit with the raycast.
This node is connected to the Success slot of the Raycast node – i.e. when something is blocking the way.
- Object
Select Selected Data. - Data Key
Set to hitObject. - Data Origin
Select Local.
Play Mecanim Animation
Add > Animation + Audio > Mecanim > Play Mecanim Animation
We’ll use this node to play the enemy’s attack animation by setting the enemyAttack trigger parameter.
- Object
Select Machine Object. - Play Mode
Select None.
Click on Add Parameter to add an parameter that will be changed.
- Parameter Name
Set to enemyAttack. - Parameter Type
Select Trigger.
Play Mecanim Animation
Add > Animation + Audio > Mecanim > Play Mecanim Animation
We’ll use this node to play the player’s damage animation by setting the playerHit trigger parameter.
- Object
Select Selected Data. - Data Key
Set to hitObject. - Data Origin
Select Local. - Play Mode
Select None.
Click on Add Parameter to add an parameter that will be changed.
- Parameter Name
Set to playerHit. - Parameter Type
Select Trigger.
Play Sound
Add > Animation + Audio > Audio > Play Sound
We’ll use this node to play the attack sound with a random pitch.
Play On
- Object
Select Machine Object.
Audio Settings
- Audio Clip
Select 0: Attack. - Play One Shot
Enable this setting. - Volume
Set to 1. - Set Pitch
Enable this setting. - Random Pitch
Enable this setting. - Pitch
Set to 0.95. - Pitch 2
Set to 1.05.
Change Variables
Add > Value > Variable > Change Variables
We’ll use this node to decrease the player’s food by the enemy’s object variable damage.
Click on Add Variable to add a variable change.
- Change Type
Select Variable. - Variable Key
Set to food. - Variable Origin
Select Global. - Type
Select Int. - Operator
Select Sub. - Float Value
Select Int Variable. - Variable Key
Set to damage. - Variable Origin
Select Object. - Object
Select Machine Object.
Start Tagged Machine
Add > Machine > Start Tagged Machine
We’ve reduced the player’s food – now we need to check if all food is gone, i.e. game over.
Checking for game over will be handled by another schematic – we’ll set it up later, so for now we only try to start it’s tagged machine.
- Share Local Variables
Disable this setting. - Wait
Disable this setting.
Machine Object
- Object
Select Selected Data. - Data Key
Set to hitObject. - Data Origin
Select Local.
Starting Object
- Object
Select Machine Object.
Tag Settings
Click on Add Tag to add a starting tag.
- Tag
Set to checkGameOver.
That’s it for the schematic – click on Save Schematic and save it as Enemy in Assets/Schematics/.
Setting up the Enemies
Now, we’ll set up object variables and a tagged machine handling the enemy’s mechanic (will be started by the GameManager) on the enemy prefabs. The following steps are the same for both enemy prefabs (Enemy1 and Enemy2, you can find the prefabs at Assets/Tutorial Resources/Prefabs/).
You can copy the components by right clicking on the name of the component and selecting Copy Component. Select the other enemy prefab and paste the component by right clicking on a component’s name and selecting Paste Component As New.
Object Variables
First, we’ll add an Object Variables component to store the enemy’s damage. Add the component to the prefab (e.g. using the component menu: Makinom > Scenes > Object Variables) and change the following settings.
- Local Variables
Enable this setting. - Always Initialize
Enable this setting.
Click on Add Variable to add a variable to the object variables.
- Variable Key
Set to damage.
Select the Value string type. - Type
Select Int. - Operator
Select Set. - Float Value
Enemy1: Set to 10 (Value).
Enemy2: Set to 20 (Value).
Tagged Machine
Now, we’ll add the Enemy schematic with a tagged machine. Add the component to the prefab (e.g. using the component menu: Makinom > Machines > Tagged Machine) and change the following settings.
Start Settings
Click on Add Starting Tag to add a tag that can start this machine.
- Starting Tag
Set to enemy.
Machine Execution Settings
- Asset Type
Select Schematic. - Schematic Asset
Select Enemy. - Execution Type
Select Single. - Update Type
Select Update.
And that’s it for the enemy prefabs – since we’ve worked directly on the prefabs, we don’t need to apply the changes.
Testing
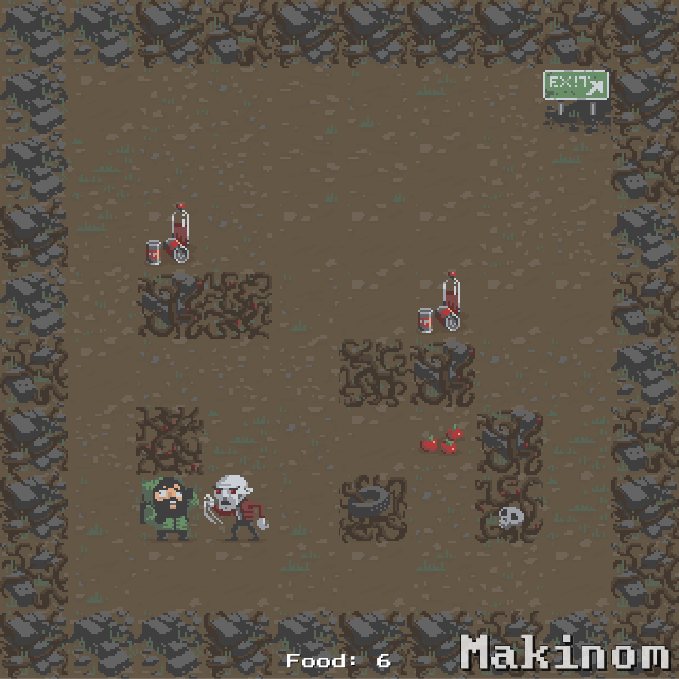
Click on Play to test the game. The enemies are now also moving and attacking the player – but the player can’t die just yet …
The next tutorial will handle game over.