
Makinom 2 is a game development tool for Unity, now available as a public beta version (RC 1).
Update: Makinom 2 is now officially available – check out the release announcement.
Download Makinom 2 Free or purchase Makinom 2 Pro in the Unity Asset Store.
See the old beta information below (you can no longer download the beta version).
Since this is a beta version, you can expect things to change and there’s no guaranteed compatibility between beta versions or beta and production ready versions.
Currently only Unity 2019/2020 is supported. Using the Unity UI requires TextMesh Pro (and when using Unity 2019.3 or newer, Unity UI) package to be added to the project via the Unity package manager – more on UI systems can be found below.
The first release candidate fixes some issues and splits the ‘Animation + Audio’ nodes into separate groups.
Please note: RC 1 moves the Unity UI module DLLs into a separate folder structure, updating previous projects will most likely not do that (has no impact on functionality).
Previous BETA versions:
- BETA 7 added new gizmo icons, a new backup system, support for multiple portraits in UI boxes and dialogues, a Loop node and more extensible features.
- BETA 6 added CSV-based editor localization, extensible interpolation system and restructured folders
Also added support for the Makinom Upgrade Tool. - BETA 5 added Unity 2020.1 support
- BETA 4 added language export/import
- BETA 3 added live debugging for schematics
- BETA 2 added some fixes
If you want to upgrade a Makinom 1 project, try the Makinom Upgrade Tool.
Please consider providing feedback and report bugs in the community forum or via email.

What’s New in Makinom 2?
A lot, and not so much.
While there are many changes throughout the system, most of the front-end and features stay the same (with the exception of UI). Makinom is still the same toolkit and has the same use as it had before. See some of the most noticeable changes below.
Data and Assets
Previously, all of Makinom’s data was stored in a single project file. This kind of data management was practical to have all data available at any time, without having to think about selecting assets or loading stuff, but it could lead to a heavy load on memory and performance, as the whole project, including all references prefabs, audio clips or textures where loaded when initializing the game.
Now, data of list items is stored in individual assets, e.g. each input key or scene object is an individual asset. In most cases this doesn’t change anything for you or how you set up your game, as the front-end editor UI and selection are handled as previously (although with shiny new features, more on that below). In case you’re doing some custom scripting, you need to reference the asset instead of having access to it through the central Makinom handlers, though.
Certain assets are still directly referenced in the Makinom project and loaded when the project is initialized, due to always needing access to them – e.g. input keys have to be processed each frame to work correctly. Other things (e.g. scene objects) are no longer loaded on startup and only loaded/used when their asset is referenced somewhere (e.g. added to a game object via the Scene Object Component).
UI System
The UI system has beel completely remade and is no longer part of Makinom’s core functionality. Don’t worry, there’s still a UI system available, but the actual system you want to use is now an extension and can be swapped out completely.
For now, there’s only an extension for the Unity UI available (and already included), i.e. the legacy GUI has been dropped completely.
Learn more about Makinom 2’s new UI system in this documentation, or the Unity UI module in this documentation.
Editor
The basic layout, look and feel of the editor stays the same as previously, but there have been a lot ease-of-use improvements.
Reorderable Lists
The data lists can now easily be reordered by dragging the individual items.
Since data is now stored in individual assets, the ID/index of the data is no longer as crucial as before. There are also sorting options available in the Search, Filter & Sort foldout above the list items.
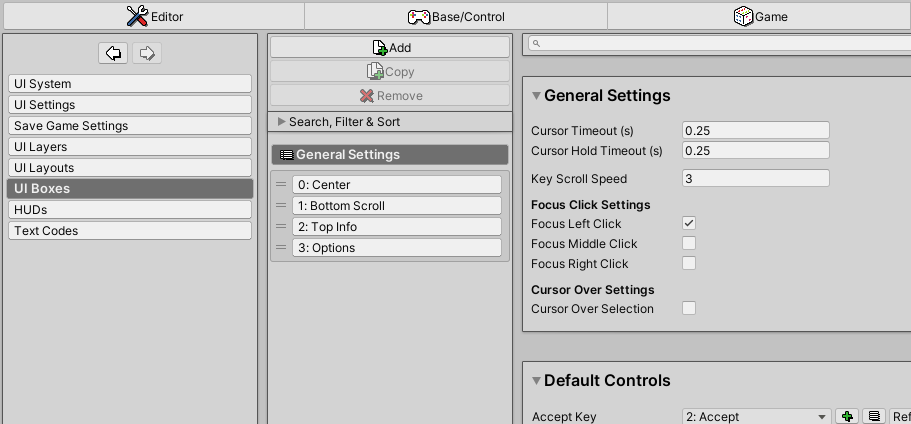
General Settings
Certain data lists now have General Settings to provide default setup that can be overridden by individual list items. Currently this is only available in UI Boxes (as no other data has these kind of default settings), but it’ll be heavily used in future extensions of Makinom 2 (e.g. ORK Framework 3).
Searchable Popups
All popup selections (e.g. for selecting data like input keys) are now searchable.
Data selections also have sorting options and can optionally be divided into sub-lists in case the data has types (e.g. scene objects can be listed by scene object types).
Language Content
Defining content in different languages has been changed. Previously, you’d have to define the content in all added languages. You can also use CSV-files to translate editor help texts (since BETA 6).
Learn more about language content definition and the new language export/import functionality (since BETA 4) in this documentation.
Node Editor
The node editor works the same as previously, but with lots of additional features to make your life easier.
Searchable Context Menu
Like the popup selections, the node editor’s context menu has been updated and is also searchable.
Box Selection
You can now use box selection to select multiple nodes.

Using Shift+Click still works as well.
Node Groups
Use the new Node Groups to bring order into your node-chaos. You can also put groups into groups, into groups, into groups …

You can add or remove nodes (and groups) to/from groups by holding CTRL while dragging them – or use the context menu.
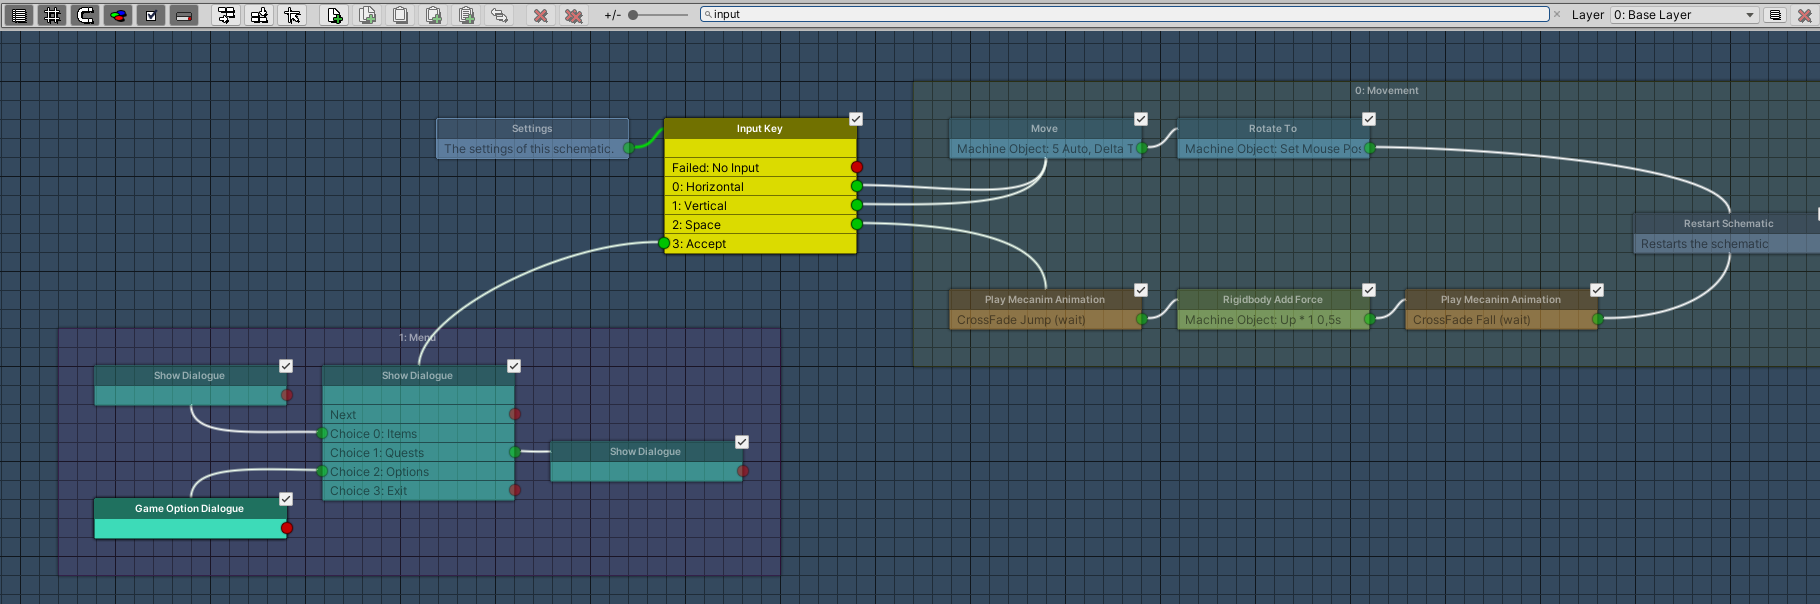
Searchable Nodes
Looking for a specific node? Use the search bar to highlight nodes!
Zooming
You can finally zoom in/out.

Keyboard Shortcuts
There are several new keyboard shortcuts available:
- CTRL+F
Focus on the search field. - CTRL+D
Duplicate a node. - CTRL+C
Copy a node to the clipboard. - CTRL+V
Paste a node from the clipboard. - CTRL+X
Cut (i.e. copy to clipboard and remove) a node. - CTRL+G
Create a node group (adding selected nodes to it). - F
Focus/scroll on the selected node(s). - Delete
Delete the selected nodes.
Live Debugging
Want to know what your running schematics are doing? Try live debugging them and see which nodes are executed, the values they’re using and which variable changes they cause.
Debug information will be collected when the Makinom editor is open while playing. You can also enable Auto Debug Schematics in Editor > Editor Settings > Node Editor Settings to always collect the debug information, even if the editor is closed.
Debugging is only used when playing in the Unity editor, i.e. built games are not impacted by it.

You can directly start debugging a machine’s schematic by clicking on the Edit Schematic button in the machine’s inspector while it’s running. Having a schematic open in the node editor will also list all available running or already stopped schematics that are using the same schematic asset.
See the image (and explanations) below for more details on the debugging features.

- 1) Debugging Available
Lists all available schematics (running and already stopped) for the open schematic asset.
Start/stop debugging via the button of each entry. - 2) Debug Info
When having a node selected, the debug info shows if the node has already been executed (and at which index) and the variable changes the node caused.
If the node has a wait time, it’ll also show this information. - 3) Debug Value
Shows the debug value(s) of string, float, bool and Vector3 value selections. - 4) Executed Node
Nodes that have already been executed are marked with a yellow border.
The color can be changed in Editor > Editor Settings. - 5) Current Node
The node the execution is currently at is marked with an orange border.
The color can be changed in Editor > Editor Settings. - 6) Breakpoint
Nodes that have a breakpoint set will be marked with a red circle in their upper left corner.
You can set a breakpoint via the Breakpoint button in the node’s settings.
Unity will pause when reaching a breakpoint node – due to the fast execution between nodes, that might still execute additional nodes after the breakpoint node until Unity paused the game.
You can also change the schematic while it’s running, e.g. changing a connection or adding/removing nodes. This’ll change all schematics that use the same asset, not just the one you’re currently debugging. To make the changes permanent, you need to save the schematic.
Please note that exiting play mode (i.e. stopping the game in the Unity editor) will lead to losing the debug values once you open a different schematic asset.