
Setting up the player’s damage, death and the fall remover.
In this tutorial we’ll create 2 schematics – one handling the player taking damage from enemies and death, the other removing everything that falls into the river (with a splash) and restarting the game if the player died.
Player Damage: Schematic
First, we’ll create the schematic that handles the player taking damage from touching enemies and dying when the health is gone. The schematic will be added to the player using a collision machine.
Open the Makinom editor, navigate to Schematics and create a new schematic. Change the following settings.
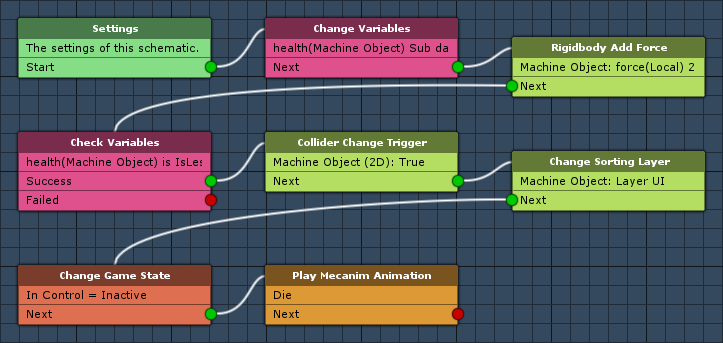
Settings
We’ll add an audio clip resource that will be played when the player takes damage.
Audio Clips
Click on Add Audio Clip Resource to add an audio clip resource.
- Name
Set to Ouch. - Use Order
Select Random.
We’ll use 4 audio clips, click on Add Audio Clip to add more clips.
- Audio Clip
Select Player-ouch1 to Player-ouch4.
The audio clips can be found at Assets/Tutorial Resources/Audio/Player/Ouch/.
Change Variables
Add > Value > Variable > Change Variables
We’ll use this node to change the player’s health using the enemy’s damage, and store the force that we’ll use to push the player away from the enemy.
Click on Add Variable to add a variable change.
- Change Type
Select Variable. - Variable Key
Set to health. - Variable Origin
Select Object. - Object
Select Machine Object. - Type
Select Int. - Operator
Select Sub. - Float Type
Select Int Variable. - Variable Key
Set to damage. - Variable Origin
Select Object. - Object
Select Starting Object.
Click on Add Variable again to add another variable change.
- Change Type
Select Variable. - Variable Key
Set to force. - Variable Origin
Select Local. - Type
Select Vector3. - Operator
Select Set. - Vector3 Type
Select Game Object. - Object
Select Machine Object. - Value Origin
Select Position.
Copy the previous variable change and change the following settings.
- Operator
Select Sub. - Vector3 Type
Select Game Object. - Object
Select Starting Object. - Value Origin
Select Position.
Again, copy the previous variable change.
- Operator
Select Add. - Vector3 Type
Select Value.
- Value
Set to X=0, Y=5, Z=0.
Rigidbody Add Force
Add > Game Object > Rigidbody > Rigidbody Add Force
We’ll use this node to push the player away from the enemy, using the force we just stored.
Rigidbody Object
- Object
Select Machine Object.
Force Settings
- Use 2D
Enable this setting. - Continue Force
Disable this setting.
Force
- Vector3 Type
Select Vector3 Variable. - Variable Key
Set to force. - Variable Origin
Select Local.
Check Variables
Add > Value > Variable > Check Variables
We’ll use this node to check if the player’s health reached 0.
Click on Add Variable to add a variable condition.
- Condition Type
Select Variable. - Variable Key
Set to health. - Variable Origin
Select Object. - Object
Select Machine Object. - Is Valid
Enable this setting. - Exists
Enable this setting. - Type
Select Int. - Check Type
Select Is Less Equal. - Check Value
Set to 0 (Value).
Collider Change Trigger
Add > Game Object > Collider > Collider Change Trigger
The following nodes handle the player’s death. We’ll use this node to set the colliders on the player to be triggers, letting him fall through the ground.
This node is connected to the Success slot of the Check Variables node.
Collider Object
- Use 2D
Enable this setting. - Object
Select Machine Object. - Scope
Select All. - Bool Value
Enable this setting.
Change Sorting Layer
Add > Game Object > Renderer > Change Sorting Layer
We’ll use this node to change the sorting layer of the player to have him nicely display above the rest of the level while falling down.
Sorting Layer
- Change Sorting Layer
Enable this setting. - Change Layer Name
Enable this setting. - Layer Name
Set to UI.
Object
- Object
Select Machine Object. - Scope
Select All In Children.
Change Game State
Add > Game > Game > Change Game State
We need to inactivate the In Control game state to stop the player controls.
- Game State
Select In Control. - Set State
Select Inactive.
Play Mecanim Animation
Add > Animation + Audio > Mecanim > Play Mecanim Animation
Finally, we’ll play the player’s death animation by setting the Die trigger parameter.
- Object
Select Machine Object. - Play Mode
Select None.
Click on Add Parameter to add a parameter change.
- Parameter Name
Set to Die. - Parameter Type
Select Trigger.
That’s it for the schematic – click on Save Schematic and save it as PlayerDamage in Assets/Schematics/.
Player Damage: Collision Machine
Now, we’ll add the schematic to the player using a collision machine. We’ll limit the machine to only start when colliding with game objects tagged Enemy.
Select the hero game object in the scene hierarchy, add a collission machine component (e.g. using the component menu: Makinom > Machines > Collision Machine) and change the following settings.
Start Settings
- Collision Enter
Enable this setting. - Collision Stay
Enable this setting.
When the player keeps colliding with the enemy, we want to continue to take damage. - Start By Other
Enable this setting.
Click on Add Check to add a game object check for the objects we collide with.
- Check Type
Select Tag. - Name
Set to Enemy. - Check Type
Select Is Equal. - Is Valid
Enable this setting.
Machine Execution Settings
- Asset Type
Select Schematic. - Schematic Asset
Select PlayerDamage. - Execution Type
Select Single. - Update Type
Select Update. - End Delay Time (s)
Set to 0.5.
This will let the player only take damage every 0.5 seconds.
That’s it for the player’s game object – apply the changes to the prefab by clicking on Apply (top of the inspector).
Fall Remover: Schematic
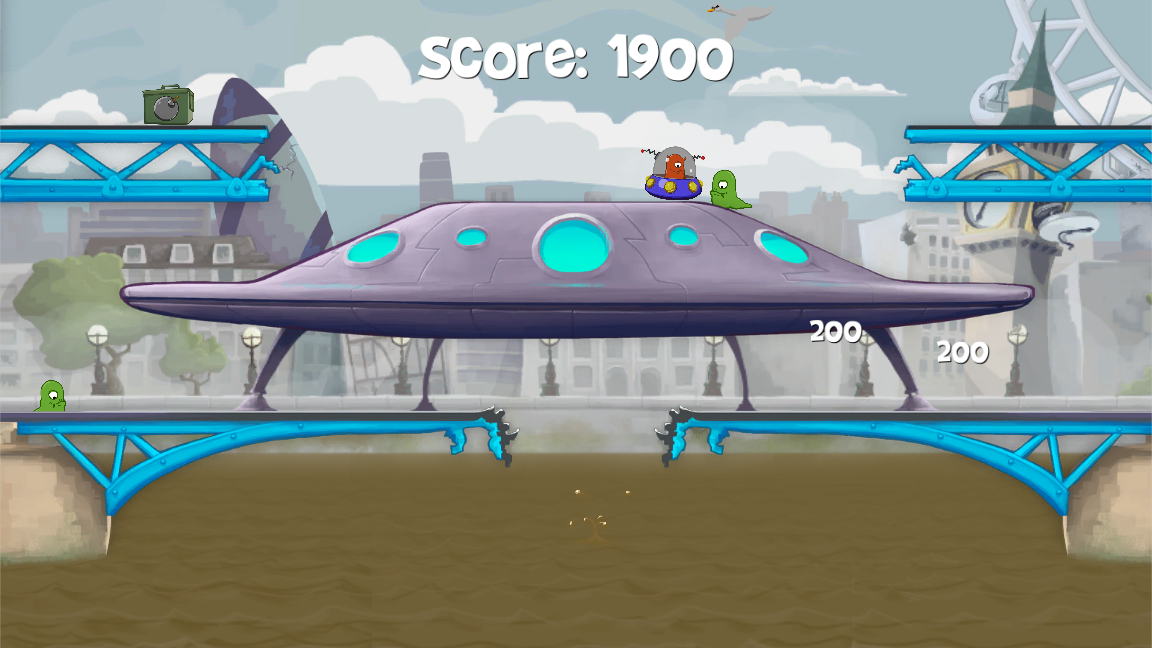
Next, we’ll set up the schematic that will remove everything that falls into the river. When something falls into the river, we’ll display a splash effect and – if the game object is the player – restart the game. The player falling into the river can happen in 2 ways – the player running into it, or the player dying and falling down – both result in game over.
Open the Makinom editor, navigate to Schematics and create a new schematic. Change the following settings.

Settings
We’ll display a splash game object (an animated sprite) at the position something fell into the river, i.e. we need a prefab resource.
Prefabs
Click on Add Prefab Resource to add a prefab resource
- Name
Set to Splash. - Prefab
Select splash.
The prefab can be found at Assets/Tutorial Resources/Prefabs/Environment/.
Spawn Prefab
Add > Game Object > Prefab > Spawn Prefab
We’ll use this node to spawn the splash prefab at the position of the game object that fell into the river.
- Prefab
Select Prefab 0: Splash. - Target Type
Select Object.
Target Object
- Object
Select Starting Object.
Destroy Prefab
Add > Game Object > Prefab > Destroy Prefab
We’ll use this node to destroy the splash prefab after 0.5 seconds.
- Prefab
Select Prefab 0: Splash. - Spawned Prefab ID
Set to -1. - Destroy After Time
Enable this setting. - Time (s)
Set to 0.5. - Wait
Disable this setting.
Play Sound At Point
Add > Animation + Audio > Audio > Play Sound At Point
We’ll use this node to play a splash sound at the position something fell into the river.
Position
- Vector3 Type
Select Game Object. - Object
Select Starting Object. - Value Origin
Select Position.
Audio Settings
- Audio Clip
Select Select Audio Clip and waterSplash. - Wait
Disable this setting. - Volume
Set to 1 (Value).
Is Payer
Add > Game > Player > Is Player
We’ll use this node to check if the game object is the player.
- Object
Select Starting Object.
Destroy Object
Add > Game Object > Game Object > Destroy Object
In case the game object isn’t the player, we’ll destroy it immediately.
This node is connected to the Failed slot of the Is Player node.
- Object
Select Starting Object.
Change Game State
Add > Game > Game > Change Game State
In case the game object is the player, we’ll inactivate the In Control game state (stopping the controls).
This node is connected to the Success slot of the Is Player node.
- Game State
Select In Control. - Set State
Select Inactive.
Destroy Object
Add > Game Object > Game Object > Destroy Object
Now we’ll destroy the player.
- Object
Select Starting Object.
Stop Global Machine
Add > Machine > Stop Global Machine
We’ll use this node to stop a running global machine that handles spawning pickups. We haven’t yet set it up, so just select the first global machine in the list, we’ll set it up later for spawning the pickups.
- Global Machine
Select 0: Default.
Wait
Add > Base > Wait
We’ll wait for 2 seconds before reloading the scene.
- Time (s)
Set to 2 (Value).
Load Scene
Add > Game > Scene > Load Scene
We’ll use this node to reload the scene.
- Reload Scene
Enable this setting. - Position Type
Select None.
Fade In Screen
- Wait Fade In
Disable this setting.
Change Variables
Add > Value > Variable > Change Variables
We’ll use this node to reset the score and bombs carried by the player.
Click on Add Variable to add a variable change.
- Change Type
Select Variable. - Variable Key
Set to score. - Variable Origin
Select Global. - Type
Select Int. - Operator
Select Set. - Float Value
Set to 0 (Value).
Click on Add Variable again to add another variable change.
- Change Type
Select Variable. - Variable Key
Set to bombs. - Variable Origin
Select Global. - Type
Select Int. - Operator
Select Set. - Float Value
Set to 0 (Value).
Change Game State
Add > Game > Game > Change Game State
Finally, we’ll activate the In Control game state to allow the player controls again (this is already after reloading the scene).
- Game State
Select In Control. - Set State
Select Active.
And that’s it for the schematic – click on Save Schematic and save it as FallRemover in Assets/Schematics/.
Fall Remover: Trigger Machine
The FallRemover schematic will be added to the killTrigger game object in the scene. Select it in the scene hierarchy and add a trigger machine component (e.g. using the component menu: Makinom > Machines > Trigger Machine). Change the following settings.
Start Settings
- Trigger Enter
Enable this setting. - Start By Other
Enable this setting.
Machine Execution Settings
- Asset Type
Select Schematic. - Schematic Asset
Select FallRemover. - Execution Type
Select Single. - Update Type
Select Update.
And that’s it for now – don’t forget to save the scene.
Testing
Click on Play to start the game. The player can now take damage and be killed. Falling into the river will reload the scene (i.e. game over).
The next tutorial will handle the health pickup.