
Setting up the player’s death schematic and game over.
In this tutorial we’ll create the schematic handling the player’s death and game over, and add tagged machines for receiving damage and death to the player.
Player Death: Schematic #
First, we’ll set up the schematic animating the player’s death and displaying a game over dialogue. When the player selects restart, the level will be reloaded, starting a new game.
Open the Makinom editor, navigate to Schematics and create a new schematic. Change the following settings.
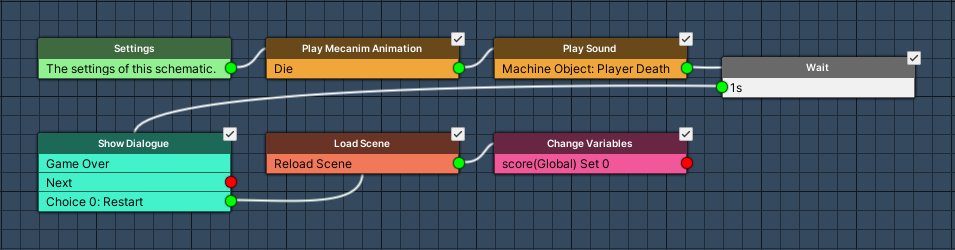
Play Mecanim Animation #
Add Node > Animation > Mecanim > Play Mecanim Animation
We’ll use this node to play the death animation of the player by setting the Die trigger parameter.
- Object
Select Machine Object. - Play Mode
Select None.
Click on Add Parameter to add an parameter that will be changed.
- Parameter Name
Set to Die. - Parameter Type
Select Trigger.
Play Sound #
Add Node > Audio > Audio > Play Sound
We’ll use this node to play the player’s death sound.
Play On #
- Object
Select Machine Object.
Audio Settings #
- Audio Clip
Select Select Audio Clip and Player Death.
The audio clip can be found at Assets/Tutorial Resources/Audio/Effects/. - Play One Shot
Enable this setting. - Volume
Set to 1.
Wait #
Add Node > Base > Wait
We’ll wait for 1 second.
- Time (s)
Set to 1 (Value).
Show Dialogue #
Add Node > UI > Dialogue > Show Dialogue
This node will display a dialogue using a GUI box. We’ll display the game over message as a choice dialogue.
- Dialogue Type
Select Choice. - UI Box
Select Message. - Text (Message Content)
Set to:
Game Over
Choice Settings #
Click on Add Choice to add a choice. We’ll display a single choice for the player to restart the game.
- Text (Choice 0)
Set to:
Restart
Load Scene #
Add Node > Game > Scene > Load Scene
This node will load a scene. We’ll use it to reload the current scene.
This node is connected to the Choice 0 slot of the Show Dialogue node.
- Reload Scene
Enable this setting. - Load Type
Select Load Level. - Position Type
Select None.
Since we already have the player in our scene, we don’t need Makinom to spawn the game object.
Change Variables #
Add Node > Value > Variable > Change Variables
We’ll reset the score to 0. Click on Add Variable to add a variable change.
- Change Type
Select Variable. - Variable Key
Set to score. - Variable Origin
Select Global. - Type
Select Int. - Operator
Select Set. - Float Value
Set to 0 (Value).
And that’s it for the schematic – click on Save Schematic and save it as PlayerDeath in Assets/Schematics/.
Take Damage: Tagged Machine #
Now, we’ll first add the tagged machine handling the player taking damage. Select the Player game object in the scene and add a tagged machine component to it (e.g. using the component menu: Makinom > Machines > Tagged Machine). Change the following settings.
Start Settings #
Click on Add Starting Tag to add a tag that can start this machine.
- Starting Tag
Set to damage.
Machine Execution Settings #
- Schematic Asset
Select TakeDamage. - Execution Type
Select Single. - Update Type
Select Update.
Resource Overrides #
Expand the Resource Overrides to change the used audio clip.
- Override Audio Clips
Enable this setting.
Click on Add Audio Clip to add an audio clip that will be used.
- Audio Clip
Select Player Hurt.
Player Death: Tagged Machine #
Finally, we’ll add the PlayerDeath schematic using a tagged machine. Add a tagged machine component to the Player game object (e.g. using the component menu: Makinom > Machines > Tagged Machine). Change the following settings.
Start Settings #
Click on Add Starting Tag to add a tag that can start this machine.
- Starting Tag
Set to death.
Machine Execution Settings #
- Schematic Asset
Select PlayerDeath. - Execution Type
Select Single. - Update Type
Select Update.
And that’s it for now – apply the changes to the prefab by clicking on Overrides > Apply All (top of the inspector).
Don’t forget to save the scene.
Testing #
Drag some of the enemy prefabs into the scene and click on Play. The enemis will now be able to damage the player – once the player’s health reaches 0, the player dies and the game over dialogue is displayed.

The next tutorial will handle spawning enemies.


