
Setting up the player’s weapon controls.
In this tutorial we’ll create a schematic to control the player’s weapon.
Player Shooting: Schematic #
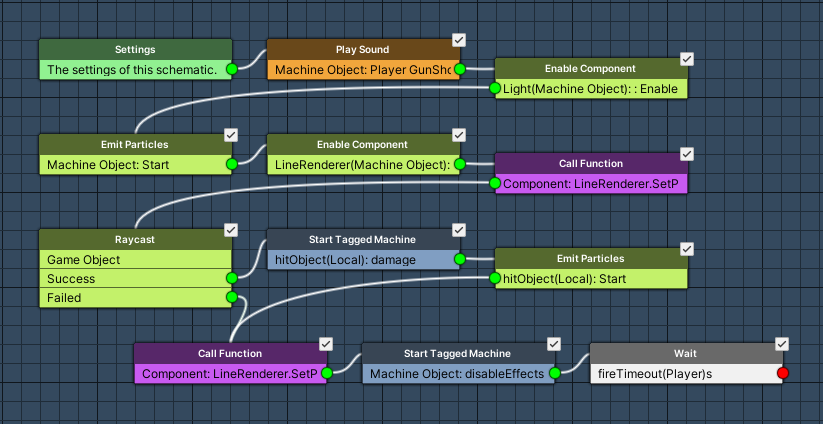
First, we’ll create the schematic to fire the player’s weapon. The schematic will play an audio clip, particle effect and show a line renderer. The player input firing the weapon is handled by an Interaction Machine component we’ll use to play the schematic.
Open the Makinom editor, navigate to Schematics and create a new schematic. Change the following settings.
Settings #
We’ll set up a local variable as Machine Start Variable for easy setup in the machine component at a later time. When using the schematic in a machine component, the defined start variables will be added automatically, using their default values.
Machine Start Variables #
Click on Add Start Variable to add a local start variable that will be exposed to the machine component’s inspector.
- Variable Key
Set to damage. - Type
Select Int. - Default Value
Set to 20.
Play Sound #
Add Node > Audio > Audio > Play Sound
This node is used to play audio clips. We’ll use it to play the gun shot sound.
Play On #
- Object
Select Machine Object.
Audio Settings #
- Audio Clip
Select Select Audio Clip and Player GunShot.
The audio clip can be found at Assets/Tutorial Resources/Audio/Effects/. - Play One Shot
Enable this setting. - Volume
Set to 1.
Enable Component #
Add Node > Game Object > Component > Enable Component
This node is used to enable/disable components. We’ll use it to enable a light component.
- Enable/Disable
Enable this setting. - Component Name
Set to Light. - Object
Select Machine Object.
Emit Particles #
Add Node > Game Object > Component > Emit Particles
This node is used to start/stop emitting particles. We’ll use it to start a gun fire particle effect.
- Emit
Enable this setting. - Stop Before Start
Enable this setting.
The particle effect will be stopped first, this results in the effect playing from the start. - Object
Select Machine Object.
Enable Component #
Add Node > Game Object > Component > Enable Component
We’ll use this node to enable a line renderer component.
- Enable/Disable
Enable this setting. - Component Name
Set to LineRenderer. - Object
Select Machine Object.
Call Function #
Add Node > Function > Call Function
This node is used to call functions on components or static classes. We’ll use it to set the line renderer’s start position, calling the SetPosition function on the LineRenderer component.
The SetPosition function needs 2 parameters, an int and a Vector3.
Function Settings #
- Class Origin
Select Component. - Class Name
Set to LineRenderer. - Function Name
Set to SetPosition.
Click on Add Parameter to add a parameter.
- Parameter Type
Select Int. - Int/Float Value
Set to 0 (Value).
Click on Add Parameter again.
- Parameter Type
Select Vector3. - Vector3 Type
Select Game Object > Game Object. - Object
Select Machine Object. - Value Origin
Select Position.
Target Object #
- Object
Select Machine Object.
Raycast #
Add Node > Game Object > Raycast > Raycast
This node is used to send a raycast into the scene. We’ll use it to see what we’ve hit with our gunfire.
We will store the game object and position we’ve hit with the raycast.
Raycast Settings #
- Raycast Origin
Select Game Object. - Object
Select Machine Object. - Distance
Set to 100 (Value). - Vector3 Type (Direction)
Select Value > Direction. - Direction (Direction)
Select Forward. - Layer Mask
Select Layer Mask (should be default) and the Shootable layer.
To only select the Shootable layer, select Nothing first.
Hit Game Object #
We want the game object that was hit to be used as Selected Data. Selected data is used to store things for later use, e.g. game objects that are found during a running schematic (in our case through raycasting). We’ll use the stored game object in the following nodes.
- Use Hit Object
Select Selected Data. - Data Key
Set to hitObject. - Data Origin
Select Local. - Change Type
Select Set.
Store Into Variables #
- Variable Origin
Select Local. - Store Hit Point
Enable this setting. - Hit Point Key
Set to hit. - Operator
Select Set.
Start Tagged Machine #
Add Node > Machine > Start Tagged Machine
This node is used to start a tagged machine. We’ll use it to start a tagged machine with the tag damage, which will handle reducing the target’s health. The actual damage is stored in the local float variable damage (local start variable of the machine).
This node is connected to the Success slot of the Raycast node.
- Share Local Variables
Enable this setting. - Wait
Disable this setting.
Machine Object
#
- Object
Select Selected Data. - Data Key
Set to hitObject. - Data Origin
Select Local.
Starting Object #
- Object
Select Machine Object.
Tag Settings #
Click on Add Tag to add a starting tag.
- Tag
Set to damage.
Emit Particles #
Add Node > Game Object > Component > Emit Particles
We’ll use it to start a hit particle effect on the target.
- Emit
Enable this setting. - Stop Before Start
Enable this setting. - Object
Select Selected Data. - Data Key
Set to hitObject. - Data Origin
Select Local. - Child Object
Set to HitParticles.
Call Function #
Add Node > Function > Call Function
We’ll use it to set the line renderer’s end position to the point we hit with the raycast.
This node is connected to the previous node and the Failed slot of the Raycast node.
Function Settings #
- Class Origin
Select Component. - Class Name
Set to LineRenderer. - Function Name
Set to SetPosition.
Click on Add Parameter to add a parameter.
- Parameter Type
Select Int. - Int/Float Value
Set to 1 (Value).
Click on Add Parameter again.
- Parameter Type
Select Vector3. - Vector3 Type
Select Vector3 Variable. - Variable Key
Set to hit. - Variable Origin
Select Local.
Target Object #
- Object
Select Machine Object.
Start Tagged Machine #
Add Node > Machine > Start Tagged Machine
We’ll use it to start a tagged machine that disables the light and line renderer of the gun after a short time. This is separated from this schematic to prevent extending the fire rate.
- Wait
Disable this setting.
Machine Object
#
- Object
Select Machine Object.
Starting Object #
- Object
Select Machine Object.
Tag Settings #
Click on Add Tag to add a starting tag.
- Tag
Set to disableEffects.
Wait #
Add Node > Base > Wait
This node is used to wait for some time. We’ll use it to wait for the player’s fire timeout (object variable).
- Time (s)
Select Variable > Float Variable. - Variable Key
Set to fireTimeout. - Variable Origin
Select Object. - Object
Select Player.
And that’s it for the schematic – click on Save Schematic and save it as PlayerShooting in Assets/Schematics/.
Player Shooting: Interaction Machine #
The PlayerShooting schematic will be added to the player’s gun. Select the GunBarrelEnd game object, a child object of the player’s game object.
Add an Interaction Machine component to the game object (e.g. using the component menu: Makinom > Machines > Interaction Machine). Change the following settings.
Start Settings #
- Key Press
Enable this setting. - Input Key
Select Fire.
Machine Execution Settings #
- Schematic Asset
Select PlayerShooting. - Execution Type
Select Single. - Update Type
Select Update.
Condition Settings #
We’ll only want the controls to work while the player is alive, i.e. we need to check the health of the player using our template.
Click on Add Condition, we’ll set up the variable condition here.
- Auto Check
Select None.
In the added Condition 0, we’ll set up our variable condition.
- Condition Type
Select Variable.
Click on Add Variable.
- Condition Type
Select Template. - Template
Select Is Alive. - Game Object (User Object)
Select Player.
Local Start Variables #
The Machine Start Variable we’ve set up in the schematic is automatically added here with its default values. Make sure the variable is enabled.
- damage
We can keep the default value of 20.
Disable Gun Effects: Schematic #
Now it’s time to create the schematic to end the gun effects (i.e. disable light and line renderer components).
Open the Makinom editor, navigate to Schematics and create a new schematic. Change the following settings.

Enable Component #
Add Node > Game Object > Component > Enable Component
We’ll use this node to disable the light component.
- Enable/Disable
Disable this setting. - Component Name
Set to Light. - Object
Select Machine Object.
Enable Component #
Add Node > Game Object > Component > Enable Component
We’ll use this node to disable the line renderer component.
- Enable/Disable
Disable this setting. - Component Name
Set to LineRenderer. - Object
Select Machine Object.
And that’s it for the schematic – click on Save Schematic and save it as DisableGunEffects in Assets/Schematics/.
Disable Gun Effects: Tagged Machine #
Finally, we’ll add the DisableGunEffects schematic to the gun using a tagged machine. Again, select the GunBarrelEnd child game object of the player and add a tagged machine component (e.g. using the component menu: Makinom > Machines > Tagged Machine).
Change the following settings.
Start Settings #
Click on Add Starting Tag to add a tag that can start this machine.
- Starting Tag
Set to disableEffects.
Machine Execution Settings #
- Schematics Asset
Select DisableGunEffects. - Execution Type
Select Single. - Update Type
Select Update.
We’ll delay the machine’s start for a short amount of time, allowing the effects to display for a flash. Expand the Wait Time Settings to show the needed setting.
- Start Delay Time (s)
Set to 0.02.
And that’s it for now – apply the changes to the prefab by clicking on Overrides > Apply All (having the Player game object selected, top of the inspector).
Don’t forget to save the scene.
Testing #
Click on Play to test the game. You’ll be able to shoot the gun by clicking the left mouse button (Fire input key).
The next tutorial will handle enemy game mechanics.


