
Setting up schematics for the jewel matching logic.
In this tutorial we’ll create schematics to check if the jewels above, below, left and right of a jewel are matching (i.e. are of the same color). To make it as easy as possible, we’ll find the matching jewels by using a shapecast with additional distance and name checks. In our game, the color of the jewel is in the game object’s name, i.e. we’ll check for game objects having the same name.
Get Matches: Schematic #
First, we’ll create a schematic that checks the nearby jewels. This is done by storing the machine object (executing the schematic) in a global selected data named match. Afterwards, we’ll check the nearby jewels using a shapecast and filters (as explained above) – if something was found, it’ll start this schematic on the found game objects (jewels). This is repeated until no matching jewels are found any longer – at the end, all matching jewels are stored in the match global selected data (which is processed by another schematic we’ll set up afterwards).
Open the Makinom editor, navigate to Schematics and create a new schematic. Change the following settings.

Select Game Objects #
Add Node > Game Object > Game Object > Select Game Objects
We’ll use this node to add the machine object to the match global selected data.
Selected Data Settings #
- Data Key
Set to match. - Data Origin
Select Global. - Change Type
Select Add.
Game Object Settings #
- Object
Select Machine Object.
Check Shape #
Add Node > Game Object > Raycast > Check Shape
We’ll use this node to check the nearby game objects and filter the found game objects.
Shape Settings #
- Check All
Enable this setting. - Single Objects
Enable this setting. - Shape Type
Select Circle 2D.
The Origin defines the center of our circle cast.
- Vector3 Type
Select Game Object > Game Object. - Object
Select Machine Object. - Value Origin
Select Position.
The Radius defines the radius used for the circle cast.
- Radius
Set to 1 (Value).
The Layer Mask defines which layers the circle cast will interact with. This sould already be the default setup (using everything).
- Float Type
Select Value > Layer Mask. - Layer Mask
Select Everything.
Filter Game Objects #
- Use Filter
Enable this setting.
Object Checks #
Click on Add Object Check to add a check. We’ll check for game objects matching the machine object’s name.
- Check Type
Select Name. - Name
Select Game Object > Game Object Name. - Object
Select Machine Object. - Check Type
Select Is Equal. - Is Valid
Enable this setting.
Distance Checks #
Click on Add Distance Check to add a check.
The To Object game object defines which game object will be used for the distance check (beside the one found by the shapecast).
- Object
Select Machine Object.
We’ll check for game objects that have a distance of 1 or less to the machine object. We only want the jewels that are above, below, left or right of the jewel we’re currently checking – they have a distance of 1 (since that’s how we set up our grid, but we’ll check for 1.1 to make sure we don’t miss anything due to rounding). Without this check, we’d also get the jewels diagonally to the jewel.
- Ignore Y Distance
Disable this setting. - Check Type
Select Is Less Equal. - Distance
Set to 1.1 (Value).
Excluded Objects #
Click on Add Excluded Object – we’ll exclude the already found matches to prevent checking the same game objects multiple times.
- Object
Select Selected Data. - Data Key
Set to match. - Data Origin
Select Global.
Hit Game Object #
We need to remember the game objects found by the shapecast to be able to use them in the next node. We’ll store them in the local selected data check – local selected data is only available in the running schematic.
- Use Hit Object
Select Selected Data. - Data Key
Set to check. - Data Origin
Select Local. - Change Type
Select Set.
Intermediate saving #
Before adding the next node, we need to save the schematic – click on Save Schematic and save it as GetMatches in Assets/Schematics/. Otherwise we wouldn’t be able to use the schematic in itself.
Start Machine #
Add Node > Machine > Start Machine
We’ll use this node to start this schematic on all found game objects.
This node is connected to the Success slot of the Check Shape node.
- Schematic Asset
Select GetMatches.
I.e. the schematic we’re currently working on. - Execution Type
Select Single. - Update Type
Select Update. - Share Local Variables
Enable this setting.
We don’t really need to share variables for this schematic, but it’s a good practice to share variables (unless this would interfere with someting in your schematic) in this case. This schematic will be started very often in sequence, without sharing variables, each started schematic would create it’s own variable handling, which can reduce the performance (even if it’s only a little bit). - Share Selected Data
Disable this setting.
Sharing the local selected data would interfere with the check selected data. - Wait Between
Enable this setting. - Wait
Enable this setting.
Machine Object #
- Object
Select Selected Data. - Data Key
Set to check. - Data Origin
Select Local.
Starting Object #
- Use Same Object
Enable this setting.
This will use the defined machine object also as starting object. When not using this option and selecting the same game object as starting object, each possible combination of machine and starting object would be used.
And that’s it for this schematic – don’t forget to save the changes.
Check Jewel: Schematic #
Next, we’ll create the schematic that initates checking for the matching jewels. It’ll first check if the machine object (jewel) is already marked to be destroyed (due to matches) – if not, it’ll start the Get Matches schematic we just created. After Get Matches finished executing, we’ll have neighbouring matches stored in the global selected data match – all we need to do is check if 3 or more jewels match and mark them for destruction.
Create a new schematic and change the following settings.
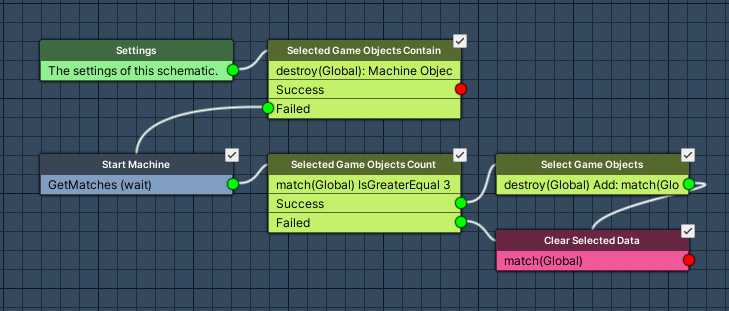
Selected Game Objects Contain #
Add Node > Game Object > Game Object > Selected Game Objects Contain
We’ll use this node to check if the machine object is already marked for destruction – i.e. stored in the global selected data destroy.
- Data Key
Set to destroy. - Data Origin
Select Global.
Game Object #
- Object
Select Machine Object.
Start Machine #
Add Node > Machine > Start Machine
In case the object isn’t stored in the global selected data destroy, we’ll start the Get Matches schematic on it.
This node is connected to the Failed slot of the Selected Game Objects Contain node.
- Schematic Asset
Select GetMatches. - Execution Type
Select Single. - Update Type
Select Update. - Share Local Variables
Enable this setting.
Again, this is for performance improvement. - Wait Between
Enable this setting. - Wait
Enable this setting.
Machine Object #
- Object
Select Machine Object.
Starting Object #
- Use Same Object
Enable this setting.
Selected Game Objects Count #
Add Node > Game Object > Game Object > Selected Game Objects Count
We’ll use this node to check if the found matches (global selected data match) are 3 or more.
- Data Key
Set to match. - Data Origin
Select Global.
Check Settings #
- Check Type
Select Is Greater Equal. - Value
Set to 3 (Value).
Select Game Objects #
Add Node > Game Object > Game Object > Select Game Objects
In case 3 or more matches are found, we’ll add the matches to the global selected data destroy.
This node is connected to the Success slot of the Selected Game Objects Count node.
- Data Key
Set to destroy. - Data Origin
Select Global. - Change Type
Select Add.
Game Object #
- Object
Select Selected Data. - Data Key
Set to match. - Data Origin
Select Global.
Clear Selected Data #
Add Node > Value > Selected Data > Clear Selected Data
We’ll use this node to remove all data from the global selected data match to be ready for the next match check.
This node is connected to the Failed slot of the Selected Game Objects Count node and the Next slot of the previous Select Game Objects node.
- Clear All
Disable this setting. - Data Key
Set to match. - Data Origin
Select Global.
And that’s it for the schematic – click on Save Schematic and save it as CheckJewel in Assets/Schematics/.
The next tutorial will handle destroying jewels.


