
Setting up the background animations.
In this tutorial we’ll create schematics to animate the background – spawning buses, cabs and swans – and set them up in the scene.
Background Prop Spawner: Schematic #
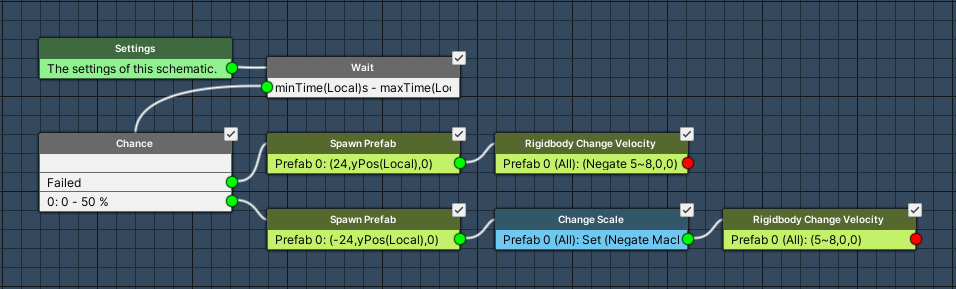
First, we’ll set up the schematic spawning background objects. The objects will move through the background from one side to another, either starting left or right. The schematic will handle a single object and will be used for each background object we’ll be using individually.
Open the Makinom editor, navigate to Schematics and create a new schematic. Change the following settings.
Settings #
We’ll add a prefab resource – the used prefab will be set by resource overrides in the machine.
Prefabs #
Click on Add Prefab Resource to add a prefab resource. No additional settings needed here.
Wait #
Add Node > Base > Wait
First, we’ll wait for a random time – the min/max values of the random wait time are stored in local start variables.
- Random
Enable this setting. - Time (s)
Select Variable > Float Variable. - Variable Key
Set to minTime. - Variable Origin
Select Local. - Time 2 (s)
Select Variable > Float Variable. - Variable Key
Set to maxTime. - Variable Origin
Select Local.
Chance #
Add Node > Base > Chance
We’ll use this node to have a 50 % chance of spawning the prefab left or right.
- Minimum Range
Set to 0 (Value). - Maximum Range
Set to 50 (Value).
Spawn Prefab #
Add Node > Game Object > Spawn Prefab
We’ll use this node to spawn the prefab on the right side.
This node is connected to the Failed slot of the Chance node.
- Prefab
Select Prefab 0. - Target Type
Select Position.
Position #
- Vector3 Type
Select Value > Set Axis. - X-Axis
Set to 24 (Value).
The Y-Axis is stored in a local start variable.
- Float Type
Select Variable > Float Variable. - Variable Key
Set to yPos. - Variable Origin
Select Local.
The Z-Axis will just be set to 0.
- Z-Axis
Set to 0 (Value). - Math Function
Select None.
Rigidbody Change Velocity #
Add Node > Game Object > Rigidbody > Rigidbody Change Velocity
We’ll use this node to move the spawned prefab to the left side.
Rigidbody Object #
- Object
Select Prefab 0 and set to -1.
Velocity #
- Vector3 Type
Select Value > Set Axis. - X-Axis
Select Value > Random and set the 1st field to 5 and the 2nd field to 8. - Math Function
Select Negate. - Y-Axis, Z-Axis
Set to 0 (Value).
Spawn Prefab #
Add Node > Game Object > Prefab > Spawn Prefab
We’ll use this node to spawn the prefab on the left side.
This node is connected to slot 0 of the Chance node.
Copy the previous Spawn Prefab node and change the following settings.
Position #
- X-Axis
Set to -24 (Value).
Change Scale #
Add Node > Movement > Movement > Change Scale
We’re moving from left to right, i.e. we need to flip the sprite by inverting the scale.
Scaling Object #
- Object
Select Prefab 0 and set to -1.
Scale #
- Vector3 Type
Select Value > Set Axis.
The X-Axis will use the negated X-axis scale.
- X-Axis
Select Game Object > Game Object and X. - Object
Select Machine Object. - Value Origin
Select Scale. - Math Function
Select Negate.
The Y-axis will just use the Y-axis scale.
- Y-Axis
Select Game Object > Game Object and Y. - Object
Select Machine Object. - Value Origin
Select Scale.
The Z-axis will just use the Z-axis scale.
- Z-Axis
Select Game Object > Game Object and Z. - Object
Select Machine Object. - Value Origin
Select Scale.
Rigidbody Change Velocity #
Add Node > Game Object > Rigidbody > Rigidbody Change Velocity
We’ll use this node to move the spawned prefab to the right side.
Copy the previous Rigidbody Change Velocity node.
Velocity #
- Math Function
Select None.
That’s it for the schematic – click on Save Schematic and save it as BackgroundPropSpawner in Assets/Schematics/.
Background Prop Destroyer: Schematic #
Next, we’ll create the schematic that will destroy a spawned background object when it moves outside of the level’s area. This schematic will be added to the background objects using a tick machine.
Create a new schematic and change the following settings.
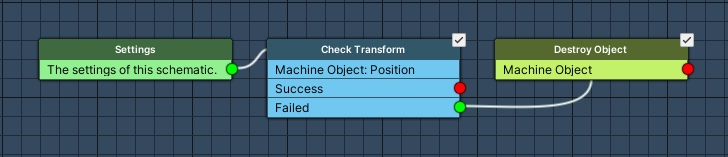
Check Transform #
Add Node > Movement > Movement > Check Transform
We’ll use this node to check if the game object’s X-axis position is within a defined range. If not, we’ll destroy the game object.
Object #
- Object
Select Machine Object. - Value Origin
Select Position.
X-Axis #
- Check X-Axis
Enable this setting. - Check Type
Select Range Inclusive. - Check Value
Set to -24 (Value). - Check Value 2
Set to 24 (Value).
Destroy Object #
Add Node > Game Object > Game Object > Destroy Object
We’ll use this node to destroy the game object.
This node is connected to the Failed slot of the Check Transform node (i.e. the game object is outside the defined area).
Destroy Object #
- Object
Select Machine Object.
And that’s it for the schematic – click on Save Schematic and save it as BackgroundPropDestroyer in Assets/Schematics/.
Background Prop Destroyer: Tick Machine #
Now, we’ll add the schematic to the background object prefabs. The settings are the same for all prefabs (Bus, Cab and Swan), so you can either repeat the setup or copy/paste the component. The prefabs can be found at Assets/Tutorial Resources/Prefabs/Environment/.
Add a tick machine component to the prefabs (e.g. using the component menu: Makinom > Machines > Tick Machine) and change the following settings.
Start Settings #
- Update
Enable this setting.
Machine Execution Settings #
- Schematic Asset
Select BackgroundPropDestroyer. - Execution Type
Select Single. - Update Type
Select Update.
That’s it for the background prefabs – we don’t need to apply the changes, since we worked directly on the prefabs.
Background Prop Spawner: Auto Machine #
Finally, we’ll set up the auto machines spawning the background objects. We’ll add them to the 3 child objects (busCreator, cabCreator and swanCreator) of the backgroundAnimation game object in the scene. The settings are the same for all 3 prefabs (except for some details), so either repeat the setup or copy/paste the component.
Add an auto machine component to the prefabs (e.g. using the component menu: Makinom > Machines > Auto Machine) and change the following settings.
Start Settings #
- Start
Enable this setting. - Repeat Execution
Enable this setting.
Machine Execution Settings #
- Asset Type
Select Schematic. - Schematic Asset
Select BackgroundPropSpawner. - Execution Type
Select Single. - Update Type
Select Update.
Resource Overrides #
Expand the Resource Overrides to change the used prefab.
- Override Prefabs
Enable this setting.
Click on Add Prefab to add a prefab that will be used.
- Audio Clip
busCreator: Select Bus.
cabCreator: Select Cab.
swanCreator: Select Swan.
The prefabs can be found at Assets/Tutorial Resources/Prefabs/Environment/.
Local Start Variables #
- Set Start Variables
Enable this setting.
Click on Add Variable to add a start variable.
- Variable Key
Set to minTime. - Type
Select to Float. - Operator
Select Set. - Float Value
busCreator: Set to 8 (Value).
cabCreator: Set to 10 (Value).
swanCreator: Set to 2 (Value).
Copy the previous variable and change the following settings.
- Variable Key
Set to maxTime. - Float Value
busCreator: Set to 18 (Value).
cabCreator: Set to 15 (Value).
swanCreator: Set to 8 (Value).
Copy the previous variable and change the following settings.
- Variable Key
Set to yPos. - Float Value
busCreator: Set to -5.5 (Value).
cabCreator: Set to -6.4 (Value).
swanCreator: Select Value > Random and set Minimum Value to 4 and Maximum Value to 8.
And that’s it – don’t forget to save the scene.
Testing #
Click on Play to start the game. You’ll now see a bus, cab or swan moving from one side to another from time to time.

This concludes the 2D platformer game tutorial series. You can add additional content to the game, e.g. new levels, bigger bombs (increasing the radius) or better health crates (giving more healthBonus).


